You can make a difference in the Apple Support Community!

When you sign up with your Apple Account, you can provide valuable feedback to other community members by upvoting helpful replies and User Tips.

Looks like no one’s replied in a while. To start the conversation again, simply ask a new question.

Make group in Publishing

  1. I'm a newbie in Motion, is it possible to create the group in or make the separate line in Publishing to use in FCP as photo?
  2. I also want to active and inactive in Publishing? In publishing, have a check box, just check to active and uncheck to inactive the layer.


Please help with many thanks


Posted on Mar 16, 2022 6:17 AM

Reply
Question marked as Top-ranking reply

Posted on Mar 16, 2022 11:38 PM

The Up/Down arrows will always be there, but if the menu only has one item, it doesn't really matter. It can be clicked on, it will highlight, but there's no menu drop down.


If you're using the Fill filter, then you have to publish the Fill With, Fill Color and Gradient for each one. You cannot use a Rig to control the Fill With parameter as one control. Each one has to be with the other two parts in the published parameters.


Sometimes you just have to try to organize parts of the published parameters with more dividers. Try to keep things in a logical order.


FxFactory has FxPlug extensions that can be used to add and format parameters, but there's a cost and you are bound to their distribution market :

https://fxfactory.com/developer/adding-custom-ui/


I cannot answer any questions about it because I am not part of their system and have no experience with it.

5 replies
Question marked as Top-ranking reply

Mar 16, 2022 11:38 PM in response to Cuhieu

The Up/Down arrows will always be there, but if the menu only has one item, it doesn't really matter. It can be clicked on, it will highlight, but there's no menu drop down.


If you're using the Fill filter, then you have to publish the Fill With, Fill Color and Gradient for each one. You cannot use a Rig to control the Fill With parameter as one control. Each one has to be with the other two parts in the published parameters.


Sometimes you just have to try to organize parts of the published parameters with more dividers. Try to keep things in a logical order.


FxFactory has FxPlug extensions that can be used to add and format parameters, but there's a cost and you are bound to their distribution market :

https://fxfactory.com/developer/adding-custom-ui/


I cannot answer any questions about it because I am not part of their system and have no experience with it.

Mar 16, 2022 2:23 PM in response to Cuhieu

The line you have circled is likely a Rig Pop-up Widget with the "label" changed to ——————— and the menu item renamed General.


My question is: how did you get the bold text????!!!!


As for Active/Inactive or expandable sections, those have to be built into the parameter's behavior in Motion. Some, not all, parameters with those features will carry over when publishing to FCPX. [Otherwise, I believe you can accomplish this type of effect if you actually program it with FxPlug.]


For example, if you would like to publish a Fill Color OR a Gradient, for most of the older parameters (like Shape options) you have to publish the Fill Mode, Fill Color AND the Gradient and both the Fill Color and the gradient will always be visible. However, IF you use the *new* Fill filter, you can publish the Fill With, the Color and the Gradient parameters and the published parameters will automatically show WHICH fill method is chosen and hide the other.


For any text in your published parameters list, you can use Unicode Characters. Just type Control-Command-Spacebar to call up the keyboard character picker and find and double-click on the characters you want to insert: ₪ℛ↘∭ including emoji 😃or other special symbols 🆗⚜️‼️


One more thing you can do with Pop-ups is to create divider lines. For example, if you're publishing a short list of blend modes, you can create separators by using just a single 'hyphen' character as a popup menu item (but it *has to be* **after** a valid menu entry, so:) Normal, -,Add, -, Burn, -, Overlay:
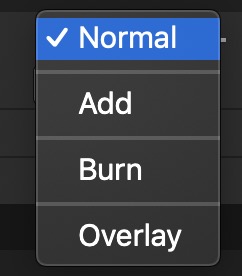


You have to be careful inserting the divider lines as the process is just a little bit "funky". Build the plain menu first then go back and select the item *before* the divider, click the + button, type the hyphen and enter. You will see New Snapshot. Just click the menu and go to the NEXT item after which another divider is to be added (otherwise ignore the "New Snapshot" text in the menu).


So, getting back to the bold text — how did you do that??


Mar 16, 2022 10:51 PM in response to fox_m

HI FOX_M,


Thanks too much for your kindly detail explain.


Following your post, I could do as below photo


As you can see above photo, I still couldn't make the pop-up for color. If I use color mode, all Solid color and Gradient color showed (total 3 color showed), it look not good. And if I choose Gradient mode, the Solid color will be hided.


Regarding to the divider line, I've already done like that but still show the up and down arrow.


Do you have any idea more?


Thanks too much for your help.

Make group in Publishing

Welcome to Apple Support Community
A forum where Apple customers help each other with their products. Get started with your Apple Account.