How do I swap two phone numbers between different phones?
I have two iPhones and two different phone numbers, I’m switching phones with my dad, how can I switch my number into his iPhone 14 and his number into my iPhone 12?
I have two iPhones and two different phone numbers, I’m switching phones with my dad, how can I switch my number into his iPhone 14 and his number into my iPhone 12?
Hi azariah1,
Welcome to Apple Support Communities. We understand that you'd like to swap your iPhone with your dad's iPhone. We'd like to help.
From what you've described, you'd like to swap your iPhone 12 for his iPhone 14 and vice versa. While some swaps can be done easily at home, you may need to contact your wireless carrier for assistance with this. If you're currently using an iPhone 14 purchased in the US, this model only has an eSIM. In order to swap your dad's phone number to the iPhone 12, you'll need a physical SIM card. Also, you'll need an eSIM code from your carrier to move your number from the iPhone 12 to the iPhone 14.
However, if you are outside of the US, you can make this swap at home. You'll want to follow these steps to get both iPhones ready for this transition:
Back up iPhone using iCloud
1. Go to Settings> [your name] > iCloud > iCloud Backup.
2. Turn on iCloud Backup.
iCloud automatically backs up your iPhone daily when iPhone is connected to power, locked, and connected to Wi-Fi.
Note: On models that support 5G, your carrier may give you the option to back up iPhone using your cellular network. Go to Settings > [your name] > iCloud > iCloud Backup, then turn on or off Backup Over Cellular.
3. To perform a manual backup, tap Back Up Now.
To view your iCloud backups, go to Settings > [your name] > iCloud > Manage Account Storage > Backups. To delete a backup, choose a backup from the list, then tap Delete & Turn Off Backup.
Note: If you turn on an app or feature to use iCloud syncing (in Settings > [your name] > iCloud > Show All), its information is stored in iCloud. Because the information is automatically kept up to date on all your devices, it’s not included in your iCloud backup. (See the Apple Support article What does iCloud back up?)
Back up iPhone using your Mac
1. Connect iPhone and your computer with a cable.
2. In the Finder sidebar on your Mac, select your iPhone.
To use the Finder to back up iPhone, macOS 10.15 or later is required. With earlier versions of macOS, use iTunes to back up iPhone.
3. At the top of the Finder window, click General.
4. Select “Back up all of the data on your iPhone to this Mac.”
5. To encrypt your backup data and protect it with a password, select “Encrypt local backup.”
6. Click Back Up Now.
Note: You can also connect iPhone to your computer wirelessly if you set up syncing over Wi-Fi.
Back up iPhone using your Windows PC
1. Connect iPhone and your computer with a cable.
2. In the iTunes app on your PC, click the iPhone button near the top left of the iTunes window.
3. Click Summary.
4. Click Back Up Now (below Backups).
5. To encrypt your backups, select “Encrypt local backup,” type a password, then click Set Password.
To see the backups stored on your computer, choose Edit > Preferences, then click Devices. Encrypted backups have a lock icon in the list of backups.
Note: You can also connect iPhone to your computer wirelessly if you set up syncing over Wi-Fi
Before you begin
* If you intend to sell your iPhone, trade it in, or give it away, see the Apple Support article What to do before you sell, give away, or trade in your iPhone, iPad, or iPod touch for steps to take before erasing iPhone.
* To save your content and settings, back up your iPhone shortly before erasing it or when you’re given the option during the erase process. You can use the backup to later restore your data on a new iPhone or iPad.
* Have your iPhone passcode ready. If you don’t remember it, see the Apple Support article If you forgot the passcode on your iPhone, or your iPhone is disabled.
* Have your Apple ID password ready. If you don’t remember it, see the Recover your Apple ID website.
* If you received your iPhone from someone else and it’s still associated with their Apple ID, return it to them and ask them to follow the instructions in the Apple Support article What to do before you sell, give away, or trade in your iPhone, iPad, or iPod touch. Otherwise, you won’t be able to erase it.
Use Settings to erase iPhone
1. Go to Settings
2. Do one of the following:
* Prepare your content and settings to transfer to a new iPhone: Tap Get Started, then follow the onscreen instructions. When you finish, return to Settings > General > Transfer or Reset iPhone, then tap Erase All Content and Settings.
* Erase all of your data from iPhone: Tap Erase All Content and Settings.
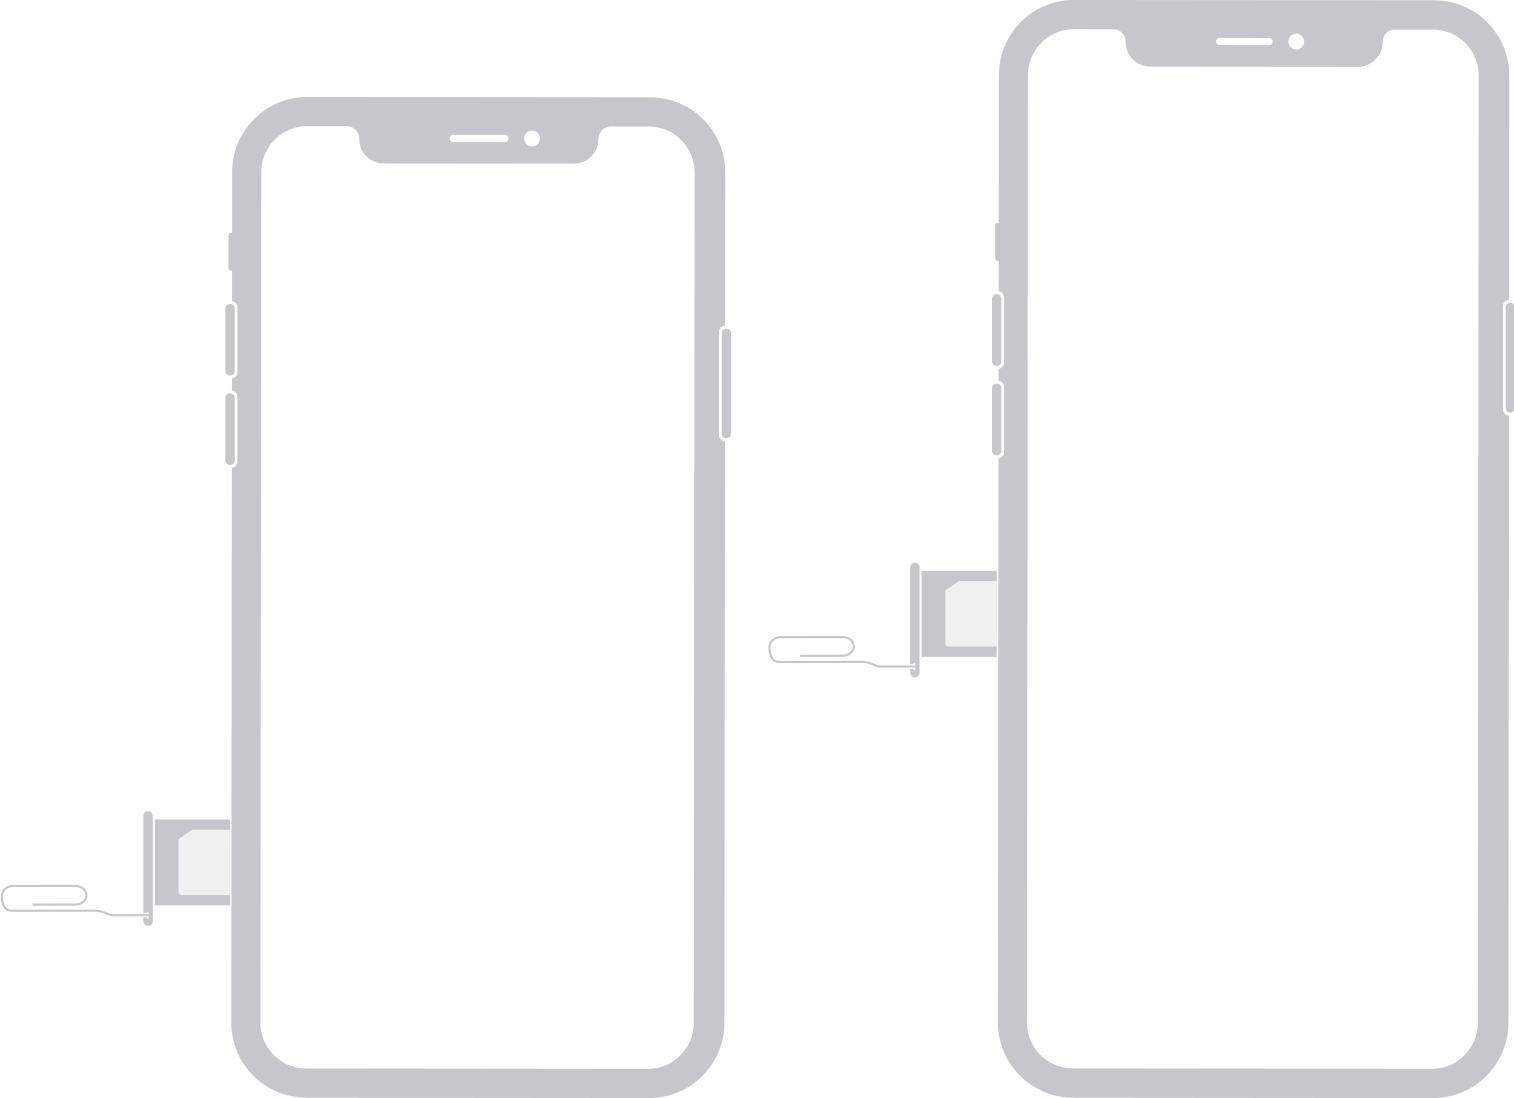
Remove or switch the SIM card in your iPhone
Find your model below to locate the SIM tray. To pop open the SIM tray, insert a paper clip or a SIM-eject tool into the hole beside the tray. Push in, towards your iPhone, but don’t force it. If you're having difficulty ejecting the SIM tray, take your device to your carrier or an Apple Store for help.
After you remove your SIM card from the tray, notice the notch in one corner of the new SIM card. Place the new SIM card into the tray — it will fit only one way, because of the notch. Then insert the tray into the device completely and in the same orientation that you removed it. The tray also fits only one way.
Find the SIM tray on the left side:
iPhone 14 Pro*
iPhone 14 Pro Max*
iPhone 14*
iPhone 14 Plus*
iPhone 13 Pro
iPhone 13 Pro Max
iPhone 13
iPhone 13 mini
iPhone 12
iPhone 12 mini
iPhone 12 Pro
iPhone 12 Pro Max
Set up your iPhone or iPad
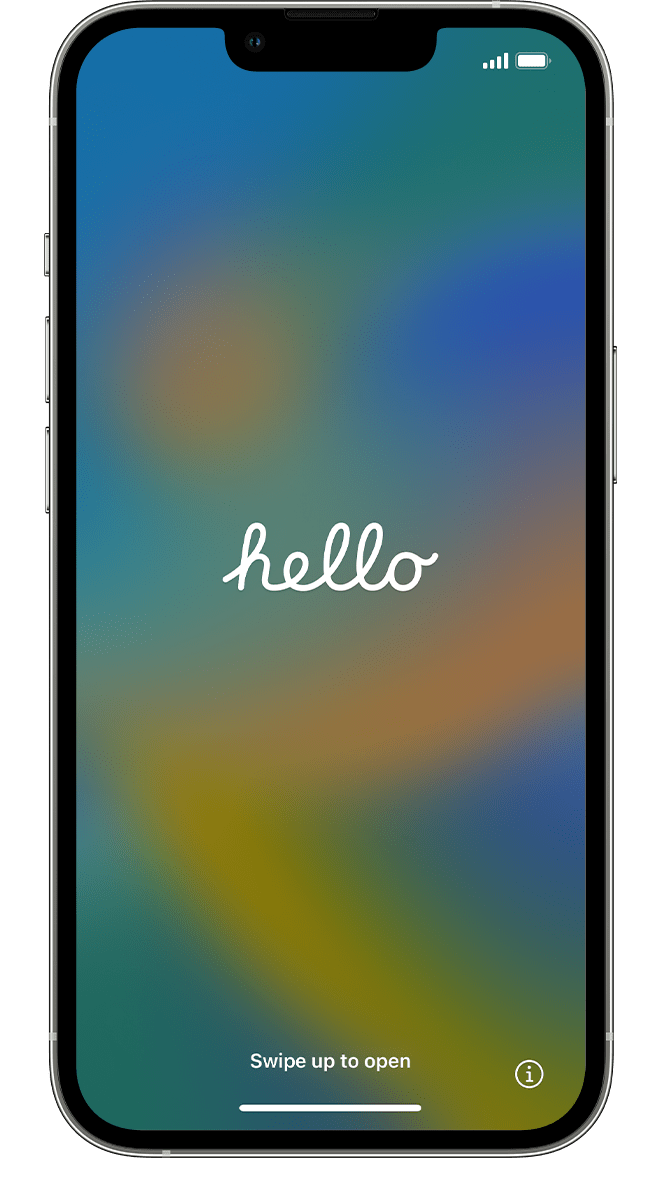
1. Turn on your iPhone or iPad
Press and hold the device's power button until you see the Apple logo. You'll then see "Hello" in many languages. Follow the onscreen instructions to get started.
If you're blind or have low vision, you can turn on VoiceOver or Zoom from the Hello screen.
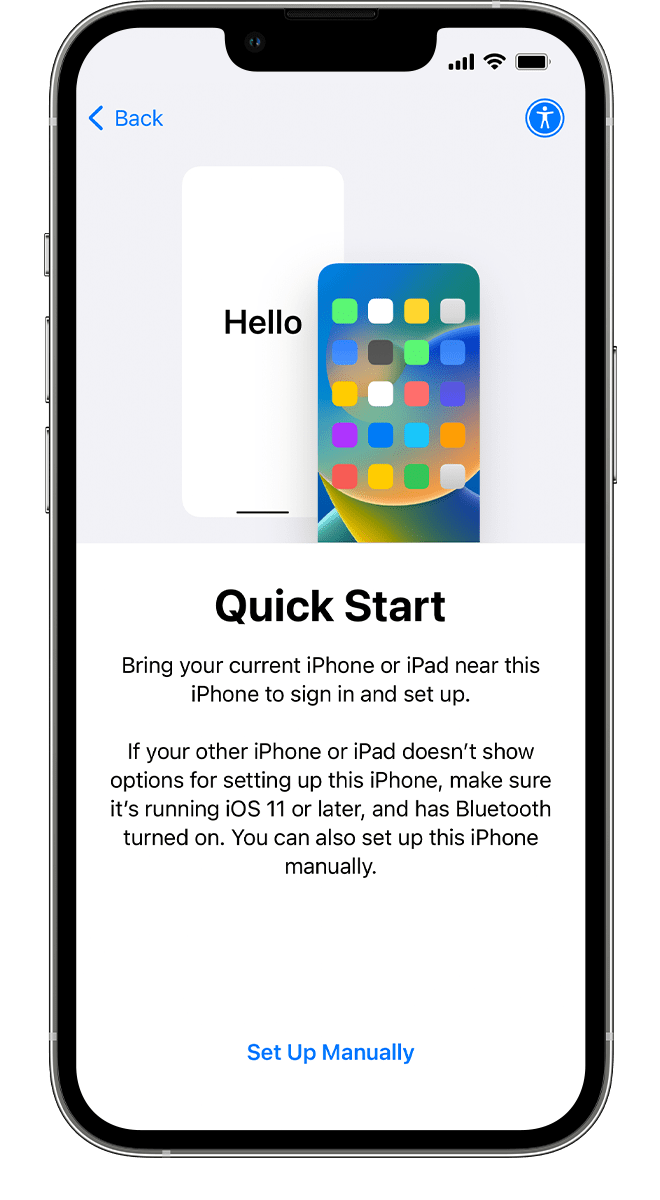
2. Use Quick Start or set up manually
If you have another device, you can use it to automatically set up your new device with Quick Start.
If you don't have another device, tap Set Up Manually.
Here you can tap the blue accessibility button to set up Accessibility Options.
3. Activate your iPhone or iPad
You need to connect to a Wi-Fi network or a cellular network to activate and continue setting up your device.
Tap the Wi-Fi network that you want to use or, if available, tap Continue Without Wi-Fi to use your device's cellular network. If you're setting up an iPhone or iPad (Wi-Fi + Cellular), you might need to insert your iPhone SIM card or iPad SIM card first. You might also be asked to activate your eSIM.
Get help if you can't connect to Wi-Fi or if you can't activate your iPhone.
4. Set up Face ID or Touch ID and create a passcode
Follow the onscreen instructions to set up Face ID or Touch ID to use face recognition or your fingerprint to unlock your device and make purchases.
Next, set a six-digit passcode to help protect your data. You need a passcode to use features like Face ID, Touch ID, and Apple Pay. If you'd like a four-digit passcode, custom passcode, or no passcode, tap Passcode Options.
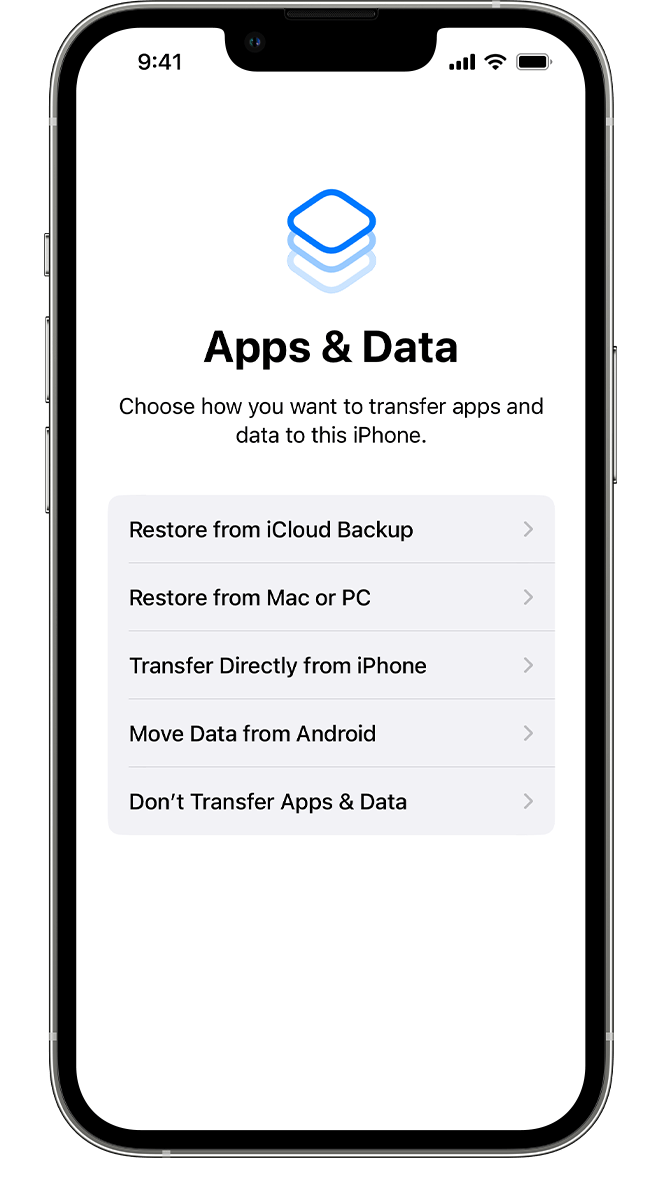
5. Restore or transfer your data and apps
Choose how you want to restore or transfer your data from your old device to your new device. You can use an iCloud backup or a backup made from your computer, or move data from an Android device.
If you don't have a backup or another device, select Don't Transfer Apps & Data.
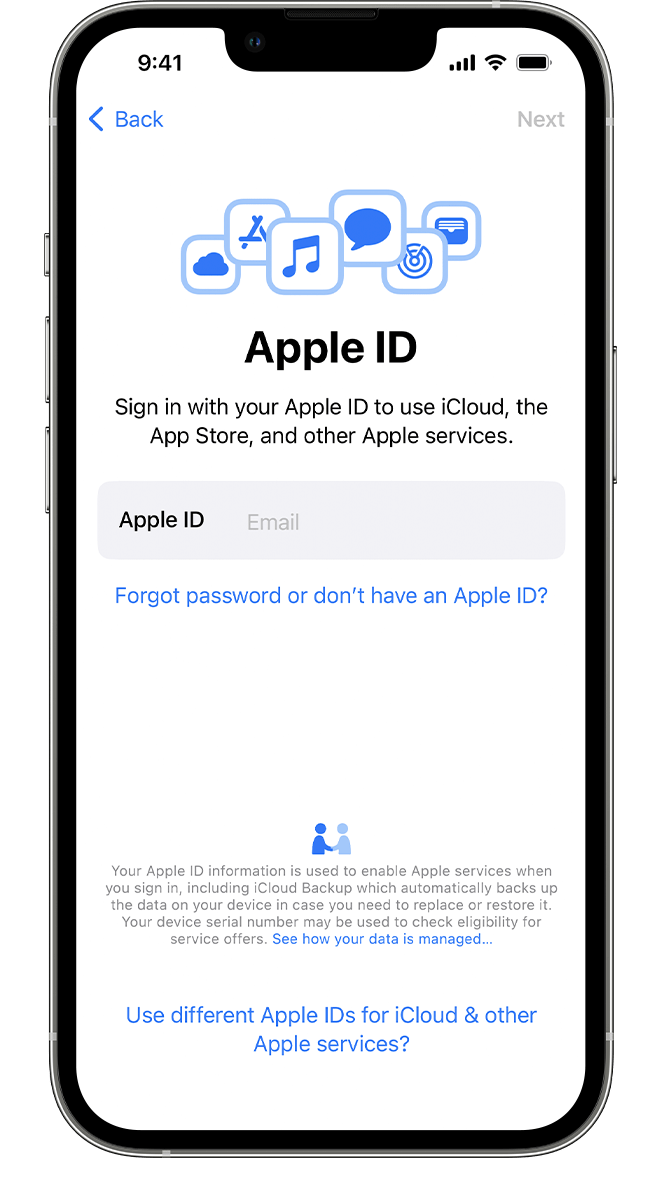
6. Sign in with your Apple ID
Enter your Apple ID and password, or tap "Forgot password or don't have an Apple ID?" From there, you can recover your Apple ID or password, create an Apple ID, or set it up later.
If you use more than one Apple ID, tap "Use different Apple IDs for iCloud and iTunes?"
When you sign in with your Apple ID, you might be prompted for a verification code from your previous device.
7. Turn on automatic updates and set up other features
Follow the onscreen instructions to allow iOS or iPadOS to update automatically and set up other features, like iMessage, FaceTime, Location Services, and Analytics.
8. Set up Siri and other services
Next, you'll be asked to set up or enable services and features, like Siri. On some devices, you'll be asked to speak a few phrases so that Siri can get to know your voice.
If you signed in with your Apple ID, follow the steps to set up Apple Pay and iCloud Keychain.
8. Set up Screen Time and more display options
Follow the onscreen instructions to set up Screen Time, which gives you insight into how much time you and your kids spend on your devices. It also lets you set time limits for daily app use.
You can also turn on True Tone, if your device supports it, and use Display Zoom to adjust the size of icons and text on your Home Screen.
Hope this helps.
Cheers!
How do I swap two phone numbers between different phones?