External HD crashed after updating to Monterey

After updating to Monterey, I have had one after another external HDs crash and now will not even be seen in anyway!


I had a critical 1TB Crucial X6 SSD with client Video/Audio from show now not being able to be written to. It still has over 750gb left on it, but now is useless unless I go to windows device to fix it???


ANY WAY TO FIX? I have tried terminal commands, rebooting in every way possible. My internal SSD boot drive is not functioning correctly either ... this all occurred IMMEDIATELY AFTER the update.


[Edited by Moderator]


iMac 27″, macOS 12.6

Posted on Mar 15, 2023 11:41 AM

Reply
Question marked as Top-ranking reply

Posted on Mar 16, 2023 4:11 PM

Hi mark_sog,


Welcome to Apple Support Communities. If you're able to use your Mac and start up in macOS Recovery, you can use Disk Utility to verify and possibly repair the disk. This is a step that may help. Here are the steps on how to use Disk Utility:


Open Disk Utility
In general, you can just open Disk Utility from the Utilities folder of your Applications folder. However, if your Mac doesn't start up all the way, or you want to repair the disk your Mac starts up from, open Disk Utility from macOS Recovery:

1. Determine whether you're using a Mac with Apple silicon, then follow the appropriate steps:
* Apple silicon: Turn on your Mac and continue to press and hold the power button until you see the startup options window. Click the gear icon labeled Options, then click Continue.
* Intel processor: Turn on your Mac, then immediately press and hold these two keys until you see an Apple logo or other image: Command (⌘) and R.

2. You may be asked to select a user you know the password for. Select the user, then click Next and enter their administrator password.
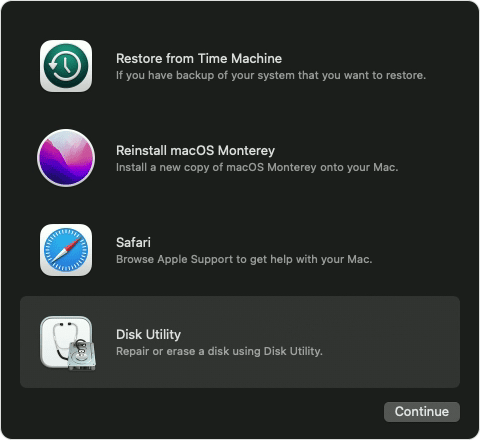
3. From the utilities window in macOS Recovery, select Disk Utility and click Continue.
macOS Recovery options with Disk Utility selected


Select your disk in Disk Utility
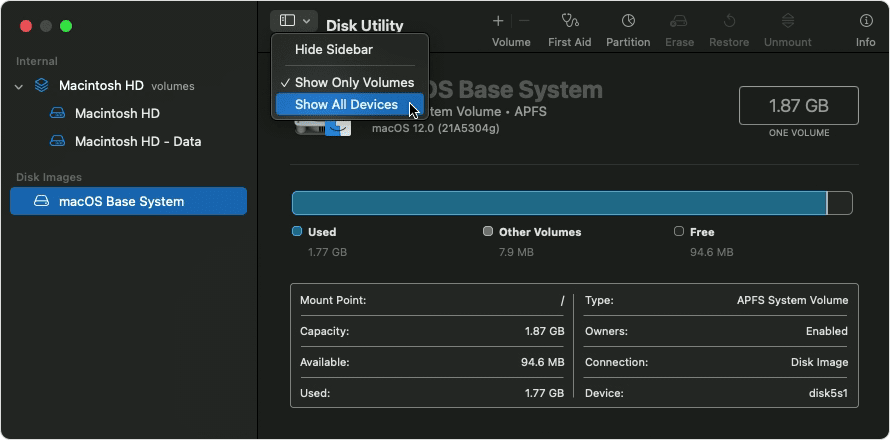
Choose View > Show All Devices (if available) from the menu bar or toolbar in Disk Utility.
Disk Utility: Show All Devices

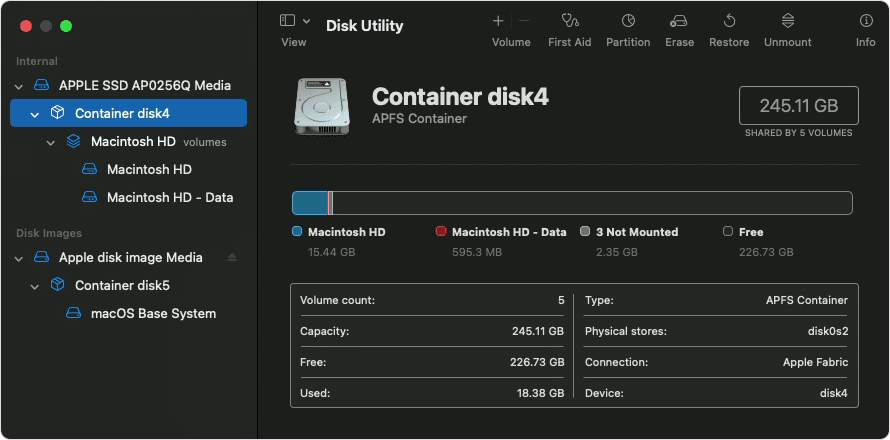
The sidebar in Disk Utility should now show each available disk or other storage device, beginning with your startup disk. And beneath each disk you should see any containers and volumes on that disk. Don't see your disk?

Disk Utility: Containers and Volumes

In this example, the startup disk (APPLE SSD) has one container and two volumes (Macintosh HD, Macintosh HD - Data). Your disk might not have a container, and it might have a different number of volumes.


Repair volumes, then containers, then disks
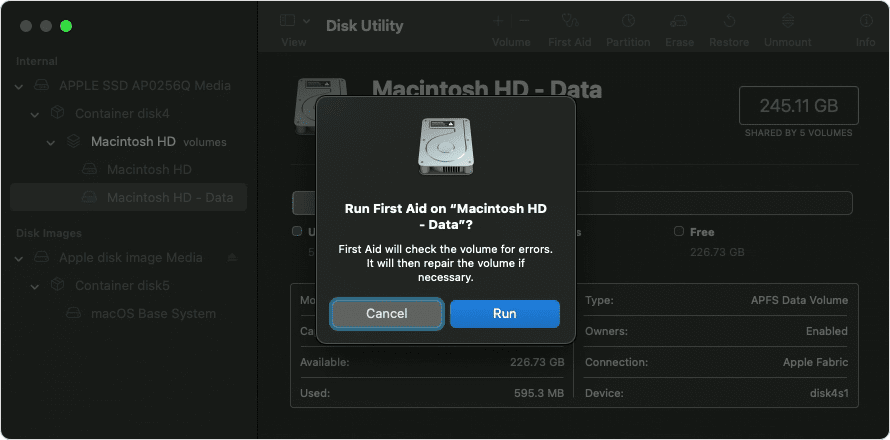
For each disk that you're repairing, start by selecting the last volume on that disk, then click the First Aid button  or tab.
Disk Utility: Run First Aid?

In this example, the last volume on the disk is Macintosh HD - Data.

Click Run to begin checking the selected volume for errors.
* If there is no Run button, click the Repair Disk button instead.
* If the button is dimmed and you can't click it, skip this step for the disk, container, or volume you selected.

* If you're asked for a password to unlock the disk, enter your administrator password.

After Disk Utility is done checking the volume, select the next item above it in the sidebar, then run First Aid again. Keep moving up the list, running First Aid for each volume on the disk, then each container on the disk, then finally the disk itself. 
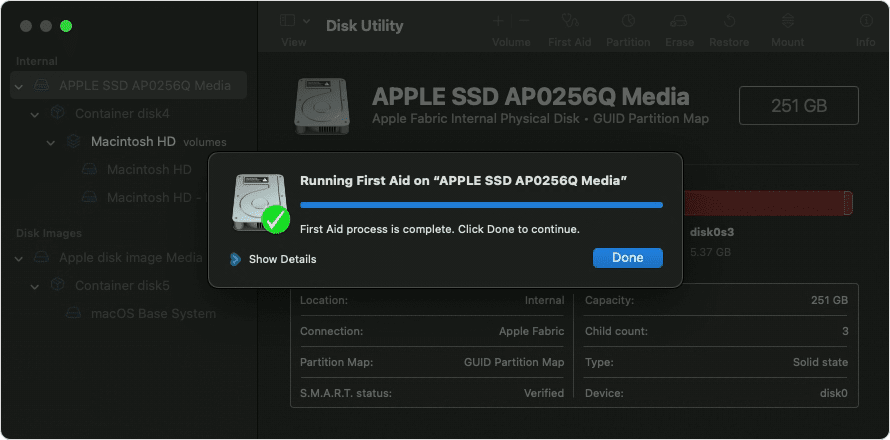
Disk First Aid: process complete

The order of repair in this example was Macintosh HD - Data, then Macintosh HD, then Container disk4, then APPLE SSD.
  
When done, quit Disk Utility. If you used Disk Utility from macOS Recovery, you can now restart your Mac: choose Apple menu  > Restart.

If Disk Utility found errors that it can't repair
If Disk Utility found errors that it could not repair, use Disk Utility to erase (format) your disk.

If your disk doesn't appear in Disk Utility

If Disk Utility can't see your disk, it also can't see any containers or volumes on that disk. In that case, follow these steps:

1. Shut down your Mac, then unplug all nonessential devices from your Mac.

2. If you're repairing an external drive, make sure that it's connected directly to your Mac using a cable that you know is good. Then turn the drive off and back on.

3. If your disk still doesn't appear in Disk Utility, your Mac might need service. If you need help, please contact Apple Support

Following these steps can help and is outlined in this article: How to repair a Mac disk with Disk Utility - Apple Support


Kind regards.


Similar questions

1 reply
Question marked as Top-ranking reply

Mar 16, 2023 4:11 PM in response to mark_sog

Hi mark_sog,


Welcome to Apple Support Communities. If you're able to use your Mac and start up in macOS Recovery, you can use Disk Utility to verify and possibly repair the disk. This is a step that may help. Here are the steps on how to use Disk Utility:


Open Disk Utility
In general, you can just open Disk Utility from the Utilities folder of your Applications folder. However, if your Mac doesn't start up all the way, or you want to repair the disk your Mac starts up from, open Disk Utility from macOS Recovery:

1. Determine whether you're using a Mac with Apple silicon, then follow the appropriate steps:
* Apple silicon: Turn on your Mac and continue to press and hold the power button until you see the startup options window. Click the gear icon labeled Options, then click Continue.
* Intel processor: Turn on your Mac, then immediately press and hold these two keys until you see an Apple logo or other image: Command (⌘) and R.

2. You may be asked to select a user you know the password for. Select the user, then click Next and enter their administrator password.
3. From the utilities window in macOS Recovery, select Disk Utility and click Continue.
macOS Recovery options with Disk Utility selected


Select your disk in Disk Utility
Choose View > Show All Devices (if available) from the menu bar or toolbar in Disk Utility.
Disk Utility: Show All Devices

The sidebar in Disk Utility should now show each available disk or other storage device, beginning with your startup disk. And beneath each disk you should see any containers and volumes on that disk. Don't see your disk?

Disk Utility: Containers and Volumes

In this example, the startup disk (APPLE SSD) has one container and two volumes (Macintosh HD, Macintosh HD - Data). Your disk might not have a container, and it might have a different number of volumes.


Repair volumes, then containers, then disks
For each disk that you're repairing, start by selecting the last volume on that disk, then click the First Aid button  or tab.
Disk Utility: Run First Aid?

In this example, the last volume on the disk is Macintosh HD - Data.

Click Run to begin checking the selected volume for errors.
* If there is no Run button, click the Repair Disk button instead.
* If the button is dimmed and you can't click it, skip this step for the disk, container, or volume you selected.

* If you're asked for a password to unlock the disk, enter your administrator password.

After Disk Utility is done checking the volume, select the next item above it in the sidebar, then run First Aid again. Keep moving up the list, running First Aid for each volume on the disk, then each container on the disk, then finally the disk itself. 
Disk First Aid: process complete

The order of repair in this example was Macintosh HD - Data, then Macintosh HD, then Container disk4, then APPLE SSD.
  
When done, quit Disk Utility. If you used Disk Utility from macOS Recovery, you can now restart your Mac: choose Apple menu  > Restart.

If Disk Utility found errors that it can't repair
If Disk Utility found errors that it could not repair, use Disk Utility to erase (format) your disk.

If your disk doesn't appear in Disk Utility

If Disk Utility can't see your disk, it also can't see any containers or volumes on that disk. In that case, follow these steps:

1. Shut down your Mac, then unplug all nonessential devices from your Mac.

2. If you're repairing an external drive, make sure that it's connected directly to your Mac using a cable that you know is good. Then turn the drive off and back on.

3. If your disk still doesn't appear in Disk Utility, your Mac might need service. If you need help, please contact Apple Support

Following these steps can help and is outlined in this article: How to repair a Mac disk with Disk Utility - Apple Support


Kind regards.


This thread has been closed by the system or the community team. You may vote for any posts you find helpful, or search the Community for additional answers.

External HD crashed after updating to Monterey

Welcome to Apple Support Community
A forum where Apple customers help each other with their products. Get started with your Apple Account.