Ah, that's why. The entire disk is set up for Time Machine. You should never try to manually write or delete items on such a drive.
With so little of the available space used for TM, you should split the drive into two partitions. One part dedicated to TM, and the other as free space to use however you want.
In Disk Utility, go up to the menu bar and choose Show All Devices.

That will allow you to see the full list of splits the OS has created, such as this.

Note the top choice you couldn't see before. That's the name of the physical drive. My internal drive in this case. Make sure you click on the physical drive name being used by Time Machine. It should be a separate listing below the internal drive. Then click the Partition icon.
Disk Utility will show a pie chart representation of the drive. It should be one big blue circle with the name of the drive shown.
The order of partitions starts at the top and goes clockwise. Click the circle to make it active. Click the plus button to create a new partition. You'll see this message.
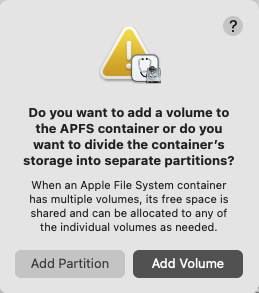
Make sure to click the Add Partition button. The new space must be separate and not shared space with TM. By default, the drive will be split into equal size parts. Move the button to whatever position you want. Give more space to TM, or more to free usable space for you. Or, just leave it evenly split.
Click on the new partition and give it a name. Make sure the format is APFS.
When you have everything the way you want it, click Apply.
It will take a few moments to finish the procedure. When it's done, you'll have your TM partition, just smaller than it was before. The other new partition you can now use to copy whatever you want on it.