Apple Intelligence now features Image Playground, Genmoji, Writing Tools enhancements, seamless support for ChatGPT, and visual intelligence.

Apple Intelligence has also begun language expansion with localized English support for Australia, Canada, Ireland, New Zealand, South Africa, and the U.K. Learn more >

You can make a difference in the Apple Support Community!

When you sign up with your Apple Account, you can provide valuable feedback to other community members by upvoting helpful replies and User Tips.

Looks like no one’s replied in a while. To start the conversation again, simply ask a new question.

Motion Tracking Green Screen Backgrounds in Final Cut Pro (Match Moving)

I have a video of an actor in front of a green screen where the camera is handheld and moves around a bit. On the green screen, multiple tracking markers are placed so the virtual background can be match-moved to replicate the camera movement in post. I know I can do motion tracking and match moving for the virtual background in Motion or After Effects, but how do I do it in Final Cut Pro since Final Cut Pro now has a built-in motion tracker?

MacBook Pro 16″, macOS 14.0

Posted on Oct 22, 2023 2:16 PM

Reply
Question marked as Top-ranking reply

Posted on Oct 29, 2023 8:46 AM

I figured it out. Follow the instructions below to do motion tracking and match moving for green screen backgrounds in Final Cut Pro:


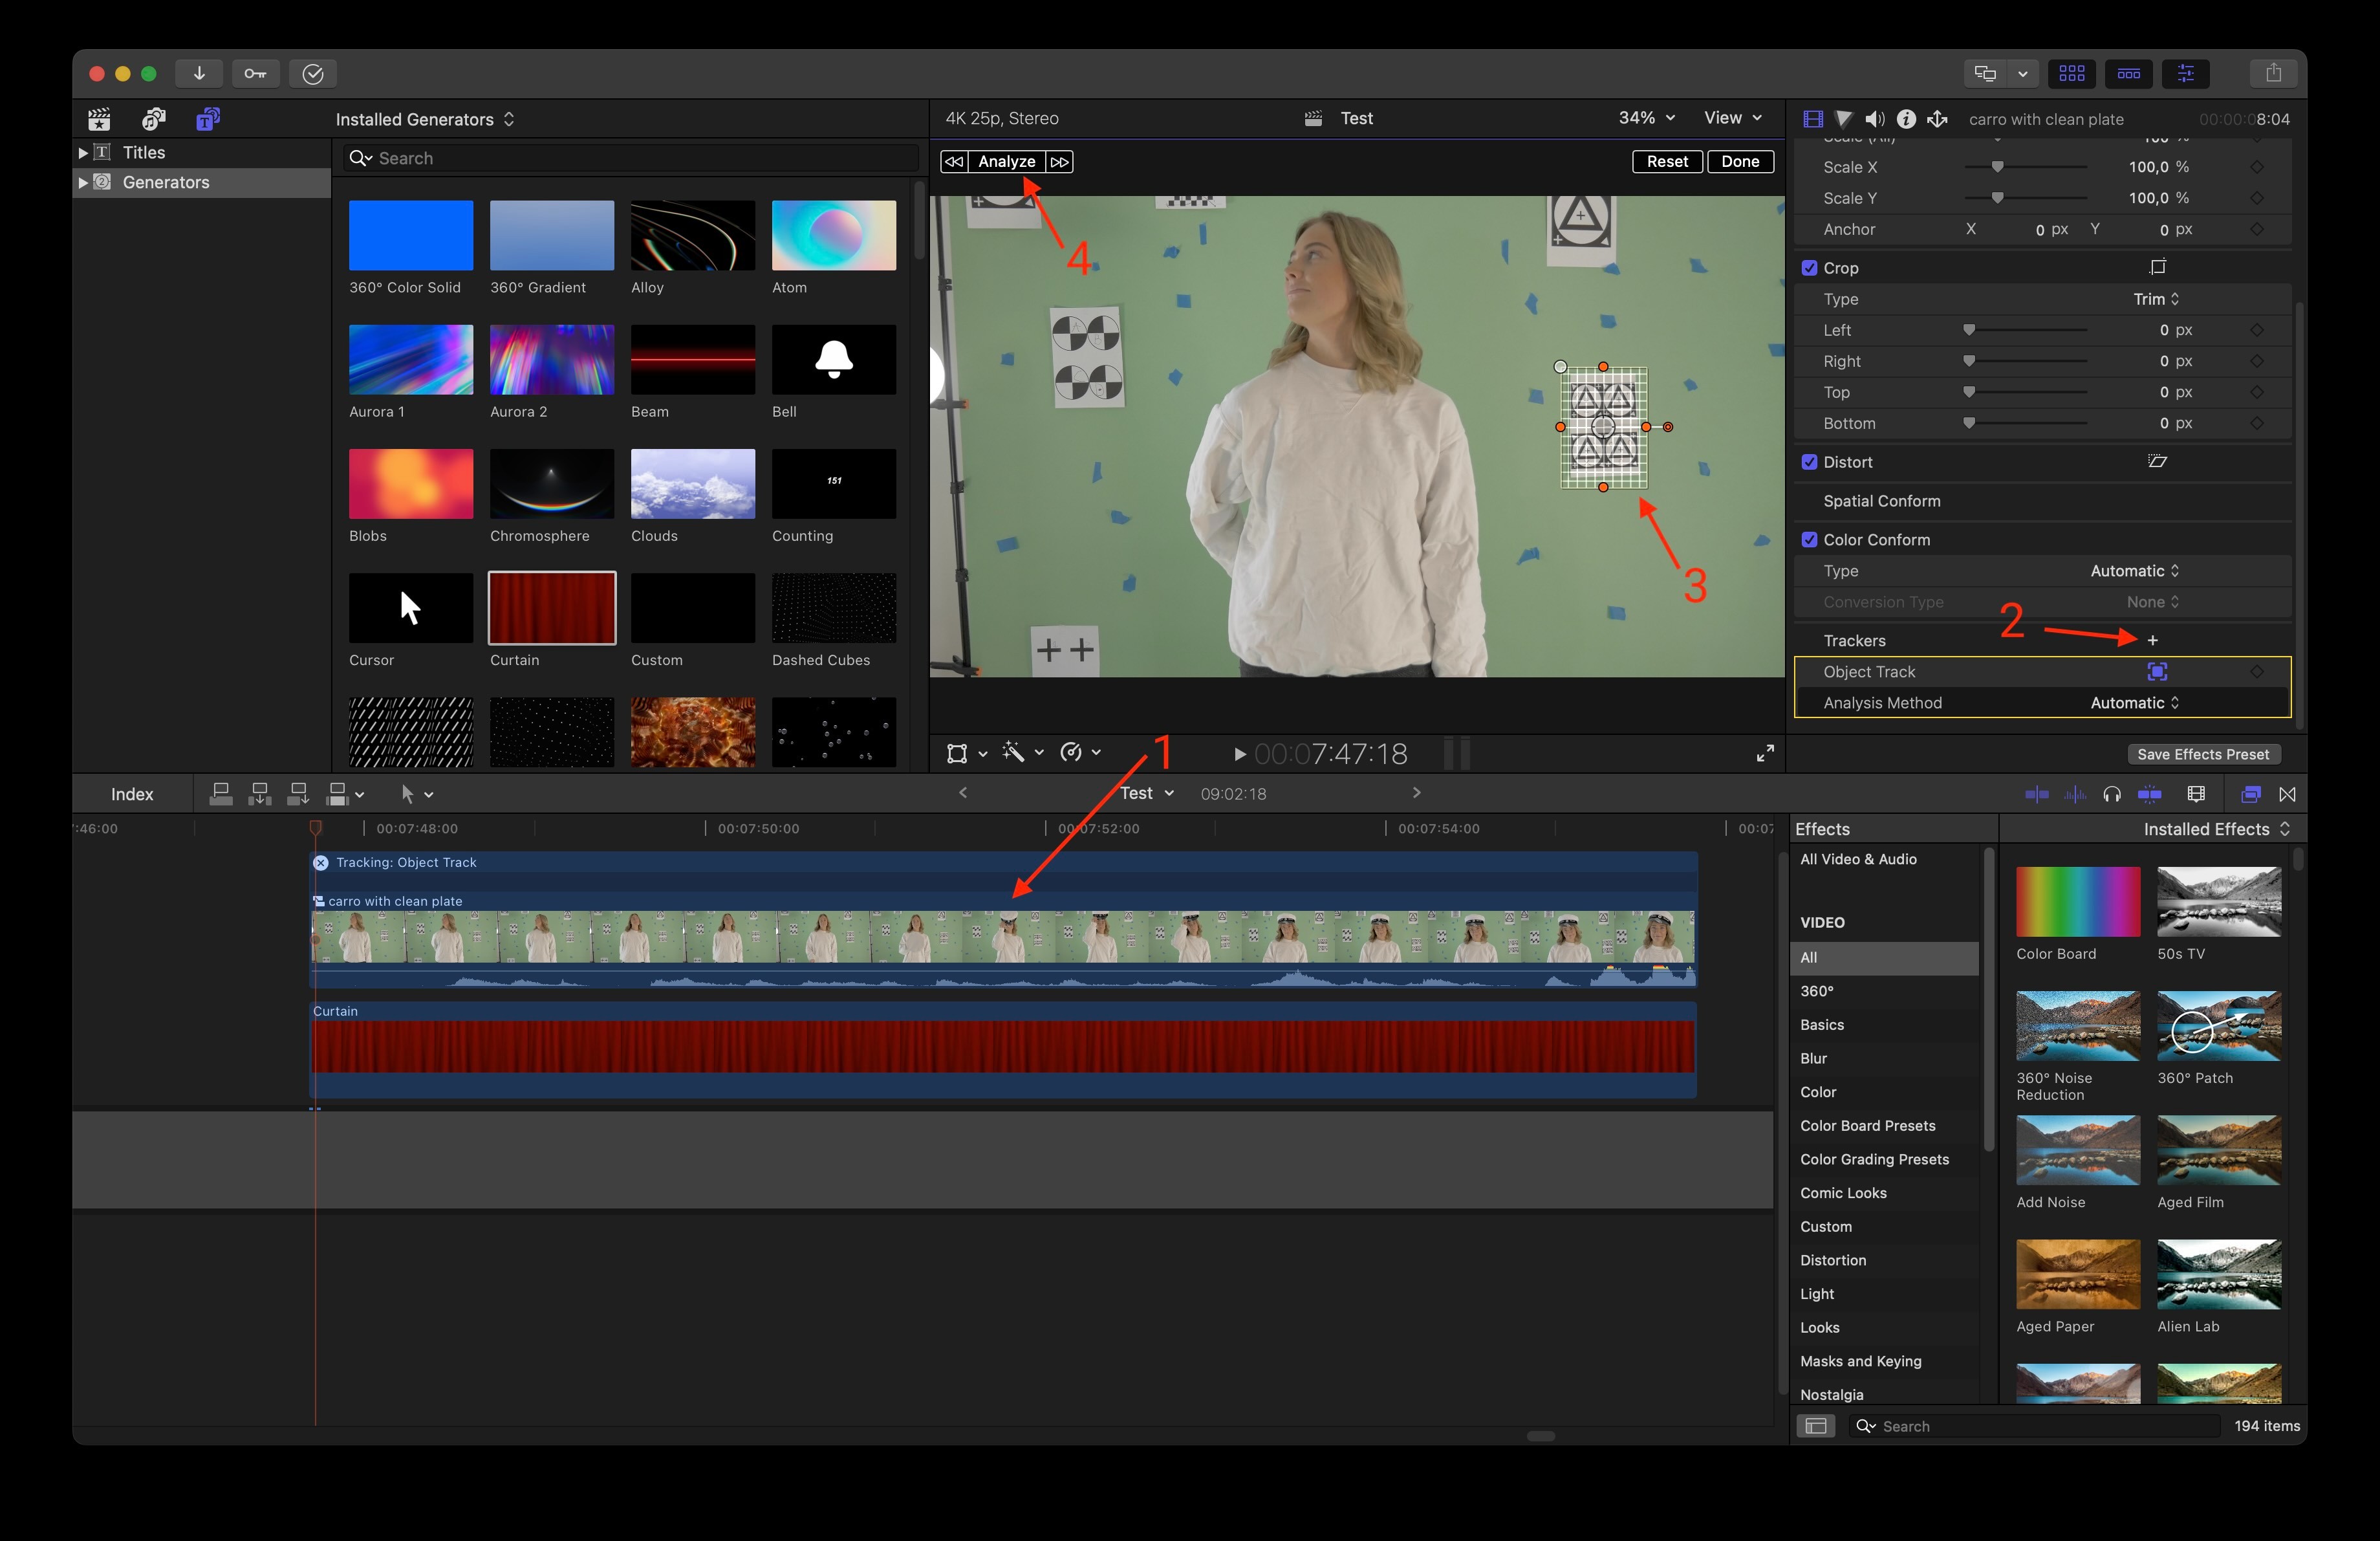
1 - Click on the green screen video with motion tracking markers.

2 - Click on the "Trackers" "+"-button.

3 - Position the tracker on top of one of the motion tracking markers.

4 - Click the "Analyze"-button.

5 - After the analyze is finished, click on the virtual background video.

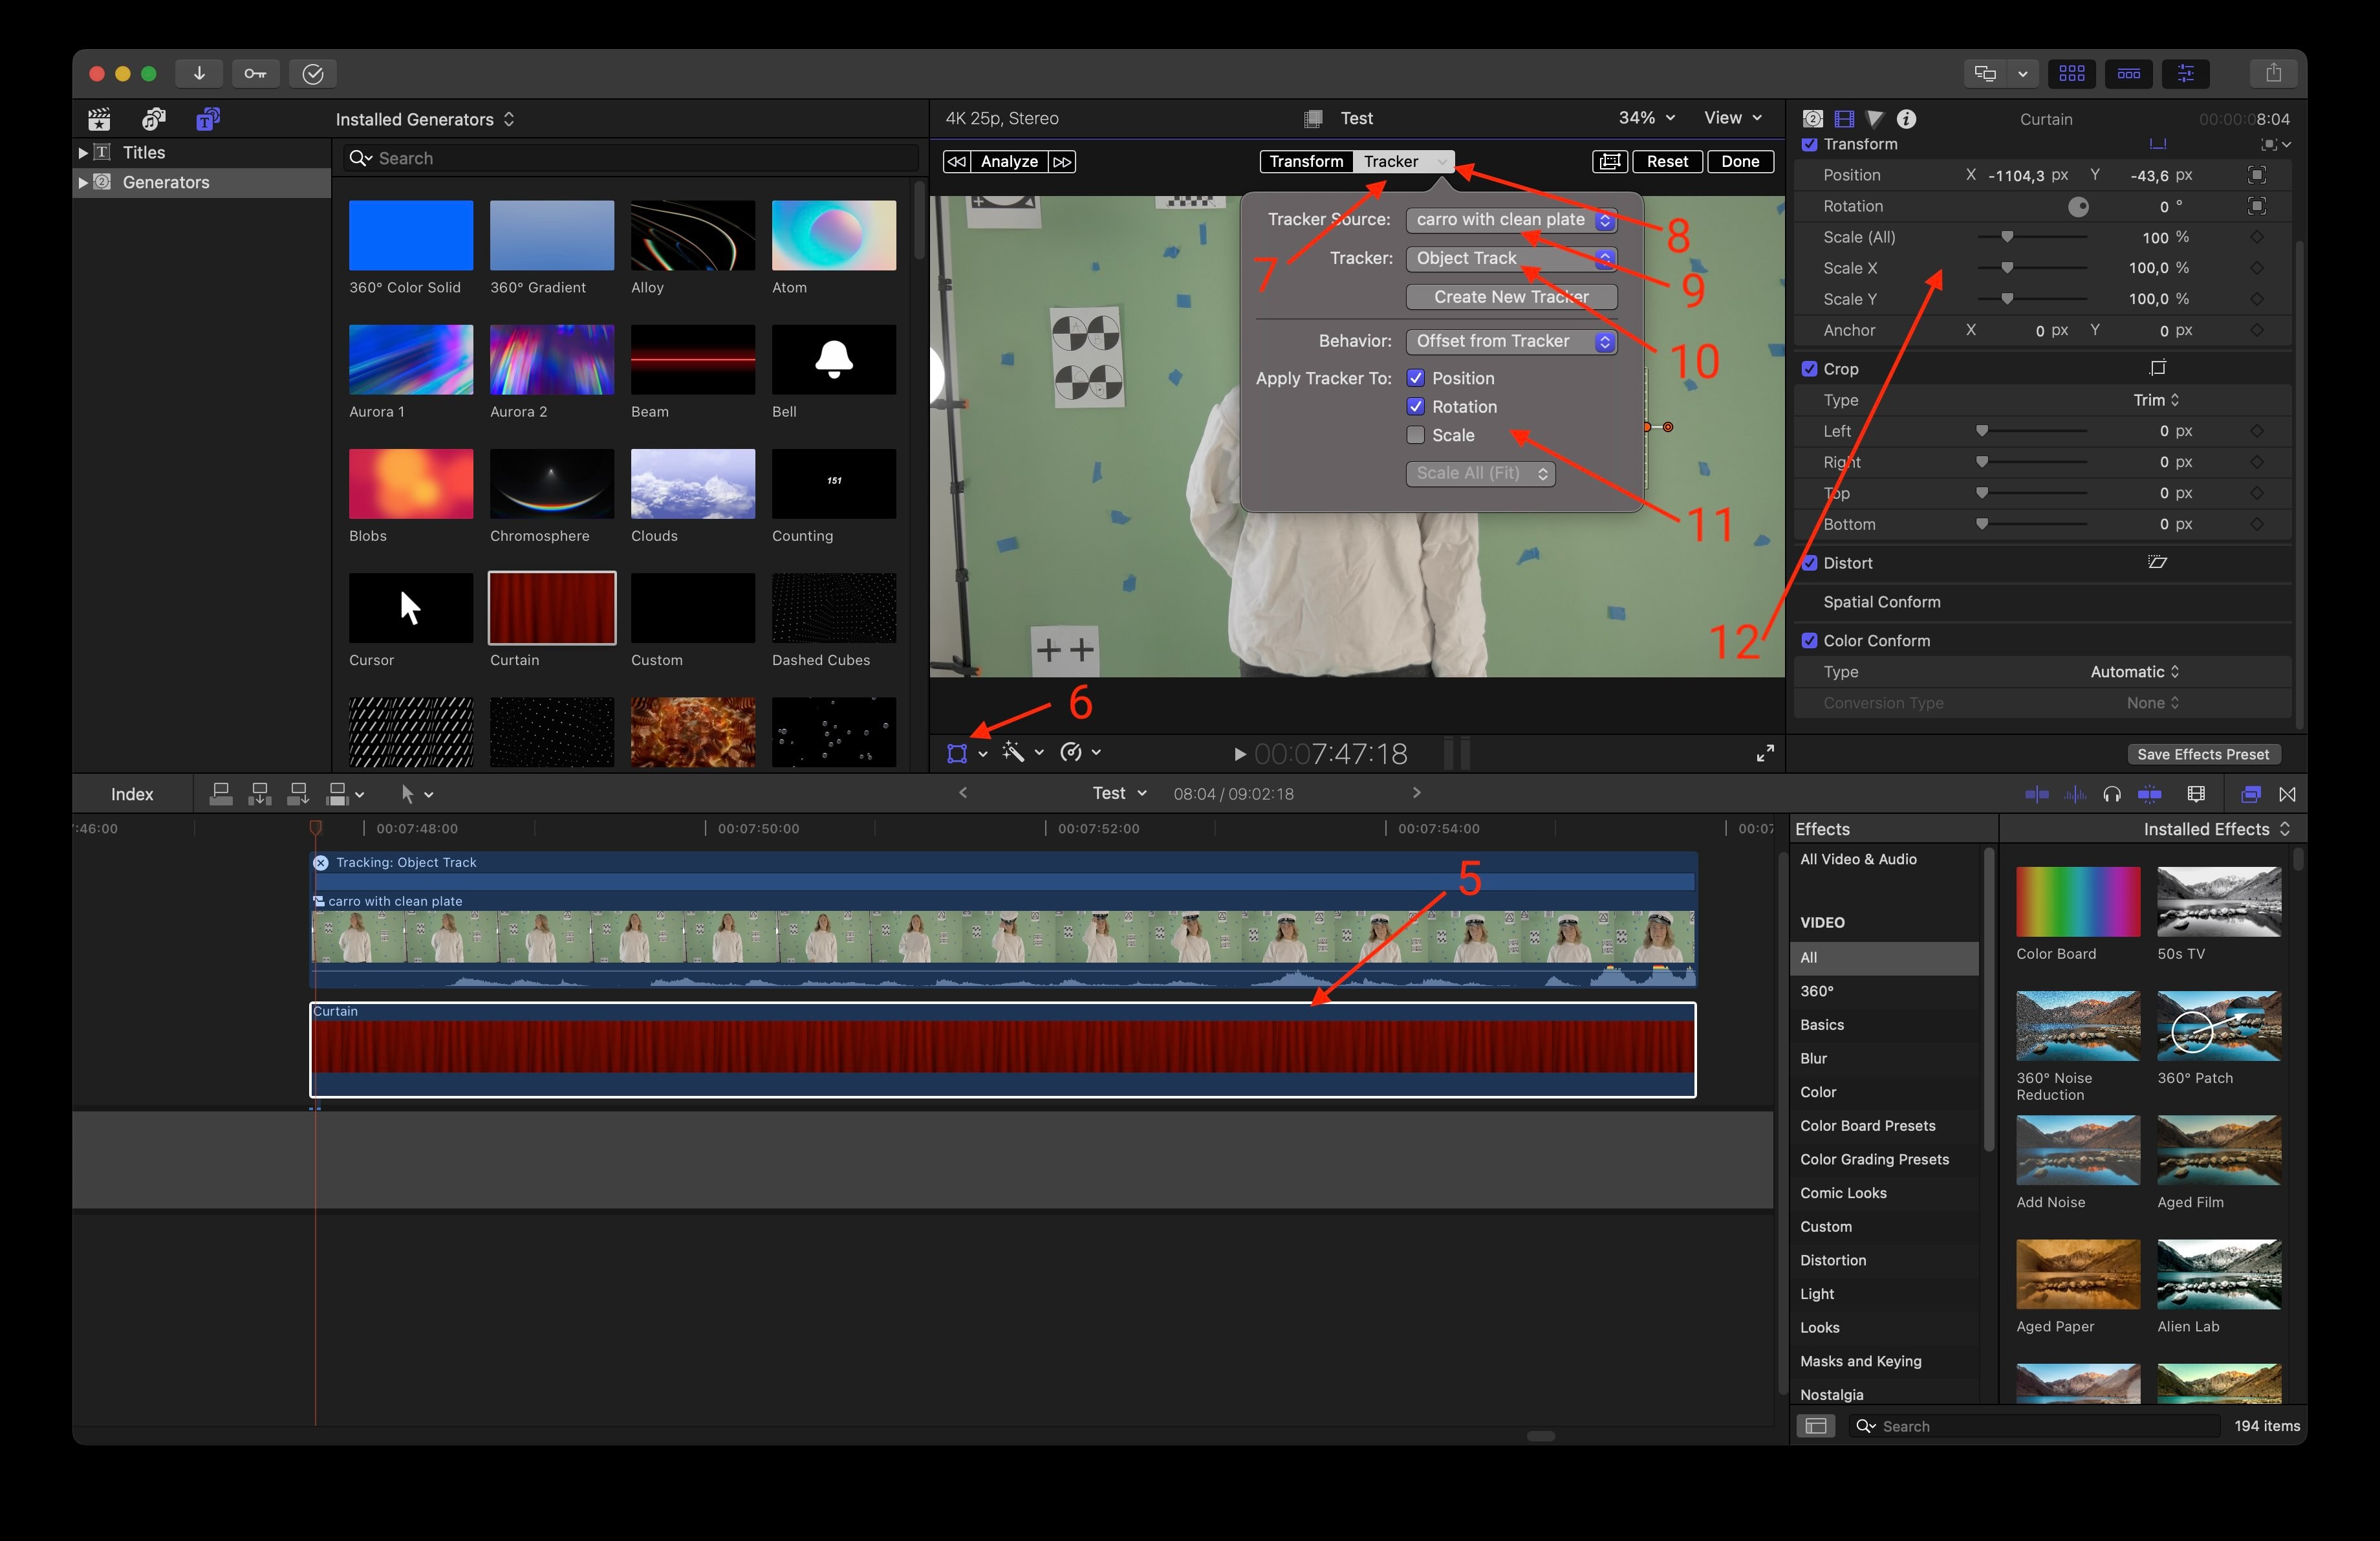
6 - Click on the "Transform"-button.

7 - Click on the "Trackers"-button.

8 - Click on the arrow down-button.

9 - Select the green screen motion tracked video as the "Tracker Source".

10 - Select "Object Track" (without the number) as the "Tracker".

11 - Select all three options: position, rotation and scale (I forgot to select scale when taking the screenshot below).

12 - Adjust the transform parameters of the virtual background video so it looks good.

13 - Done!


Now you'll have a motion tracked virtual background that follows the motion tracking markers from the green screen video. You can also use a motion blur plugin on the virtual background so it gets motion blur as the camera moves.


BONUS TIP - THE BEST WAY TO REMOVE GREEN SCREEN (CHROMA KEYING) IN FINAL CUT PRO IN 2023:

1 - Go to the first frame of the green screen video.

2 - Go to export - export frame (you might need to add this button in the export menu).

3 - Import the exported frame into, for example, Pixelmator or other image editing app.

4 - Create a clean plate by removing the actor from the image.

5 - Export the clean plate image.

6 - Import the clean plate image into Final Cut Pro.

7 - Add the clean plate image to the timeline before the green screen video.

8 - Make the clean plate image 1 frame long.

9 - Select the clean plate image and the green screen video and make a New Compound Clip containing both.

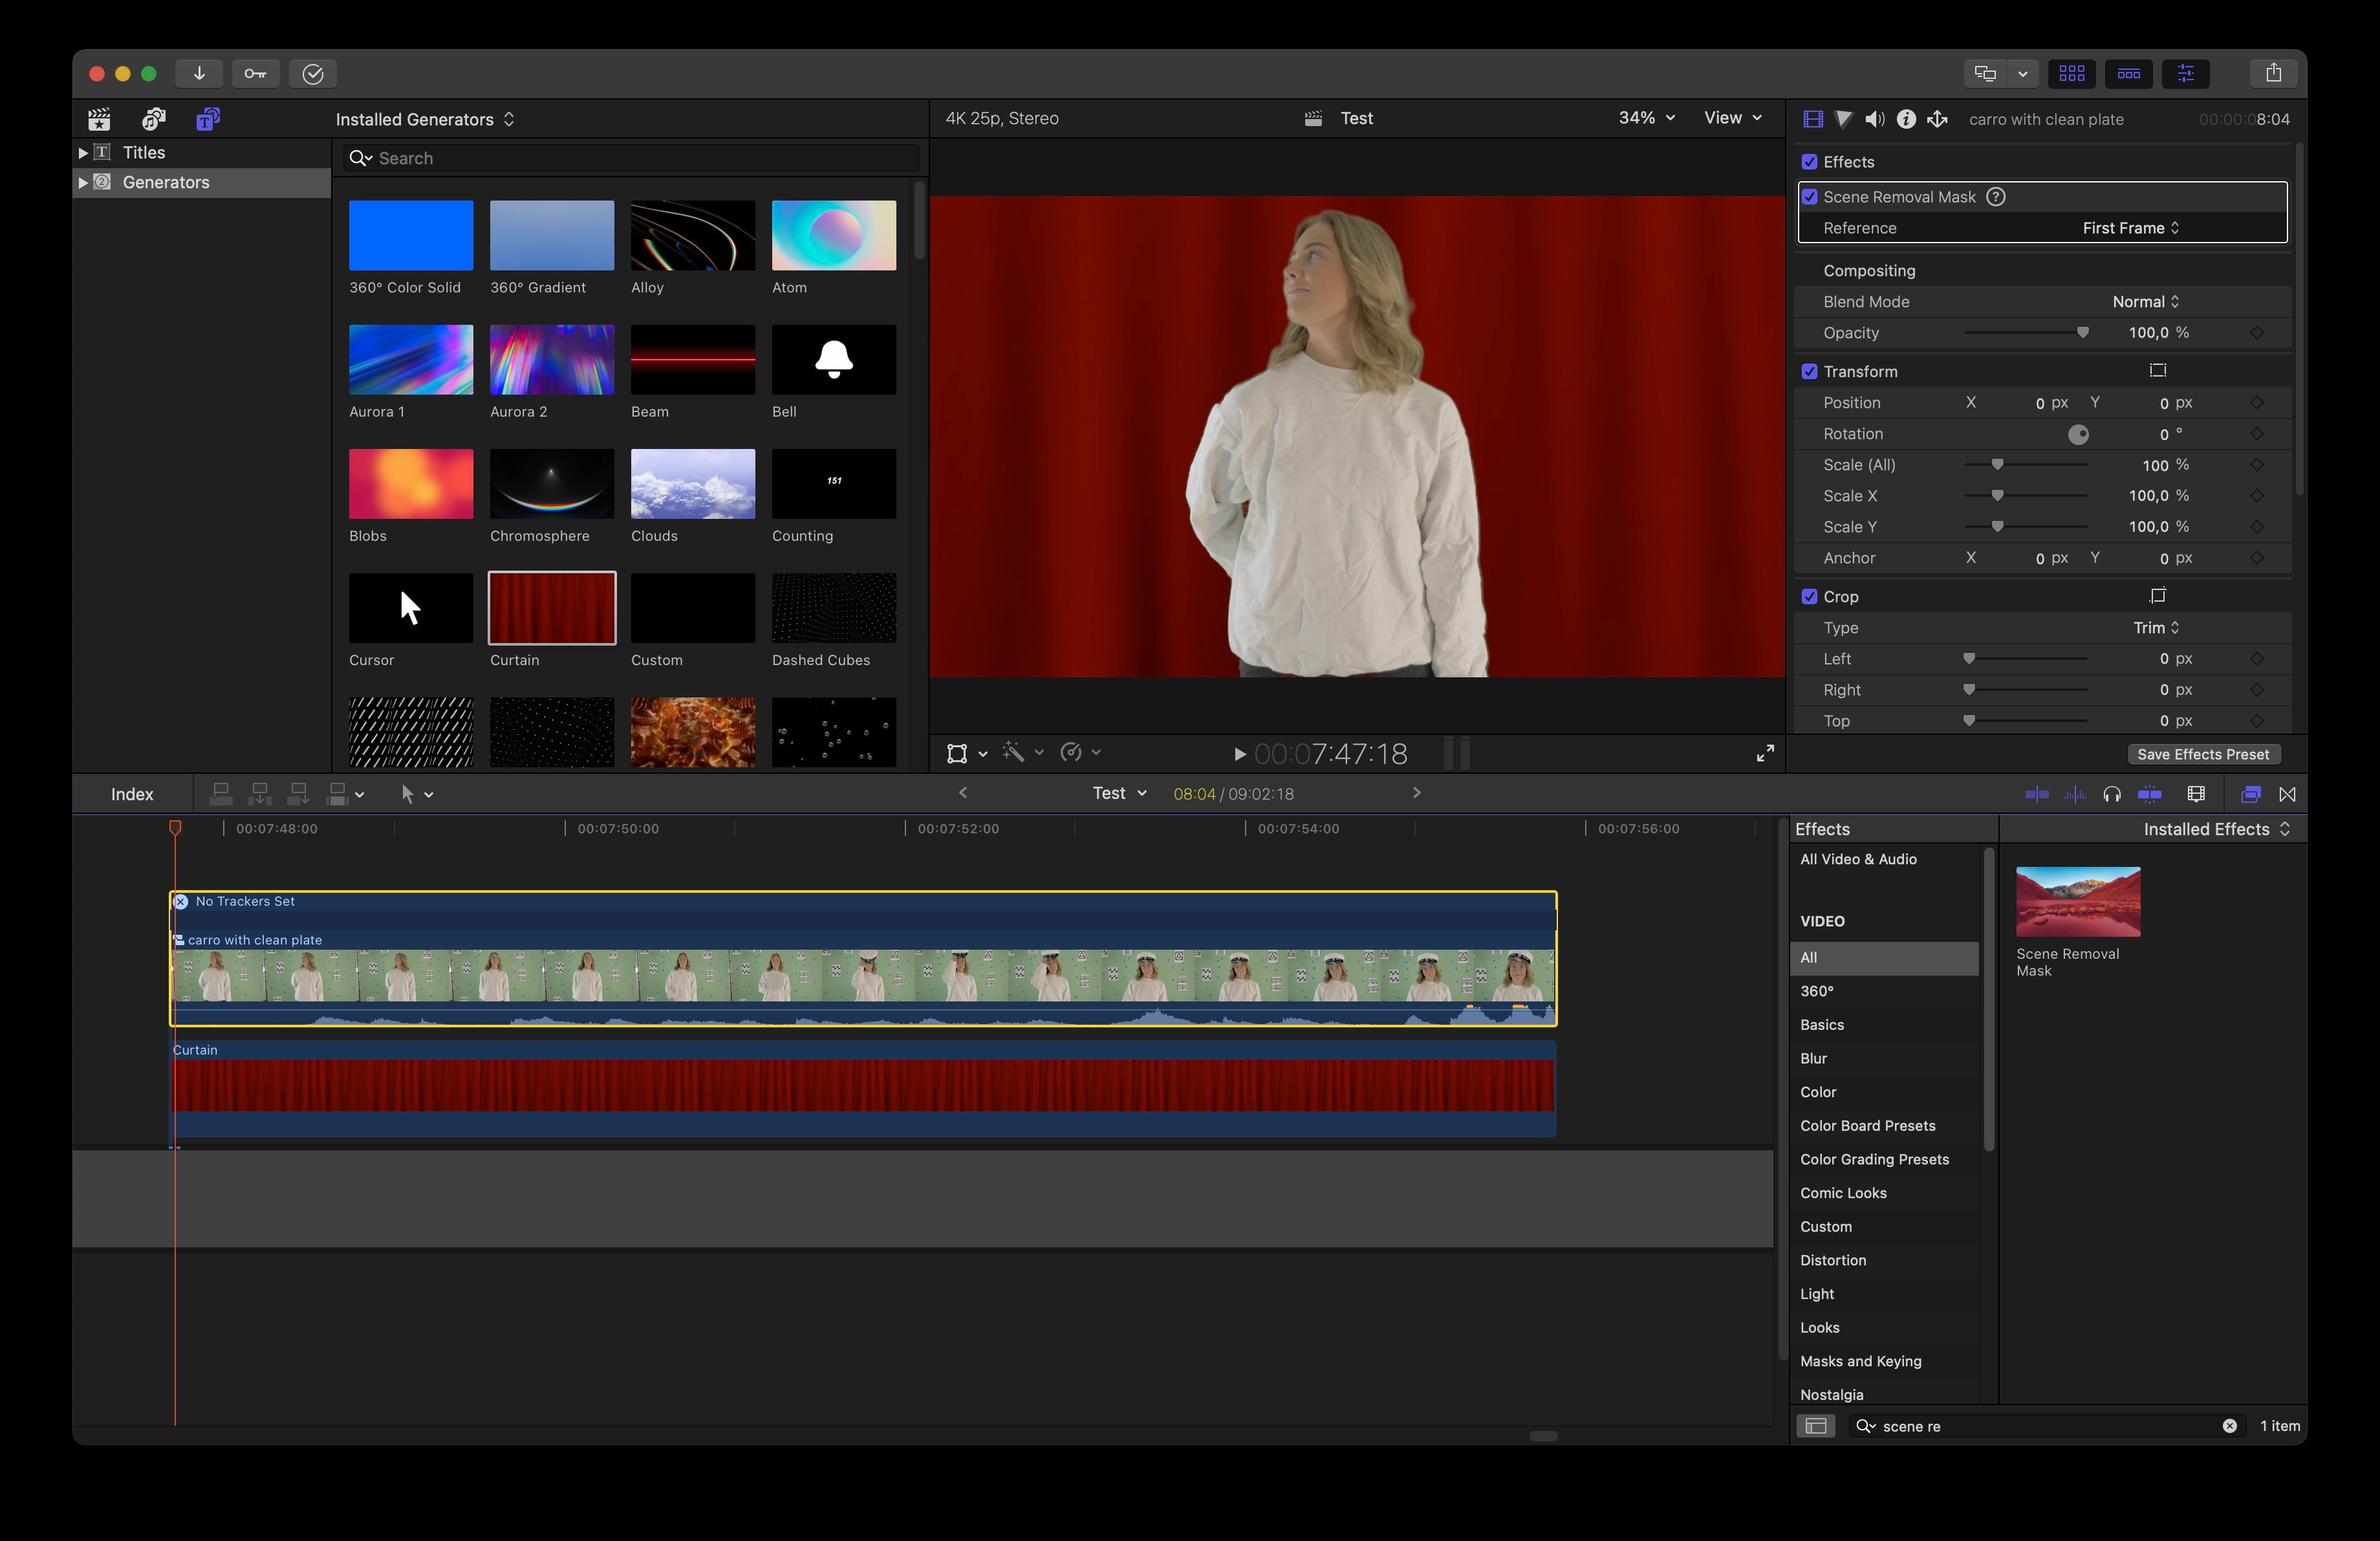
10 - Add the Scene Removal Mask effect to the new Compound Clip.

11 - Done!


This will use the clean plate image as a reference frame to do a fantastic green screen key in Final Cut Pro. This is a much better method of doing green screen chroma keying in Final Cut Pro in 2023 since it's better at preserving hair details than the Green Screen Keyer is, since the Scene Removal Mask is machine learning-/AI-based and therefore analyses your specific green screen lightning using the reference frame. You can also add a Hue/Saturation Curves effect and go the Hue vs Saturation and crank down the green colors to the minimum to remove the green spill. You can also change the luminance of the green spill in the Hue vs Luminance curve.


Good luck!

1 reply
Question marked as Top-ranking reply

Oct 29, 2023 8:46 AM in response to FilipOfficial

I figured it out. Follow the instructions below to do motion tracking and match moving for green screen backgrounds in Final Cut Pro:


1 - Click on the green screen video with motion tracking markers.

2 - Click on the "Trackers" "+"-button.

3 - Position the tracker on top of one of the motion tracking markers.

4 - Click the "Analyze"-button.

5 - After the analyze is finished, click on the virtual background video.

6 - Click on the "Transform"-button.

7 - Click on the "Trackers"-button.

8 - Click on the arrow down-button.

9 - Select the green screen motion tracked video as the "Tracker Source".

10 - Select "Object Track" (without the number) as the "Tracker".

11 - Select all three options: position, rotation and scale (I forgot to select scale when taking the screenshot below).

12 - Adjust the transform parameters of the virtual background video so it looks good.

13 - Done!


Now you'll have a motion tracked virtual background that follows the motion tracking markers from the green screen video. You can also use a motion blur plugin on the virtual background so it gets motion blur as the camera moves.


BONUS TIP - THE BEST WAY TO REMOVE GREEN SCREEN (CHROMA KEYING) IN FINAL CUT PRO IN 2023:

1 - Go to the first frame of the green screen video.

2 - Go to export - export frame (you might need to add this button in the export menu).

3 - Import the exported frame into, for example, Pixelmator or other image editing app.

4 - Create a clean plate by removing the actor from the image.

5 - Export the clean plate image.

6 - Import the clean plate image into Final Cut Pro.

7 - Add the clean plate image to the timeline before the green screen video.

8 - Make the clean plate image 1 frame long.

9 - Select the clean plate image and the green screen video and make a New Compound Clip containing both.

10 - Add the Scene Removal Mask effect to the new Compound Clip.

11 - Done!
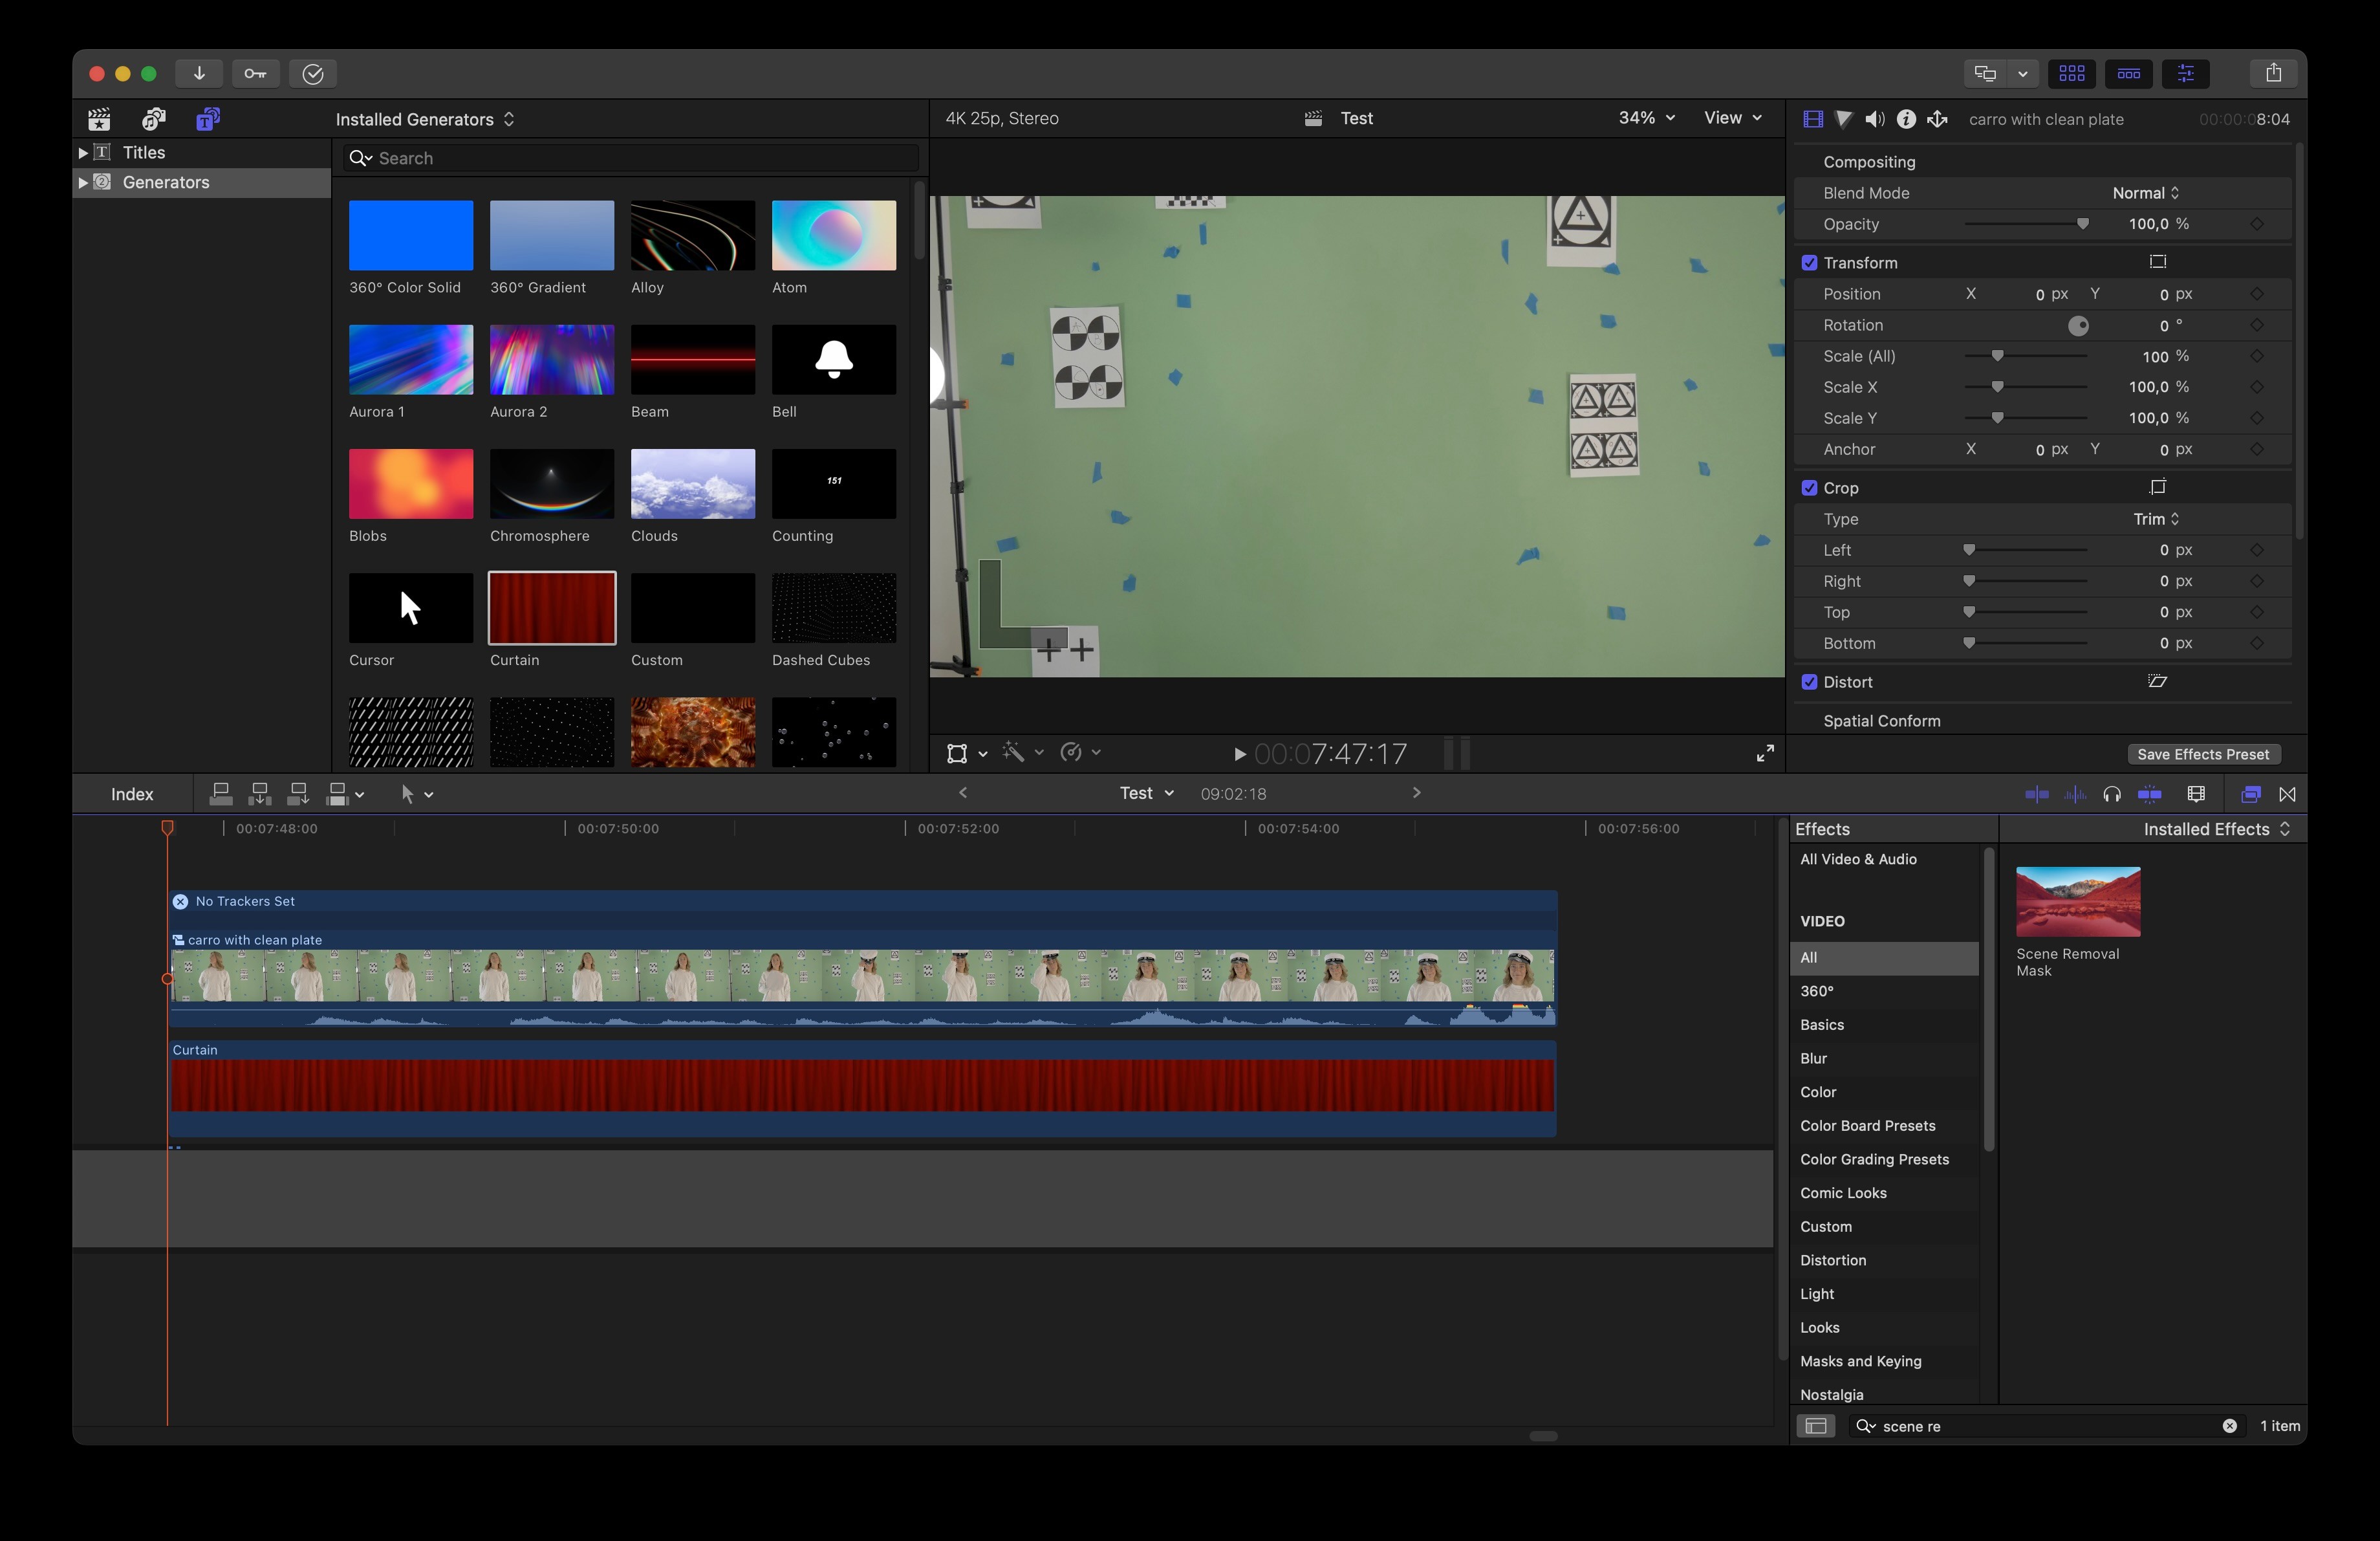


This will use the clean plate image as a reference frame to do a fantastic green screen key in Final Cut Pro. This is a much better method of doing green screen chroma keying in Final Cut Pro in 2023 since it's better at preserving hair details than the Green Screen Keyer is, since the Scene Removal Mask is machine learning-/AI-based and therefore analyses your specific green screen lightning using the reference frame. You can also add a Hue/Saturation Curves effect and go the Hue vs Saturation and crank down the green colors to the minimum to remove the green spill. You can also change the luminance of the green spill in the Hue vs Luminance curve.


Good luck!

Motion Tracking Green Screen Backgrounds in Final Cut Pro (Match Moving)

Welcome to Apple Support Community
A forum where Apple customers help each other with their products. Get started with your Apple Account.