Guide: Force-Injecting iOS Update via Finder to Fix iPhone Storage Loop & System Data Bloat (No Data Loss)

I am sharing this guide after my iPhone 15 suffered from an absolute 'storage blow' for over a year, eventually freezing completely at 0 bytes free. Every regular advice on Apple Forums failed because my phone kept disconnecting from my Mac during Finder updates. After hours of troubleshooting, I successfully broke the loop, cleared my System Data bloat, and freed up 40GB of space without losing a single piece of data (including my WhatsApp chats or photos). Here is the exact step-by-step workaround that works when standard methods fail.


The Problem:

When an iPhone's local storage hits 100% capacity, it enters a critical storage loop. The device lacks the local "scratchpad" space required to compress or sync data with iCloud, make a standard Mac backup, or download an over-the-air update. Furthermore, internal background processors panic, heavily inflating the "System Data" cache category. If you try to update or back up normally via Finder or iTunes, the phone's choked processor will repeatedly drop the USB connection mid-transfer, failing with an error.

To break this loop without erasing your device, you must download the update independently onto your computer first to eliminate network timing drops.

The Solution: Manual IPSW Update Injection

Step 1: Open Up Storage Runway on Your Mac

  • A full 128GB/256GB iPhone requires a compressed staging environment on your computer to process the code.
  • On your Mac, go to System Settings > General > Storage.
  • Clear out at least 40 GB to 50 GB of free space on your laptop drive by temporarily deleting large apps, clearing app caches, or emptying your Trash.

Step 2: Isolate the Stuck iPhone

  • On your iPhone, turn Airplane Mode ON and verify that both Wi-Fi and Mobile Data are completely disabled.
  • Why: This stops the phone from trying to pull down heavy background iCloud photo syncing data, preserving your remaining local storage cushion.

Step 3: Download the Update Package Separately

  1. Unplug your iPhone from the computer. This prevents the phone from dropping out and aborting your download progress.
  2. Open Safari on your Mac and head to the community archive website: ipsw.me
  3. Click iPhone, select your specific device model, and click the latest Signed IPSW file (highlighted in green at the top of the list).
  4. Let the file download completely into your Mac's Downloads folder.

Step 4: Force-Inject the Update File

  1. Once the browser download hits 100%, plug your iPhone firmly back into your Mac using a USB-C/Lightning cable.
  2. Open a Finder window, click on your iPhone in the left sidebar under "Locations," and tap Trust on both screens if prompted.
  3. Select the radio button for "Back up all of the data on your iPhone to this Mac" and click Apply in the bottom right corner.
  4. The Critical Key: Hold down the Option (⌥) key on your Mac keyboard (or the Shift key if using Windows) and click the Update button in the Finder window.
  5. A file window will pop open. Go to your Downloads folder, select the .ipsw file you just downloaded from Safari, and click Open.
  6. Confirm by clicking Update.

What to Expect:

Finder will immediately shift to "Extracting software...". Because the heavy installation package is already sitting entirely on your Mac's hard drive, your phone's unstable storage state cannot crash or halt the download process. The Mac will unpack the software and push the code over the wire, causing your iPhone to reboot into a black screen with a white Apple logo and a progress bar.

This process will cleanly swap out the core operating system files, completely dismantling the corrupted "System Data" block and restoring stable storage room to your phone, while keeping your WhatsApp chat history, photos, and personal data 100% safe.


Hopefully, this guide saves someone else hours of frustration and protects your data from being erased! Let me know if you have any questions about these steps.

iPhone 15

Posted on Sep 24, 2026 3:22 PM

Reply
1 reply

Sep 25, 2026 6:01 AM in response to iskandarzulkarnaen

I checked the current Apple documentation, including Apple's documentation for Finder updates, backups, storage, recovery-mode updating, iCloud Photos and Apple Configurator.


Follow this process below to keep your personal data.


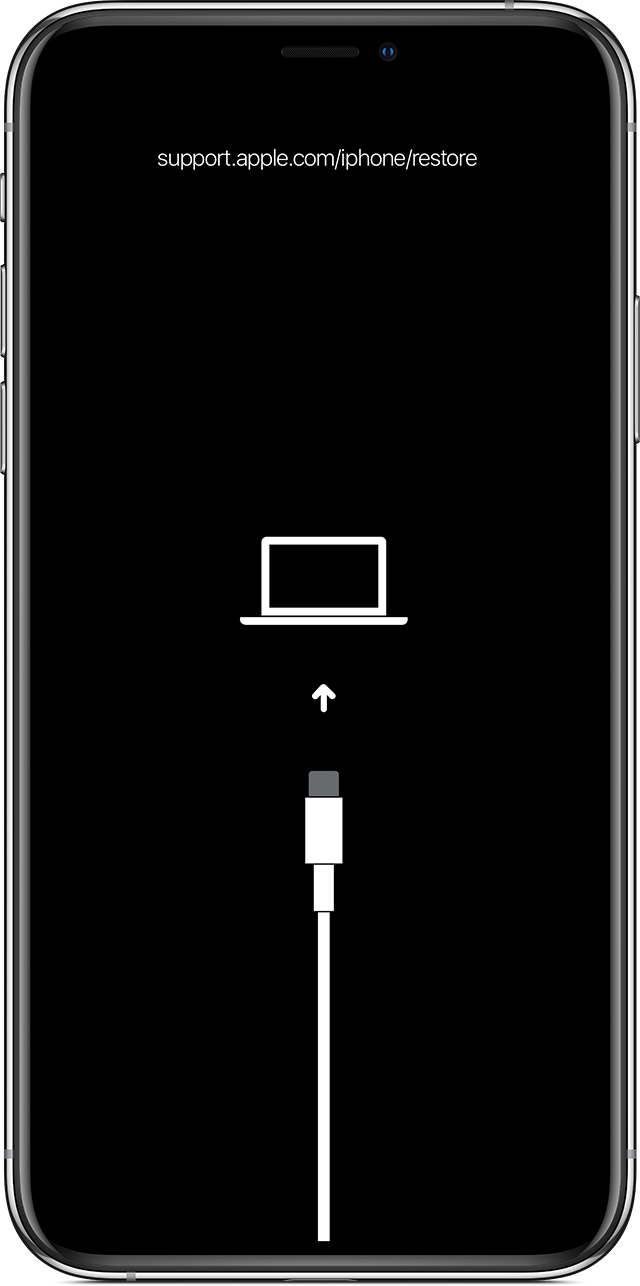
If you see the Restore screen on your iPhone, iPad, or iPod touch

If you see the Restore screen on your iPhone, iPad, or iPod touch, learn what to do.


Restart your device

If you see the Restore screen, restart your device:

  • iPad models with Face ID: Press and quickly release the Volume Up button. Press and quickly release the Volume Down button. Press and hold the Top button until the device restarts.
  • iPhone 8 or later: Press and quickly release the Volume Up button. Press and quickly release the Volume Down button. Press and hold the Side button until you see the Apple logo.
  • iPhone 7, iPhone 7 Plus, and iPod touch (7th generation): Press and hold both the Side (or Top) button and the Volume Down button until you see the Apple logo. 
  • iPad with Home button, iPhone 6s or earlier, and iPod touch (6th generation) or earlier: Press and hold both the Side (or Top) button and the Home button until you see the Apple logo.


Reinstall iOS or iPadOS

If you still see the Restore screen after you restart, you need to reinstall iOS or iPadOS:

  1. On your Mac, make sure that you’ve installed the latest software updates (including iTunes if you have MacOS Mojave or earlier). Or on your Windows PC, make sure that you’ve installed the latest version of iTunes.
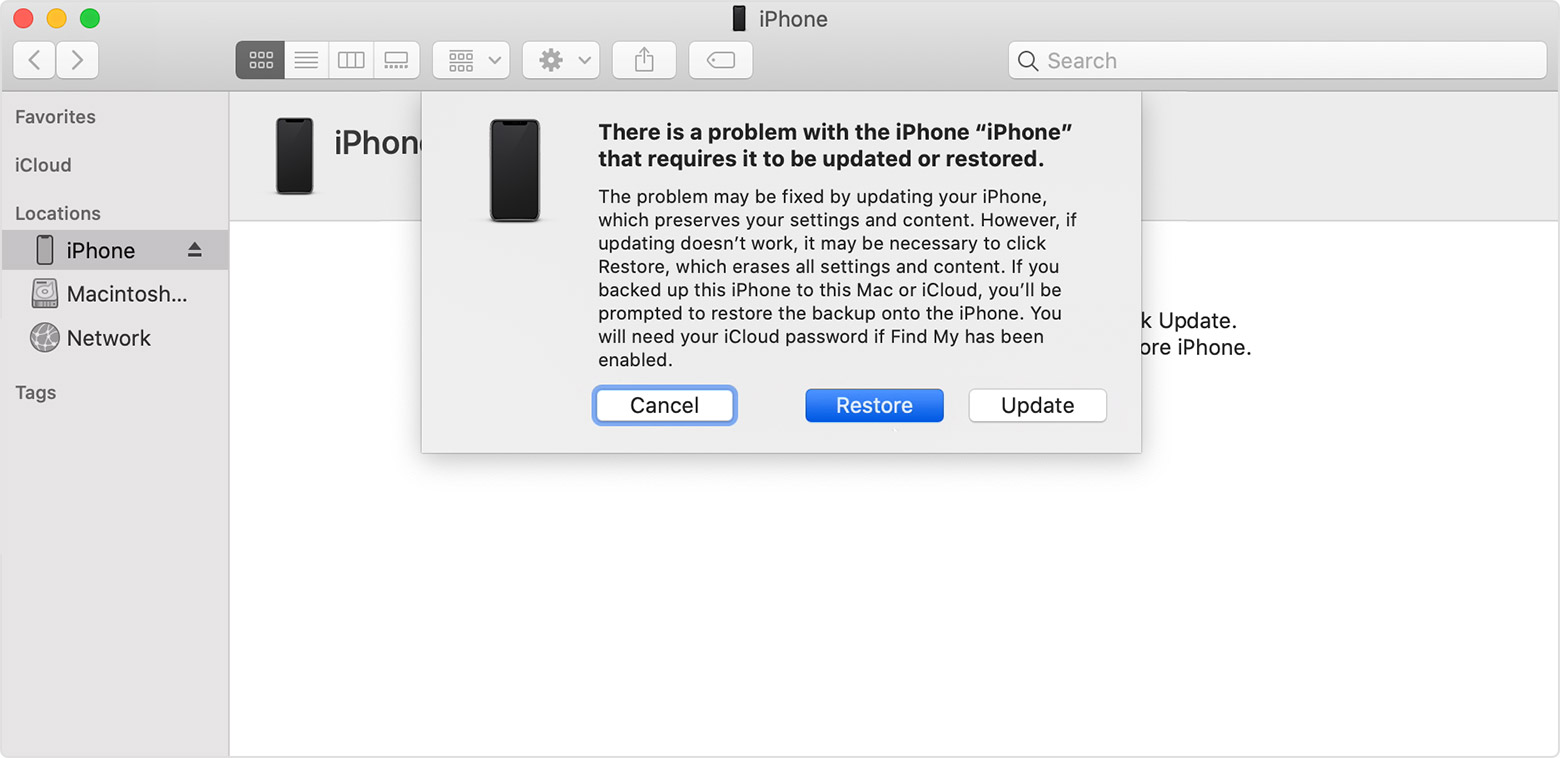
  2. Connect your device to your computer using the cable that came with your device. You should see this message: "There's a problem with the [your device name] that requires it to be updated or restored."
  3. Click Update (not Restore) to reinstall iOS or iPadOS and keep your personal data.


If the above fails


If your device turns on but gets stuck during start up

If you see the Apple logo or a red or blue screen during startup, try these steps:

  1. Connect your device to a computer. On a Mac with macOS Catalina 10.15, open Finder. On a Mac with macOS Mojave 10.14 or earlier, or on a PC, open iTunes.
  2. Locate your device on your computer.
  3. While your device is connected, follow these steps:
    • iPad models with Face ID: Press and quickly release the Volume Up button. Press and quickly release the Volume Down button. Press and hold the Top button until your device begins to restart. Continue holding the Top button until your device goes into recovery mode.
    • iPhone 8 or later: Press and quickly release the Volume Up button. Press and quickly release the Volume Down button. Then, press and hold the Side button until you see the recovery mode screen.
    • iPhone 7, iPhone 7 Plus, and iPod touch (7th generation): Press and hold the Top (or Side) and Volume Down buttons at the same time. Keep holding them until you see the recovery mode screen.
  • iPad with Home button, iPhone 6s or earlier, and iPod touch (6th generation) or earlier: Press and hold both the Home and the Top (or Side) buttons at the same time. Keep holding them until you see the recovery mode screen.
  1. When you get the option to restore or update, choose Update. Your computer will try to reinstall iOS or iPadOS without erasing your data.

Your computer will download the software for your device. If it takes more than 15 minutes, your device will exit recovery mode and you'll need to repeat steps 2 and 3.


If you need more help

Contact Apple Support to set up service if you have any of these issues:

  • You still see a black screen after charging, force restarting, or following the steps in this article.
  • You see a black screen, but you can hear alerts, sounds, and vibrations.
  • The screen remains black, but the device chirps when you unmute it and connect it to power.
  • Your screen is on, but it doesn't respond when you tap, slide, or try other gestures. 
  • You can't force your device to restart because a button is broken or stuck.
  • Your device is stuck on the Apple logo, displays a solid color, or isn't recognized in iTunes.


Guide: Force-Injecting iOS Update via Finder to Fix iPhone Storage Loop & System Data Bloat (No Data Loss)

Welcome to Apple Support Community
A forum where Apple customers help each other with their products. Get started with your Apple Account.