You're going to be very happy. I figured it out. It's not that bad either, a bit of a hassle but you'll be fine. Me too.
1> purchase compressor app on the apple app store if you haven't yet. it's $50.
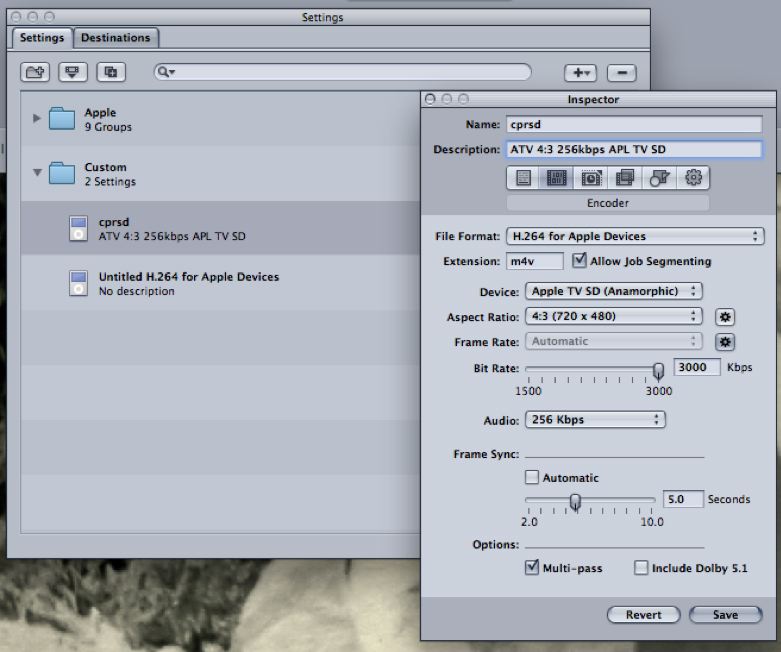
2> start it up.
3> menu> Settings (or cmd-3). Scroll down to the custom folder and click the little plus/down arrow on top right of the settings window and select "H.264 for apple devices".
4> Double click the new custom setting you created called "untitled..."
5> Here's where you decide based on the actual pixel shape of your source .dv file videos. In my case, it was 720x480, so I selected "Apple TV SD (anamorphic)" as the "device", and the "aspect ratio" as "4:3". You pick the setting based on whatever your DV files are. If you don't know, use quicktime pro "Inspector" window to discover, or download VLC from videolan and use that. They both play and show you the pixels, etc of your .dv file. Whatever the shape, make sure the aspect ratio you choose in the setting is the same as the original source.
6> Select Audio setting 256 kbps
7> Name the setting something short (trust me) - name is on top
8> click "save" button on bottom of window
9> in the window that shows "drag a file to create a job", drag a folder full of .dv files
10> MAKE SURE YOU HAVE ENOUGH SPACE ON THE HD OF THE SOURCE MATERIAL FOR 15% MORE SPACE OF FILES
11> click submit button below list of videos in job
12> go to the folder of the source .dv files and you'll see new files you created
13> In FCPX - choose to import these new files and you'll hear their audio in FCPX - and you'll see the quality of the video is the same.
See pic below of custom setting for compressor app to made me hear audio of .dv files I got from my old camcorder :