This Apple support article:
http://support.apple.com/kb/HT2084?viewlocale=en_US&locale=en_US
says:
When signing into MobileMe and enabling Back to My Mac, TCP port 443 is used. When connecting to another machine or accepting a connection from another machine, Back to My Mac may use TCP port 443 and UDP ports 4500, 5678, and 32768 through 65535.
I can give you a suggestion to try; however, be forewarned that the NVG510 has known issues with port forwarding. Some ports just will not forward, no matter what you do (such as PPTP, for example). Having said that, if you still want to try it, here is my suggestion:
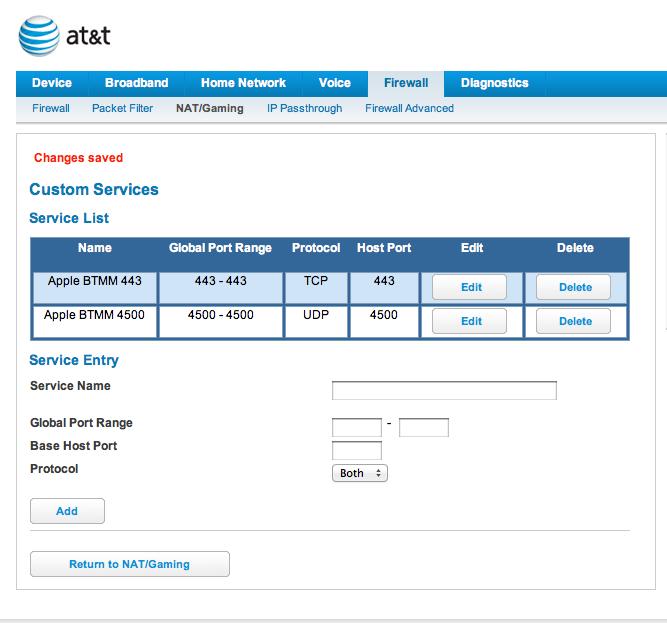
You will need to set up four (yes, 4) custom services, one for each of the first three individual ports, and one for the range of ports required by Back to My Mac (BTMM).
On the NAT/Gaming page, click the Custom Services button near the bottom.
On the Services page that comes up, you will need to fill in the appropriate entries:
- Service Name: this can be whatever you want. I would name it something meaningful and easy to find, such as Apple BTMM. Put a number or something at the end to show which of the four this particular one is. Something like Apple BTMM 1, for example, or Apple BTMM 443, perhaps, for the first one, and then something similar to distinguish each of the others.
- Global Port Range: this is where you put the start and finish numbers for any port range. For only one port, such as 443, put the same number in both boxes on that line. For a true range, such as 32768 through 65535, put the starting number in the first (left-side) box, and the ending number in the second (right-side) box.
- Base Host Port: the first port number that is used to communicate with your internal computer (the one you're setting up for BTMM) is what goes here. Usually it is the first port of the range, eg, 443 for the first single-port item and 32768 for the range item.
- Protocol: the protocol(s) on which a port range will communicate. For BTMM, 443 will communicate on TCP. The rest will communicate on UDP.
Once you've filled in the entries for a single port or port range, click the Add button. The port or range you just created will appear in a box on the page, while cleared textboxes remain underneath for the next port or range you'd like to add.
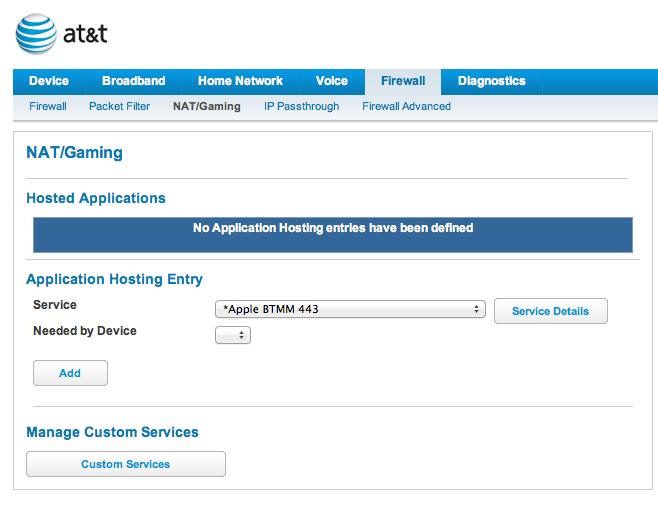
Finish creating the four entries. Then, click the Return to NAT/Gaming button. In the Service dropdown, you will now see the items you created, preceded by an asterisk, but in correct alphabetical order for the name you created.
Select one of the items you created. Once it is selected, click the Needed by Device dropdown. There, select the IP address of the computer you want to be able to use with BTMM. Repeat this for each of the four Services you created.
(I don't have my NVG510 assigning any IP addresses, so the image below doesn't show any. However, your Needed by Device list should contain the IP addresses of any connected computers or devices.)
Now, theoretically, you'll be able to use BTMM with that computer - theoretically. We'll see if the NVG510 will forward those ports in reality or not. Let me know - I'm crossing my fingers for you!!!
Oh, yeah - even though you see a "Changes saved" message, I suggest rebooting the NVG510. It often saves the changes, but doesn't actually activate them until you restart. Do that back at the Device tab, where you'll see a Restart Device link in the menu (a few items to the right of 'status').