Thanks for the models, this makes it easier.
The modem appears to be preconfigured. There is no method to access it from your browser. It should have some sort of IP address of its own in order to connect to the computer's Ethernet port, though none is mentioned in the manual. There isn't even a way to set any kind of manual configuration. So it is what it is.
The router's default IP address is 192.168.1.1, not 0.1. Everyone used to use 192.168.0.1, but it interfered so often with cable or DSL modems set to the same address, that router manufacturers started using 192.168.1.1 as the default so the devices wouldn't conflict right out of the box.
The first thing you want to do is not have the modem plugged directly into the Mac. While your modem does have a built in firewall (as does my DSL modem), they usually aren't that good. Much better to be behind the router, which has a far superior firewall of its own.
Connect your hardware in this order.
1) Incoming coaxial cable to the back of the modem.
2) Plug an Ethernet cable into the port on the back of the modem.
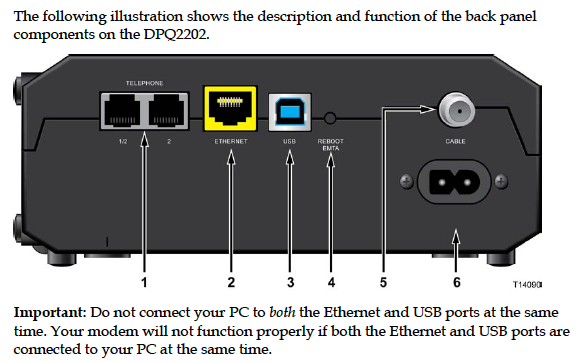
I purposely left in some of the text from the manual to make sure you see the note to never have an Ethernet and USB connection to the computer at the same time. If you have a USB cable connected, remove it. You won't be needing it.
3) Connect the other end of the Ethernet cable from the modem to the WAN port of the router. Which is marked as Internet.
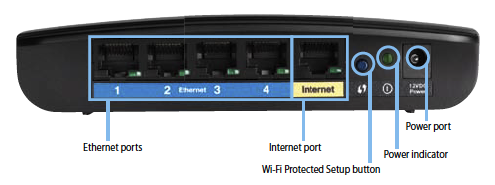
4. Run another Ethernet cable from any of the four LAN ports to the Ethernet port on your Mac. It doesn't matter which one of the four you use.
This puts the router between your Mac and the outside world. The router's firewall will make it virtually impossible for anyone to see, or hack into your computer from the outside as the router will not allow anyone to see any devices connected to it.
5. Make sure your Mac is set to connect with DHCP on automatic. Do that by entering the System Preferences and clicking on the Network icon. Select the active Ethernet port at the left (it will have green dot next to it). Where the menu at the right says, Configure iPv4, make sure the drop down menu is set to Using DHCP. If you needed to make any changes, click the Apply button. No need to restart, these changes take effect immediately.
Your router uses WPA/WPA2 by default, which is currently the best wireless security. Nothing to change there. The router also supposedly sets up a difficult to crack password for your wireless signal. That's nice, but the Achille's heel is that anyone can see what it is with very little difficulty. Which means anyone close enough to see your wireless signal can ride on your bandwidth without your knowledge.
This is possible because the default admin setting passwords are extremely simple. Those who want to steal bandwidth know all of the ones to try. Once in your router's settings, they can see your wireless password and login. In your case, once you go into your web browser and type in 192.168.1.1, a small sheet will appear asking for your user name and password. The default is no user name, and the password is admin. That's all anyone needs to do to get into your router's settings. So you want to change that.
Enter the router's settings via the browser with the IP address 192.168.1.1 and enter admin as the password. Then go to the correct configuration page to enter a much stronger password. From the manual:

Make sure to write your password down as you will need it to access the router's settings in the future. In case of a lost or forgotten password, the router has a reset button on the bottom which will return it to the factory default settings.
6) Go through the startup motions again. Turn everything off. Turn the modem on and wait for its ready state. Then the router, and lastly the Mac.