Looks like no one’s replied in a while. To start the conversation again, simply ask a new question.

Q's-Wiping/Reinstalling iMac G5 PPC (10.4.11) for donation

My parents recently purchased a new 2012, 21.5” Intel Core i, iMac with OS 10.8 installed.


They wish to donate their old iMac G5 ALS PowerPC (20”) computer to a local charity. It came with OS 10.4 installed and they never upgraded, but did install all Tiger updates to 10.4.11.


Before donation, I want to wipe the hard drive, and then do a clean install of OS 10.4, iWork ’06 and MacFonts2, from their original discs.


Additional information:

> The original RAM (512k) was replaced by 2 - 1 GB cards in Dec ’11.

> The OS X discs are as follows:

Disc 1 = Mac OS X Install Disc 1 Disc 2 = Mac OS X Install Disc 2

Mac OS ver. 10.4 Disc ver. 1.0

AHT ver. 2.5.1 2Z691-5493-A

Disc ver. 1.0 Includes Mac OS 9.2

2Z691-5317-A


Because Apple no longer supports the PowerPCs AND Tiger OS 10.4, the only way I could transfer my parents’ files and maintain their original dates, etc. is by plugging a Fire-Wire 9-6 Pin Cable cord into the iMac G5 PPC, and to a Thunderbolt to Fire-Wire adapter, which in turn, was plugged into my 2012 Mac Mini (OS 10.8). Then by putting the PPC iMac in Target disc mode, I could copy over (almost) all files.


Unfortunately, figuring this all out took a long time, because my background has been in PC’s since 1984. I briefly owned an iMac Pro in 2006 before it was stolen from my car. Unfortunately I could not afford to replace it due to a high deductible on my Homeowner’s Policy.


When my parents purchased their new iMac, I decided to get a Mac Mini, to help them adjust to the jump from Tiger to Mountain Lion, etc.


Here are my concerns:


1. I was able to copy most of the old folders on the PPC iMac to a “holding” folder on the desktop of my Mac Mini.

Then I compared the “Get Info” of the Source file/folder to the Target disc’s file/folder “Get Info”. Most folders copied over with no differences noted.


Should I be concerned about those files that would not duplicate?


How / where can I find out which files are okay, if they aren’t completely duplicated?

(since I will need some application/system files from the copied files).


Examples of these are:

  • System / Library / Frameworks / JavaVM.framework
  • System / Library / PrivateFrameworks / Install.Framework / Versions

System / Library Size
Files

Source folder 1,893,633,028 36,066

Target folder 1,514,639,237 26,653

Difference 378,993,791 9,413

Missing 378,671,851 9,358 Frameworks / JavaVM.framework

Missing 321,940 55 PrivateFrameworks/Install.Framework/Versions

0 0


2. How can I install all the Tiger updates from 10.2 thru 10.11, if I cannot do a clean download straight from Apple.com?


> If I am to copy the updates from the Target disc files that I copied to my Mac Mini, will they be recognized as legal copies?

> If so, how do I identify the correct update files to target? (i.e., are they hidden?).

> How do I find them in the system folders?


3. I don’t want to wipe the hard drive until I know I’ve got the stuff I need to properly reinstall the OS to 10.4.11, afterwards.


Somewhere I read that I might need to use a stand-alone installer so I can target specific files in specific areas.


Can anyone make sense out of all this information?


It is probably very telling that I have a PC background with the kind of questions posed above.

I have Googled many issues and have called AppleCare on my parents behalf to get to this point. I think I am close to being able to wipe the iMac G5, but need some answers and MORE importantly, some MORAL SUPPORT!


Note: my parents will be 80 years old this year, and the new Mac is their 3rd Mac since 1999.

They recently learned how to use a first generation iPad that was given to them. A couple about to celebrate 60 years together and never afraid to learn something new!


Sorry about the length of this query. I will be on and off the ‘net during the next couple of days, but I will get back to any queries for clarification ASAP.

When I’m not working on one of my computers, I volunteer at a local library. THANKS!

Mac mini, OS X Mountain Lion (10.8.4), MS Office:Mac 2011, Pages '09,
Posted on Jun 28, 2013 12:51 PM

Reply
Question marked as Best reply

Posted on Jun 28, 2013 2:16 PM

Hello, good work so far! 🙂

Should I be concerned about those files that would not duplicate?

Yes, use Disk utility while it's in Target mode, try Repair Disk on the PPC's Disk, not Repair permissions.

How can I install all the Tiger updates from 10.2 thru 10.11, if I cannot do a clean download straight from Apple.com?

Software update should work, or...


The combo update for PowerPC-based Macs...

http://www.apple.com/support/downloads/macosx10411comboupdateppc.html


Repair Permissions afterwords, reboot.

14 replies
Question marked as Best reply

Jun 28, 2013 2:16 PM in response to THE Original WYSIWYG

Hello, good work so far! 🙂

Should I be concerned about those files that would not duplicate?

Yes, use Disk utility while it's in Target mode, try Repair Disk on the PPC's Disk, not Repair permissions.

How can I install all the Tiger updates from 10.2 thru 10.11, if I cannot do a clean download straight from Apple.com?

Software update should work, or...


The combo update for PowerPC-based Macs...

http://www.apple.com/support/downloads/macosx10411comboupdateppc.html


Repair Permissions afterwords, reboot.

Jun 30, 2013 6:36 AM in response to BDAqua

First, thanks for your quick response! I was able to "Repair Disk" within the hour of your reply.

BDAqua wrote:


Hello, good work so far! 🙂


Should I be concerned about those files that would not duplicate?


Yes, use Disk utility while it's in Target mode, try Repair Disk on the PPC's Disk, not Repair permissions.


ℹ Notes to others interested in "Repair Disk" step through instituting the "Erase Disk" step:


1. This was a quick process (10-15 mins.?), esp. since this was the first time it was done, that I know of.


2. I was SHOCKED by all the red lines scrolling down my screen. To quickly determine how many lines were generated, I copied the log over to Excel (using unicode text), splitting it over 2 sheets. The entire log had 8,970 lines, half of which were 'errors'.


3. I, too, received the message at the end of the log "Updating boot support partitions for the volume as required." Since "updating" is an active verb, implying "as we speak," and "as required" indicated to me that this is an important step, I naturally waited... and waited... for 4 hours. I figured the log would eventually end itself with a "completed" message.


Researching this cryptic line, led me to others whom have had similar expectations and outcomes (no final line indicating completion). I couldn't get a handle on how long was 'long enough' to wait to get this ending I had expected, esp. considering the almost 4,500 errors.


Earlier when I copied the log, I scrolled up and down the log, cutting and pasting. I had not noticed the lone "Log" button in the upper right corner of this window (it's a black square with yellowish lettering). Willing to scrap this go-round, I decided to click on the Log button. Up popped a screen showing the same as what I had cut-n-pasted before, BUT there was a message printed AFTER the "Updating boot support partitions for the volume as required" step. The wording was such that this repair was now finished, complete with a date and time stamp. The date/time stamp indicated it was finished mere seconds after the generation of the "as required" line.


The log didn't indicate I had forced the process to end, but I couldn't figure out why this last line did not post on the live log window I watched during the repair. So, I repeated the "Repair Disk" step again. This time the process was real quick (under a minute), as no errors were detected. Again, I received the "Updating... as required" message, and nothing after. I waited a few minutes, nothing happened, so I clicked the Log button again. Again the log ended with a finished message and date/time stamp, following the infamous phrase!? What I noted looking different about the finished line, from all others, was that it was not generated on a new line, by itself. There wasn't even the proper amount of spacing between sentences.


Not knowing a lot about a lot, but having had the dubious honor of learning Fortran and COBOL using punch cards, I speculate that this might be a small glitch in the Apple software? After all, there are spelling errors found in operating system software (not naming any names here).


4. The next step was correcting the files/folders that had not completely copied over during Target Disk mode.


During this tedious, day-long process, which was not as straight forward as one would think, I learned a few things. Some folders would not copy over due to lack of permission, but if I opened up these same folders and copied the contents in piece-meal fashion, most did so unheeded. The few that stopped, indicating privileged contents, an administer pop-up asking for my password, which was sufficient to allow the copying to go forward. Ultimately, I was able to make copies of the missing pieces from before.


It was during the process of comparing original folders to copied folders using "Get Info", that I believe there is another glitch. The folder size would not always recompute after having its contents increased through the copying phase. Searching through the forum, other people have noted this, too.


Sometimes (3 or 4 at most), I jarred the size to recompute (I think) by repeatedly right clicking on the size line numbers. Most of the time, I had to go through the folders contents and open each sub-folder's "Get Info," before doubling back and redoing thus on the main folder, to get the size to recalculate. But even that was not always successful. Sometimes, I erased the entire copied folder and then piece-meal copied the source folder's contents to a new target folder


Ultimately, I settled for making sure that the source and the target folders contained the same number of items, because sometimes the target size was off a bit (like 6,148 bytes). I figure better the target to be over than under in size.


5. Once satisfied (i.e., tired of step 4) that all the contents of the old iMac were copied, time to wipe the harddrive. Once again, not as straight forward as I had hoped. I couldn't invoke the reformat to occur while logged onto said computer. Putting in the original OS X disk and then restarting, didn't invoke said reformat. Also, restarting the computer while holding down the command and "r" keys, did nothing. So I put the iMac into Target Disk mode and was able to use the Erase Disk options (no longer greyed out) on the old iMac.


Then, some confusion with the difference between harddrive and volume was next researched (I needed to select the harddrive, because I wanted the entire computer to be wiped).


Finally, ready. However, the Disk Utility/Erase Disk options in 10.8.4 are different from those offered in 10.4.11, which was what I originally researched. No 35x option was offered (not that I would have selected it!), but I did select the 7x option and let it run overnight to see how far this would go. NOT VERY. After 8 hours, the revised time estimate for a 7x wipe was 3 days 2 hours, and the wipe was still on round 1. I stopped the process and changed it to 3x wipe. After 3 hours, the little blue line had gone twice as far as it had in the 8 hours from before. The new estimate is 1 day, 1 hour and the blue line looks to be about 1/12th across.


THUS, the reason I have not marked this thread as "answered" yet, is the processes involved between the steps are taking awhile to complete. (Go figure!).


I do want to thank BDAqua for the advice given that brought me to this point. I intend to post again after using his next step of advice, which appears to be at least a day off from now. 🙂


P.S. From reading the How To's and scanning the forum itself, I hope I have correctly surmised that I can come back and change or add to the "This helped me" rating to "This solved my question"? 😕


Message was edited by: THE Original WYSIWYG

Jul 1, 2013 11:00 AM in response to BDAqua

You could make a complete backup of the g5 harddrive. Connect g5 via target disk mode to some machine.


"Clone, synchronize, backup. Schedule and forget it."

http://www.bombich.com/software/ccc.html


"SuperDuper is the wildly acclaimed program that makes recovery painless, because it makes creating a fully bootable backup painless."

http://www.shirt-pocket.com/SuperDuper/SuperDuperDescription.html


Also, you should be able to do the backup from the command line. Let me know if you want to try & I will try to workup the command line commands.


Robert

Jul 1, 2013 11:50 PM in response to THE Original WYSIWYG

I was so happy returning home to find the reformat phase complete. Now... not so much.


I am stuck at two different points and don't know at which I SHOULD be, and if once there, what to do in order to get the iMac to copy

OS X 10.4 Disc 1 onto the harddrive.

Note: Research indicates that OS X must be present on the harddrive first/before the accompanying software can be installed from Disc 2.


Method #1:

> Inserted Install Disc 1 into the optical drive (built-in side of monitor in a G5 PPC).

> Pushed power button (Held down no keys).

> Language choice screen appears first. Default is English, so I click 'enter.'

> Window titled "Install Mac OS X" appears. It also contains the wording "Welcome to the Mac OS X Installer."

I click "Continue" tab at bottom right of this window.

> At "Software License Agreement" window, click "Continue" tab at bottom right.

> Pop-down screen prompts me to AGREE to terms in order to continue installation.

> "Select a Destination" window shows the harddrive icon to the iMac with a red circle/white exclamation point on it.

> I click on "harddrive" icon (no explanation for red circle was given at this window).

> Message shows up on the Select Destination window indicating Mac OS X cannot be installed on this volume AND

Mac OS X cannot start up from this volume.


>> I can either Go Back, quit Installer by clicking on the Startup Disk button, or click Restart.

OR

>> Use options on the Apple Menu bar at top of monitor screen to do the same. Under Installer, I can select "Quit Installer,"

or chose "Startup Disk" from the Utilities dropdown.


* Restart is self-explanatory.

* Startup Disk brings a new window titled "Choose Startup Disk." There are two icon options to select from.

1. Disk titled "OS X 10.4 Disc 1." - it's title is highlighted in blue, indicating this has been selected automatically.

2. Network Startup (but icon has question mark on it).


Only a "Restart" button is available here. After clicking this button, a popdown asks if I am sure I want to restart the computer

using the OS X Disk to boot. i.e., Cancel or Restart.


Method #2: (Note: research indicated these are the correct icons/options I should see for PowerPC computers.

> Inserted Install Disc 1 into the optical drive.

> Hold the "option"/("alt") key down while pushing the power button on. Hold key until 4 items show up on screen.

> The four items are:

1. Refresh Icon button

2. Square with Disk Icon and "X" on it - titled "Mac OS X Install Disc 1"

3. Square with Disk Icon and tiny monitor on it - titled "Apple Hardware Test"

4. Right Arrow Icon button

> Research indicated that the two options here are:

>> Click the Disk Icon w/ Monitor, followed by the Right Arrow Icon button. (This is to check for possible hardware or software problems).

OR

>> Click the Disk Icon w/"X", followed by the Refresh Icon button.


When I do the second step (X & R), it results in the same results as Method #1.


Q: What special chant must I say to make the installation disk install onto the iMac's harddrive?

Note: I did both a Utility Disk Verify on the harddrive AND the Apple Hardware Test (long version), with no problems noted at all!


Q. I found an archived Q&A on the Tiger 10.4.11 forum that made reference to downloadable instructions for reformatting and reinstalling Tiger.

But, like several other archived Q&A's, when I clicked on the link, it took me back to Apple's main Support page.

I'm guessing because Apple no longer supports Tiger, that all links relating to Tiger are severed. Are these Archived pages only available to forum participants whom have achieved high Levels? The Mac OS X 10.4.11 Combo Update for PPCs link appears to have the very information I looked for ad nauseum during Jan/Feb/Mar of this year, and never found!

Niel (Level 10) Feb 4, 2007 @ 2:34 am (Link is titled "this article" and appears in the 2nd entry of this discussion thread)

https://discussions.apple.com/thread/842055


Thank you once again BDAqua for your timely answer and suggestions. When I read your reply, the 3-pass was almost 1/3 complete, so I decided to hang in there and wait. I did do another repair on the harddrive afterwards, and it appears to be fine. our explanation of the use of solved and helpful feedback was appreciated too. I dont' want to use them up too soon, and it appears the options stay open until someone selects one.


Also rccharles I appreciate your suggested software packages that could help with the duplication of the entire harddrive. I did use the Target Disk Made, through Firewire to Thunderbolt with my Mac Mini and most of the folders copied over 100% problem free the first time, but there always seem to be stragglers out there!


Will tackle this all again in the a.m.

Jul 2, 2013 10:12 AM in response to THE Original WYSIWYG

OK, sounds like the IntelMac formatted it GUID, PPC Macs need APM Partition scheme.


1. Insert the Mac OS X Install disc, then restart the computer while holding the C key.

2. When your computer finishes starting up from the disc, choose Disk Utility from the Installer menu at the top of the screen. (In Mac OS X 10.4 or later, you must select your language first.)

*Important: Do not click Continue in the first screen of the Installer. If you do, you must restart from the disc again to access Disk Utility.*

3. Click the Erase tab.

4. Click the disclosure triangle to the left of the hard drive icon to display the names of your hard disk volumes and partitions.

5. Select your Mac OS X volume.

6. Highlight the drive, select Partition Tab, then Format type... MacOS Extended Journalled, APM Partition scheme.


How to format your disks...


http://www.kenstone.net/fcp_homepage/partitioning_tiger.html


Thanks to Pondini, Formatting, Partitioning, Verifying, and Repairing Disks...


http://Pondini.org/OSX/DU.html

Jul 2, 2013 11:03 AM in response to THE Original WYSIWYG

I was so happy returning home to find the reformat phase complete.


From reading reading of earlier posts, you did an erase. You may have to format the hd with a filesystem.


Boot from installation cd. after language, you will see a utilities pull down. Pick disk utility & format hd.


Method # 1 and Method # 2


are the same as for as installation of of x. The difference is how you boot the machine. First is default boot, second is custom boot.


red circle


It's international. It's not allowed.


combo update is here:

http://support.apple.com/downloads/Mac_OS_X_10_4_11_Combo_Update__PPC_


The word download appears to the upper right. For some reason, it's in French? today.


User uploaded file


I downloaded MacOSXUpdCombo10.4.11PPC.dmg and install this update sucessfully about a week ago.


--------------------------------------------------------------


Format a disk


  1. Insert your startup DVD into your reader. Power down your machine. Hold down to the c key. Power on your machine. This will bootup your startup DVD.
  2. This will bring you to a panel asking you for your language. Pick your language.
  3. User uploaded file


  4. You you come to the Install Mac OS panel. Do not install.
  5. Click on Utilities menu item. This will give you a pulldown list of utilities.
  6. Click on the disk utility.
    User uploaded file


Start up disk utility.
On the left pane view, you will see a list of all your disks. Click on the disk.
Click on the partition tab.


User uploaded file


You will now see how your disk is currently set up. Fill in the information as appropriate. You should pick Mac OS Extended (Journaled).


Click on Options...


User uploaded file


Select Apple Partition Map to boot a PPC.


More details on formatting.
http://www.kenstone.net/fcp_homepage/partitioning_tiger.html

Jul 2, 2013 10:38 PM in response to BDAqua

Once again, thank you BDAqua, for your help.

I followed your steps listed, but with a few tweeks, probably due to this iMac being both a PowerPC AND with Tiger OS X.

BDAqua wrote:


OK, sounds like the IntelMac formatted it GUID, PPC Macs need APM Partition scheme (modified for Tiger-based PowerPC iMac)


1.Connect iMac PPC to Mac Mini using FireWire 9-6 Pin Cable and Thunderbolt Adapter combo.

2. Insert the Mac OS X Install disc, then restart the iMac PPC while holding the "T" key (to put into Target Disk Mode).

3. When iMac PPC has large FireWire symbol on its monitor, release key.

4. Open Finder window on Mac Mini; look for orange harddrive w/FireWire symbol under "Devices" (after "Applications").

5. Still in Finder window, click on Applications, open Utilities folder, then choose Disk Utility.

6. Left column of Disk Utility window shows (at minimum):

* HD icon for Mac Mini.

> HD icon for volume partition(s) on Mac Mini HD.

* Orange HD icon w/FireWire symbol for iMac G5 PPC.

> Orange HD icon w/FW symbol for iMac partition(s)

* Disk icon, titled for manufacturer of iMac's optical drive

> Disk icon, titled OS X Install Disc 1

*** Select orange HD icon w/FW symbol for iMac G5 PPC ***

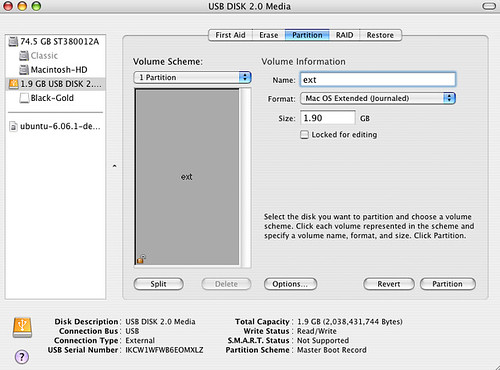
7. Click the Partitions tab (middle of 5).

8. Under Partition Layout, click down arrow next to word "current." Click on "1 Partition" (minimum).

9. Under Partition Information

Name - name the partition,

Format - select Mac OS Extended (Journaled)


10. Under the volume schematic, click on Options button.

11. Pop-up window shows 3 options, select Apple Partition Map (APM) and click on OK button.

12. Click on Partition button on bottom right of window.

13. Pop-up window asks about additional options. Leave the default.

14. Click Yes when prompted "Are you sure...".


I *think* I have installed Disc 1 onto the iMac's harddrive (disk), but am not totally sure. There was a lot of doing and un-doing of steps, as I stumbled into realizing that the Tiger's Disk Utility version does not offer an "Options" button, and only through putting it in Target Disk Mode, with my Mac Mini, would it be available.


Once the partition was reformatted using APM, I found I could install Disc 1, using different methods:

1. Booting up the iMac while holding the "C" key, then using the Installer window that previously was not available to me. OR

2. Putting the iMac in Target Disk Mode and through the Mac Mini's Disk Utility's RESTORE tab, drag the iMac's single partition/volume to "Destination" line and drag the iMac's Optical Drive' OS X Install Disc 1 icon to the "Source" line.

At some point I did watch the iMac's progress bar indicating the Disc was being installed, but it never asked for Disc 2 and all efforts to reboot the iMac both with or without the Install Disc in the optical drive, resulted in a gray screen with the Apple motif and a never-ending "boot" circle.


My brain is fried and confused right now. It needs a reboot worse than the iMac. Any more ideas of what I might be missing or doing incorrectly?


Thanks again for your help!

Jul 3, 2013 10:35 AM in response to rccharles

rccharles wrote:


Tiger's Disk Utility version does not offer an "Options" button, and only through putting it in Target Disk Mode, with my Mac Mini, would it be available.


DVD must have come out before the newer Intel macs arrived. So no need to ask about partitioning type. ( There was fat32 format, but maybe that was done differently. )


Robert


That sounds plausible. It was purchased in June 2005 and was Apple's last PPC model & discontinued March 2006.

The Intel version of the G5 was marketed in January 2006.


Having worked with pcs since 1984 - and experienced their MANY growing pains first hand - it's ironic how much Apple started to act like Microsoft (issuing updates, new versions, etc. almost before the market is technically ready for it), once it contracted with Intel in 2005. Before then, the Apple products seemed inpenetrable to the many problems affecting Microsoft products. Being the designated iMac troubleshooter for my parents over the past few years, has opened my eyes to the overall shift in Apple's approach. There is definitely a (small?) contingent of folks out in the WWW, who are still disgruntled over the changes.


Of course, IMHO.

Kim

Jul 3, 2013 3:19 PM in response to BDAqua

Success!! As I am replying here, the iMac G5 PPC is downloading the Mac OS X Update Combined (PowerPC) directly from Apple.com


THANK YOU, THANK YOU! If you had not responded when you did to my original questions, I would have given up.


Now, for anyone following this thread and wondering what happened:

> I put the iMac into Target Disk Mode and re-partitioned "the" Disk (harddrive); then "ejected" the iMac through Finder.

> Next I "reset the PRAM" (see http://support.apple.com/kb/HT1379 for the instructions).

> Before powering off the iMac, I inserted the Install Disc 1 into the iMac's optical drive (DVD drive).

> As I heard the opening ring sound of the iMac as it powered on, I held down the "C" key, and only released it when the apple logo appeared

on the grey screen. Soon after, the circular downloading symbol appeared, and after a few more moments, the Installer Window appeared on screen.

> Now I could follow the instructions in this Installer Window, as the iMac's harddrive was properly formated/partitioned and ready to accept installation.

> Disc 1 took about an hour and then powered off the iMac. When powered back on eventually a pop-up screen indicated I should insert Disc 2.

> I tapped the "eject" key until Disc 1 popped out. Insert Disc 2 and wait a few minutes for new disc to be recognized.

> Followed instructions on screen, restarted iMac when directed. Then after connecting with internet, notice of available software updates appeared in drop-down menu.


I am impressed with Apple's Software Update service. It is an inclusive list - even Java updates are addressed here.

Call me paranoid from past and current issues with Microsoft updates, but I chose to install these updates in a piece-meal fashion.


First and by itself, I ran the Mac OS X Combo Update, then restarted the iMac.

Next I chose 4 more updates, including the earliest of the Java updates.

Following that I installed 4 more, and then the final 3.


Next I plan to install the previously purchased software (iWorks & MacFonts) AND THEN, the iMac is ready to be donated! 🙂 😀 😁

Q's-Wiping/Reinstalling iMac G5 PPC (10.4.11) for donation

Welcome to Apple Support Community
A forum where Apple customers help each other with their products. Get started with your Apple ID.