Hi mbarmby,
Happy New Year! If you have enough storage space on your respective computers, and you use the same software programs, I would suggest the following:
1) Use Migration Assistant to copy your user account (home folder) from your computer to your wife's computer using an Ethernet cable. Confirm that you can switch into your user account on your wife's computer.
2) Use Migration Assistant to copy your wife's user account to your computer. Confirm that her account is working on your computer.
3) Once you have confirmed that your information has migrated, you can delete you and your wife's original user account from both computers.
Here is some detailed information on using Migration Assistant:
Move your data to a new Mac - Apple Support
http://support.apple.com/en-us/HT5872
Migration Assistant transfers your accounts, documents, and settings from another computer to your Mac.
Setup Assistant opens the first time you start up a new Mac. It helps you enter your information about your network, and guides you through setting up a user account on your computer. Use it to transfer user accounts, settings, and documents from another computer to your Mac. If you don't use Setup Assistant to transfer information when you first set up your new Mac, you can do it later using Migration Assistant.
Migration Assistant in Mavericks and Yosemite can transfer information from other computers that have OS X Snow Leopard v10.6.8 or later installed. If you're migrating from a computer with an earlier version of OS X, update your older computer first, or manually copy your data from one computer to another.
If you're migrating from a Windows-based PC to a Mac, you can use the Windows Migration Assistant as part of this process.
- If you're using a Mac notebook, make sure its power adapter is connected and plugged in.
- Use Software Update on both the source and destination computers to confirm that the latest updates are installed.
- On the source (original) Mac, make sure that you have updated your third-party software before migrating.
- On the source Mac, open System Preferences, click Sharing, then make sure you've entered a name in the Computer Name field.
As part of setup or migration, you might be asked if you want to use FileVault. FileVault encrypts your startup drive. This helps to prevent others from viewing information stored on your computer without the right user name and password. If you change your mind after setup or migration, you can enable or disable FileVault from the Security & Privacy pane of System Preferences at any time.
If your new Mac already has a user account with the same name as one you're trying to transfer, Migration Assistant lets you decide what to do. You can either replace the existing user on your new Mac, or give the user you're migrating a new account name.
Selecting the option to replace an existing user overwrites that user's Home folder on your new Mac. This can be convenient if you just set up your new Mac using the same account name and of your important data is still on your original Mac. Don't select the option to replace the existing user unless you're certain you don't have any important files stored in this user's Home folder on your new Mac.
If you're migrating user accounts, music, documents, and other files from a computer you no longer plan to use, you might want to do these things:
- If the computer you're no longer using has content purchased from the iTunes Store, you should deauthorize it.
- If the Mac you're no longer using is signed into iCloud, turn off "Find My Mac" if it's on, and sign out of iCloud from the iCloud pane of System Preferences before selling or giving it away.
- Make sure both of the Macs you're using are connected to the same network, either wirelessly or using an Ethernet cable.
If your network connection is slow, you can connect a single Ethernet cable between your two computers at any time during migration to transfer information. Migration Assistant detects the new connection, and automatically switches to Ethernet without having to start your migration over again.
- On your new Mac, open Migration Assistant. You can find it by choosing Go > Utilities, or using Spotlight or Launchpad.
- Once the Migration Assistant window opens, click Continue.
- Enter an admin password when prompted, and click OK.
- On your older Mac, open Migration Assistant.
- Once the Migration Assistant window opens, select the option to migrate your data "To another Mac", and click Continue. Enter an admin password when prompted.
- Select the system that you want to migrate from, then click continue. The continue button will be unavailable (dimmed) until you select a source.
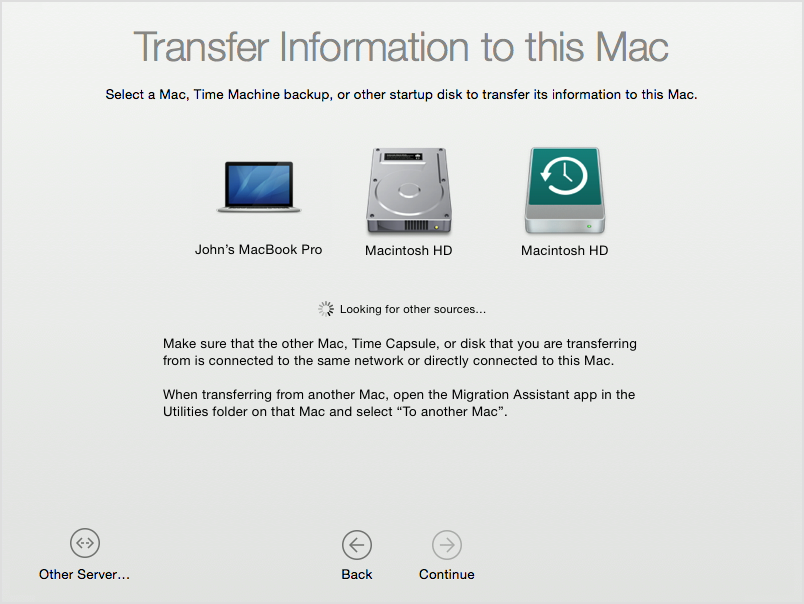
- If you see a security code appear, confirm the same security code is displayed on both of your computers. Then, click Continue on the source computer.
- You can customize the type of information that is migrated on the next screen. If you want to transfer only a portion of an account, deselect anything you don't want migrated. If there is more than one user on your original Mac, you can click the triangle next to a user's icon and deselect anything you don't want to migrate for specific users.

- After you click Continue, the Migration Assistant begins transferring files to your new Mac. The amount of time that it takes for migration to complete depends on the amount of data being copied, and the speed of the connection.
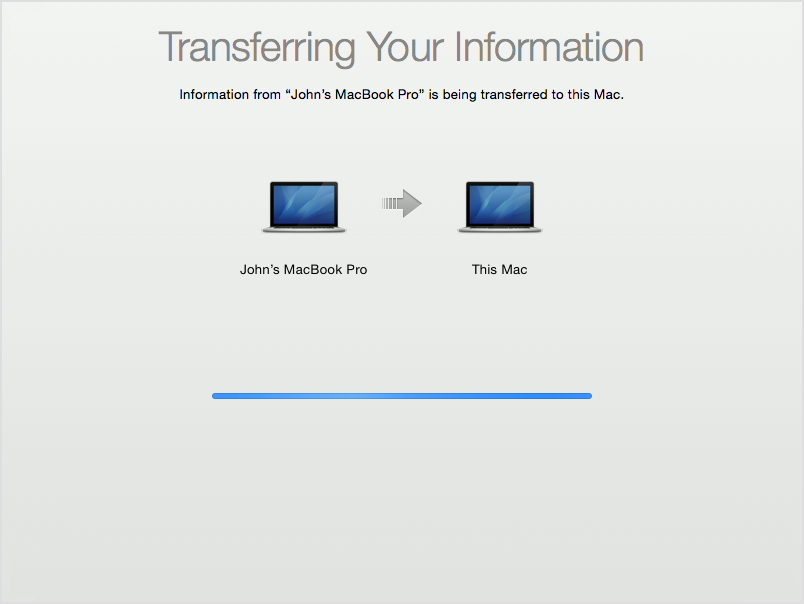
When migration finishes, the login window reappears. Log into the migrated account on your new Mac to see your files.
I've included information below for deleting a user account on OSX version 10.10, which is Yosemite:
OS X Yosemite: Delete a user
http://support.apple.com/kb/PH18890
I hope this information helps ....
- Judy
