You can make a difference in the Apple Support Community!

When you sign up with your Apple Account, you can provide valuable feedback to other community members by upvoting helpful replies and User Tips.

Looks like no one’s replied in a while. To start the conversation again, simply ask a new question.

Mac OS X can't install on this computer MacBook Pro Mid 2009

Hello,


This is probably my first post here in a long time.


Here's my situation:


I want to play some older games on my MacBook Pro Mid 2009 (i.e. StarCraft, WarCraft III) and these games will not work in the current version of OS X (Yosemite). Through all the research I've done, these games should work in Snow Leopard. Now, from my understanding, the original OS that came with this MacBook Pro was Leopard (10.5.x), so I shouldn't have a problem installing 10.6.3 on a separate partition, right?


Specs of the MacBook Pro currently:

OS: 10.10.3

Processor: Core 2 Duo 2.53GHz

Memory: 8 GB 1333 MHz DDR3

Call sign: MacBook Pro (15-inch, 2.53GHz, Mid 2009) MacBook 5,4


So I've put the installer image on a 16GB SD Card (formatted as MacOS Extended, Journaled, using GUID partition map) and was able to boot to the installer. I get to the "Choose a language" screen and choose English... Goes to the screen "Preparing for installation" then says "Mac OS X Cannot be installed on this computer"


I also put the installer on a separate partition as well on the internal HDD, but got the same results.


Is there something in the Current OS that is preventing me from doing this?

Posted on May 13, 2015 4:23 PM

Reply
Question marked as Top-ranking reply

Posted on May 13, 2015 4:30 PM

The installer sees your current Yosemite volume. You need to set the destination for Snow Leopard to the partition on which you will install Snow Leopard. If you don't have a new partition on the drive for Snow Leopard, then you will need to create one before you can do any installation.


To resize the drive do the following:


1. Open Disk Utility and select the drive entry (mfgr.'s ID and size) from the left side list.


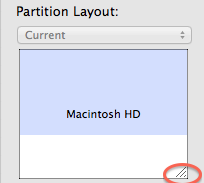
2. Click on the Partition tab in the DU main window. You should see the graphical sizing window showing the existing partitions. A portion may appear as a blue rectangle representing the used space on a partition.

User uploaded file


3. In the lower right corner of the sizing rectangle for each partition is a resizing gadget. Select it with the mouse and move the bottom of the rectangle upwards until you have reduced the existing partition enough to create the desired new volume's size. The space below the resized partition will appear gray. Click on the Apply button and wait until the process has completed. (Note: You can only make a partition smaller in order to create new free space.)


4. Click on the [+] button below the sizing window to add a new partition in the gray space you freed up. Give the new volume a name, if you wish, then click on the Apply button. Wait until the process has completed.


You should now have a new volume on the drive.


It would be wise to have a backup of your current system as resizing is not necessarily free of risk for data loss. Your drive must have sufficient contiguous free space for this process to work.


Clean Install of Snow Leopard


1. Boot the computer using the Snow Leopard Installer Disc or the Disc 1 that came

with your computer. Insert the disc into the optical drive and restart the computer.

After the chime press and hold down the "C" key. Release the key when you see

a small spinning gear appear below the dark gray Apple logo.


2. After the installer loads select your language and click on the Continue

button. When the menu bar appears select Disk Utility from the Utilities menu.

After DU loads select the hard drive entry from the left side list (mfgr.'s ID and drive

size.) Click on the Partition tab in the DU main window. Set the number of

partitions to one (1) from the Partitions drop down menu, click on Options button

and select GUID, click on OK, then set the format type to MacOS Extended

(Journaled, if supported), then click on the Apply button.


3. When the formatting has completed quit DU and return to the installer. Proceed

with the OS X installation and follow the directions included with the installer.


4. When the installation has completed your computer will Restart into the Setup

Assistant. After you finish Setup Assistant will complete the installation after which

you will be running a fresh install of OS X. You can now begin the update process

by opening Software Update and installing all recommended updates to bring your

installation current.


Download and install Mac OS X 10.6.8 Update Combo v1.1.

14 replies
Sort By: 
Question marked as Top-ranking reply

May 13, 2015 4:30 PM in response to Tnelson832

The installer sees your current Yosemite volume. You need to set the destination for Snow Leopard to the partition on which you will install Snow Leopard. If you don't have a new partition on the drive for Snow Leopard, then you will need to create one before you can do any installation.


To resize the drive do the following:


1. Open Disk Utility and select the drive entry (mfgr.'s ID and size) from the left side list.


2. Click on the Partition tab in the DU main window. You should see the graphical sizing window showing the existing partitions. A portion may appear as a blue rectangle representing the used space on a partition.


User uploaded file


3. In the lower right corner of the sizing rectangle for each partition is a resizing gadget. Select it with the mouse and move the bottom of the rectangle upwards until you have reduced the existing partition enough to create the desired new volume's size. The space below the resized partition will appear gray. Click on the Apply button and wait until the process has completed. (Note: You can only make a partition smaller in order to create new free space.)


4. Click on the [+] button below the sizing window to add a new partition in the gray space you freed up. Give the new volume a name, if you wish, then click on the Apply button. Wait until the process has completed.


You should now have a new volume on the drive.


It would be wise to have a backup of your current system as resizing is not necessarily free of risk for data loss. Your drive must have sufficient contiguous free space for this process to work.


Clean Install of Snow Leopard


1. Boot the computer using the Snow Leopard Installer Disc or the Disc 1 that came

with your computer. Insert the disc into the optical drive and restart the computer.

After the chime press and hold down the "C" key. Release the key when you see

a small spinning gear appear below the dark gray Apple logo.


2. After the installer loads select your language and click on the Continue

button. When the menu bar appears select Disk Utility from the Utilities menu.

After DU loads select the hard drive entry from the left side list (mfgr.'s ID and drive

size.) Click on the Partition tab in the DU main window. Set the number of

partitions to one (1) from the Partitions drop down menu, click on Options button

and select GUID, click on OK, then set the format type to MacOS Extended

(Journaled, if supported), then click on the Apply button.


3. When the formatting has completed quit DU and return to the installer. Proceed

with the OS X installation and follow the directions included with the installer.


4. When the installation has completed your computer will Restart into the Setup

Assistant. After you finish Setup Assistant will complete the installation after which

you will be running a fresh install of OS X. You can now begin the update process

by opening Software Update and installing all recommended updates to bring your

installation current.


Download and install Mac OS X 10.6.8 Update Combo v1.1.

Reply

May 13, 2015 5:06 PM in response to Kappy

@Kappy, I have a created a separate partition to install Snow Leopard on, but the same thing still happens after booting to the installer and choosing language.


Here is what Disk Utility is showing me:

User uploaded file

As you can see, I have plenty of HDD space available. What else is there to do?

Reply

Jul 2, 2016 11:57 PM in response to Kappy

Hey Kappy,

I followed your steps and when I booted from holding down "C" key an error log came up:

User uploaded file

What really freaked me out was when it said "Mac OS Version: not yet set" (second last 2 lines) and I rebooted my mac and it showed a folder with a question mark in the middle. I took it to Apple and they said all the data is gone BUT I made a backup 🙂 so they put the backup on the mac and all is fine.

Is there a way to do it without wrecking a new MBPro?

Reply

May 13, 2015 5:24 PM in response to Kappy

That's the thing, I'm not even getting to that point. As soon as I choose the Language, it shows that it's preparing installation, then spits out the message: Mac OS X Cannot be installed on this computer. And the only options are to Restart or Recover from a back up. The window doesn't say why it can't install, just says that it can't. Maybe it's the installer I'm using?

Reply

May 13, 2015 5:55 PM in response to Tnelson832

Here's what I find. I get to a window in which all available volumes are displayed as icons. Invalid volumes have a yellow triangular badge. That means you cannot install on that volume as-is. You also should have a screen menubar at the top with one menu labeled Utilities. Select the desired volume, then select Disk Utility from the Utilities menu. Re-format the volume on which you want to install Snow Leopard. Be sure you select the Mac OS Extended, Journaled format option. Click on the Apply button. Upon completion you should now be able to install on that volume. If you cannot, then it's because the Snow Leopard volume you have cannot be used to install Snow Leopard on the computer model you have. You can install 10.5.7 from the original discs or 10.5.8 from a retail set of Leopard or the retail version of Snow Leopard - 10.6.3.

Reply

May 13, 2015 11:01 PM in response to Tnelson832

So, based on these images you are not seeing a menubar as you should? Are you booting from a completely separate disk like a DVD or a flash drive? This will not work if you are trying to boot from that third partition you have. You need to boot from a separate drive. Otherwise, I don't see why it won't work having done this dozens of times myself. 😕

Reply

May 13, 2015 11:15 PM in response to Tnelson832

Well, the images you have posted are not the same as what I saw on my computer. There is a menubar at the top of the screen. Once you click the Continue button at the bottom of the language screen, the next screen is where you would select the destination and has three buttons: Back, Options, and Continue. I don't see any of those in your second image.

Reply

May 14, 2015 12:29 PM in response to Tnelson832

Is the disk a gray or white disk. Gray disk is the original that came with the macbook but it has to be for your specific model macbook. Disc for another model will give you that error. The white would be a retail version that should install. Also where did you get the installer image from? The image might just be for another mac.

Reply

Mac OS X can't install on this computer MacBook Pro Mid 2009

Welcome to Apple Support Community
A forum where Apple customers help each other with their products. Get started with your Apple Account.