Oddities with deinterlacing some vintage video
Hello all.
I have some beautiful but old video footage that I need to use in a project. I have been told that bet tool/plug-in currently available is Fields Kit (FK) Deinterlacer. It's made by RE:Vision.
So I purchased it having heard miraculous tales.
I'm usually fairly good at learning new tricks but the manual for using it has me flummoxed. In particular the part about extending the length of a sequence manually first.
Here are the instructions. if someone could explain it to me and how it applies to deinterlacing in FCP 7 I would be immensely grateful.
Here goes:
1) Select the Source Layer to Deinterlace Source Layer : The current layer to which the filter is applied will be deinterlaced. Disclaimer: A plugin cannot by itself extend the duration of a clip. It needs help from the user and the usage of an external layer. Make sure to read the application note on how to extend the duration when applying a RE:VIsion Effects plugin.
Here is the "application note"
The plugin shows up in the submenu “Effects->Video-> Filters->REVision plugins.”
IMPORTANT: A plugin by itself cannot extend the duration of a layer or sequence it is applied to. If you are making the duration of a piece of footage longer you will first need to put your footage in a sequence that is the correct final duration. Make sure this intermediate sequence is extended to the correct final duration with valid frames (To “trick” the plugin into producing a frame for ALL of the extended sequence). This is a necessary FCP workaround. Each frame must be unique, or FCP will not rerun the plugin on each frame. As such you cannot use the Slug or Gradient video generator.
We now suggest that you extend the clip by simply appending multiple copies of the original clip along the timeline in the intermediate sequence. This will create a new and different frame at each point in time. Now apply the plugin to this intermediate extended sequence inside of another sequence.
Having different input and output frame rates using the plugin is not supported by Final Cut Pro.
For example, let's say we want to apply a RE:Vision Effects time-extending plugin to a 10 second sequence, and that the final sequence will be 30 seconds.
FCP Figure 1.First we make an Intermediate clip and extend the source clip by adding 20 seconds of the original footage. Because the original clip is 10 seconds, we need to add two more copies of the clip.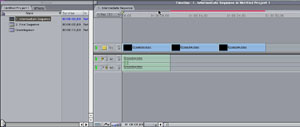
(click to enlarge)
FCP Figure 2. The plugin should then be applied tothe Intermediate sequence inside of another sequence.
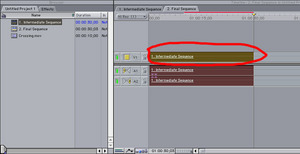
(click to enlarge)
So if someone can explain how this pertains to deinterlacing and how I apply the plugin to a clip (or the duplicate clips) so that the final video is deinterlaced and in the progressive format I'll be forever in your debt.
For those truly seeking sainthood the link to the manual is here:
http://www.stadionvideo.it/materiale/IED/FieldsKitV2Manual.pdf
Thank you - thank you - thank you