Most of the time you can't really tell if the emitter is conforming to an image IF the speed parameters are set to anything but 0. Other "problems" occur if your emitted object is too large to fit within the image mapping (Emission Alpha Cutoff) and whether you've set the Arrangement to Tile or Outline. Usually Random Fill is the best to use. Also, the "Image" shape can be just about anything in Motion, a Shape, and image, Text, etc... just about anything. You shouldn't need to pull in an image of text from another application - just pick your font and type your text right in Motion.
Try these steps:
1 - create a rectangle. In the Shape > Geometry tab, dial down the Size parameter and set Width 20; Height 50; and set the Roundness to 20. (These do not need to be exact...) (if you're using an older version of Motion than 5.2.x, scale the rectangle down to those approximate dimensions or manually set the Points parameters.)
2 - center the shape in the Canvas (Properties tab - hit the Reset icon [backward turned arrow])
3 - Type E or click the Emitter icon under the canvas. (If you centered the shape, the emitter will automatically be centered.)
4 - Type your text in the canvas and set its size to around 150 and click the center alignment icon.
In Properties > center it in the canvas (reset icon...)
4 - Select the Emitter. In the Emitter inspector:
Shape: Image
Arrangement: Random Fill
Image Source: drag your text layer into the well
Emission Alpha Cutoff: 100%
check the 3D option
Set Emission Latitude to 90°
Emission Longitude and Emission Range to 0°
In Cell Controls:
Birth Rate: 10000 (play with this setting later)
Birth Rate Randomness - play with this and BirthRate settings later
Initial Number: 0
Life: 0.5
Life Randomness - play with this and Life settings later
Speed: 180
Speed Randomness: ~50 to start
Angle Randomness: 6°
Spin Randomness: ~7° to start
Check Additive Blend
Color Mode: Over Life
Color Over Life Gradient:
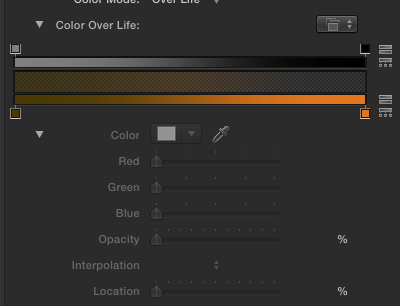
[This is a 50% grey to 0% grey gradient on top (opacity) and a 25% yellow [25% red and green; 0%blue] to Orange [red .9; grn .5; blue 0]
color gradient underneath -- doesn't have to be exact and can be played with later -- example - try blue hues for a methane flame 😉 ]
5 - With the Emitter selected in the Layers list, add a Behaviors > Particles > Scale Over Life.
In the Scale Over Life behavior inspector, set: Scale at Birth: 150%/ Scale at Death: 25% (to start...)
6 - Start Playing. The emitter will be moderately displaced due to the way font metrics differ from the rest of the illustration world. Select the text layer and in the Text > Format inspector, adjust the Baseline downward until the text and the emitter align vertically. [You remembered to center everything setting it up, didn't you?] The Text layer should be above the emitter (but it doesn't have to be -- adjust the opacity of the flames lower!! or play with the Emitter's or its parent group's blend mode! Hard Light works well on white text.)
You should see something like:
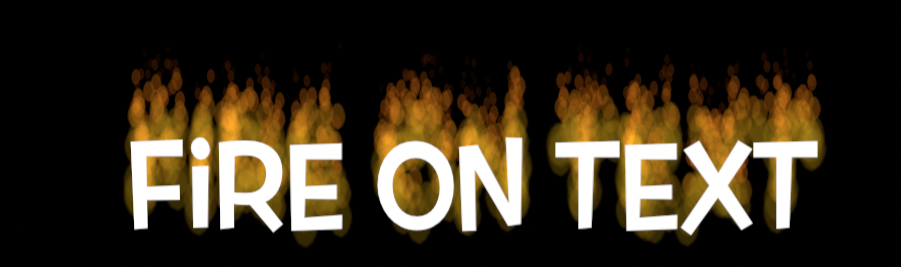
which will look considerably more realistic while playing. If you like you can feather the original rectangle shape a few points to help blend everything together.
There's dozens of ways to build fire in Motion - this was just the quickest (and perhaps "cheesiest") way. In the Library, there are Trueflame images and wisps and other types of sources you can put together to create flame shapes (or you can draw your own with the pen and paint stroke tools). You can animate a series of shapes to emulate flame behavior and have the emitter *play* the frames of the animation for each emitted object... etc... as advanced as you'd like to get.... but this little set of directions should get you started on your way.
BTW - to move or reposition all this effect to other parts of the canvas, select the Groups containing the text and the emitter and Command-Shift-G to make another parent group containing both. Use the Position/Rotation controls of this parent group to reposition the effect. (You might have to collapse the "inner" groups before grouping will take effect.) This way, everything stays aligned together.
HTH