3D doesn't interact with 2D, unfortunately, so you have to find a workaround to put 2D into a 3D scene.
One way to do that is to create what could basically be thought of as a customized 3D drop zone which involves using what would normally be a Texture option as a custom image drop well. I'll try to walk you through it:
Create a new Text object and when you have the blinking text cursor in the canvas, type Command-Control-Space. In a couple of seconds or so, the Unicode character picker *should* appear. In the Search field, type: "full block" (without the quotes.) You should see a character that looks like this: ▄... Double click on it, it should be entered in the canvas at the text cursor. (If not, select it in the character window and Copy then Paste in Motion.)
In the Text inspector > Format, set the text size to as large as you need (example: within the Radius of the circle path.)
In the Text inspector > Appearance > Material, change to Multiple. Select the Front Edge or anything to the right and click the link buttons to everything to the right of front edge. Change that substance to Generic and dial the Opacity down to zero.
For the Front, select it; Change the substance to Generic and for the Surface, select Image.
*I'll leave that there for a minute...
Create a new group (organizationally better if at the top level, so right click at the bottom of the layers list and select New Group from the popup.) Select the new group and add your 2D object, illustration, animation, etc... into the group. If you've already added a camera, select the new group and in the Group inspector, set it Flatten if you want to keep it 3D or set it to 2D (and I've found Fixed Resolution usually serves best... but not definitively necessary.)
The thing about using images for a 3D surface - and this is very important - where there is alpha (transparency), that alpha will also be in the 3D "texture". Also, in general, you need to *define* a boundary to the pattern/texture (2D object, illustration, animation, etc) to the design, shape, object, etc. you will be applying as the 3D texture (still with me???)
As an example: draw a circle. Fill the circle with a solid color. To to Properties and Center it in the canvas. Now, draw a Rectangle with a size larger than your circle shape. Set the Outline to 1 px. Turn off the fill. Move it behind (I know - even though it's transparent, put it in the background! Something in the 3D texture positioning "engine" in Motion will keep it from centering easily otherwise.)
Now, go back to your Full Block Character > Appearance > Subsance > Image Options > Image source well and drag the Group you created your "texture" to it. If you set the background rectangle size large enough, it will not matter if the Wrap mode is repeat, you just want enough of your artwork to fill the size of the surface of the 3D character.
Now when you play your orbit animation, you should see the text move around the front and then behind of the center object :
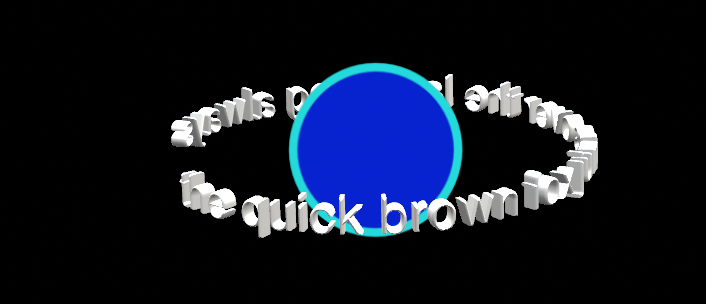
and the 2D object still looks 2D even though it is actually the square shaped Full Block character from unicode (notice the alpha of the circle shape still applies.)
If I didn't explain this well enough, let me know... I'll give it another shot.
HTH