To resize the drive do the following:
1. Restart the computer and after the chime press and hold down the COMMAND and R keys until the menu screen appears.
After the main menu appears select Disk Utility and click on the Continue button. Select the hard drive's main entry then click on the Partition tab in the DU main window.
2. You should see the graphical sizing window showing the existing partitions. A portion may appear as a blue rectangle representing the used space on a partition.
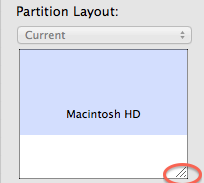
3. In the lower right corner of the sizing rectangle for each partition is a resizing gadget. Select it with the mouse and move the bottom of the rectangle upwards until you have reduced the existing partition enough to create the desired new volume's size. The space below the resized partition will appear gray. Click on the Apply button and wait until the process has completed. (Note: You can only make a partition smaller in order to create new free space.)
4. Click on the [+] button below the sizing window to add a new partition in the gray space you freed up. Give the new volume a name, if you wish, then click on the Apply button. Wait until the process has completed.
You should now have a new volume on the drive.
It would be wise to have a backup of your current system as resizing is not necessarily free of risk for data loss. Your drive must have sufficient contiguous free space for this process to work.