Samsung SSD 850 Pro Help

Hi,


I recently bought and install the Samsung SSD 850 Pro 256GB into my mid 2012 13" MacBook Pro. Everything seems to be working fine; however, when i run the black magic speed test i am only getting between 30-100 Read and 100-250 Write speeds.


The way i installed it was:


- Removed original HD

- Installed SSD

- Connected HD via sata/usb

- Booted and press Command and R key

- Disk Utility->Erase->Mac OS Extended Journaled

- Reinstalled Mac OS X

- Migration Assistant


I am fully able to use my computer as before but i thought i would be getting up to 500 MB/s for each.


Is there something I can do to get the speeds up to where they should be?


Thank you,


Chris

MacBook Pro, OS X El Capitan (10.11.3)

Posted on Mar 2, 2016 7:28 PM

Reply
11 replies

Mar 2, 2016 8:07 PM in response to vanderveenc

Hi Vanderveenc:


Do you have TRIM enabled? You are running El Capitan and it supports TRIM.

Trim help with performance.

See the following article. http://www.thessdreview.com/daily-news/latest-buzz/garbage-collection-and-trim-i n-ssds-explained-an-ssd-primer/

Also it is very important to have about 10% of your SSD free to allow for garbage collection.


To enable TRIM, first save all your open documents as this will reboot your Mac.

1) launch Terminal.

2) Type "sudo trimforce enable".

3) Confirm that you want to enable trim.

4) Reboot your Mac.


To verify that TRIM is enabled, click the Apple icon in the top left of your screen. Choose "About this Mac" -> "System Report" -> "SATA/SATA Express" and look for the entry "Trim Support". It should say "yes" if trim has been enabled.


Kim

Mar 2, 2016 8:13 PM in response to vanderveenc

vanderveenc wrote:


Thanks so much! This worked perfectly! Ran a speed test and the speeds were in the 500s!


Thank you for your help!

Surprising. Good work KimUserName


There are many reports of problems with the Samsung SSD 850 Pro on Mac. They state PC but not Mac specifically.


MacBook Pro (15-inch Mid 2012), OS X El Capitan(10.11.3), i7 480GB SSD 16GB RAM iPhone5 iOS9.2.1, Parallels10.0.2

Mar 2, 2016 8:15 PM in response to vanderveenc

I think you did not prepare the drive properly. If you have the original drive that was in your MBP, then install it in an external enclosure if you haven't done so already. Now here's what you do:


Boot Using OPTION key:


1. Restart the computer.

2. Immediately after the chime press and hold down the

"OPTION" key.

3. Release the key when the boot manager appears.

4. Select the external disk drive.

5. Click on the arrow button below the icon.


After your computer starts up open Disk Utility and do this:


  1. After Disk Utility loads select your newly installed SSD (this is the out-dented entry with the mfgr.'s ID and size) from the left side list. Click on the Erase tab in the Disk Utility toolbar. A panel will come down.
  2. Set the partition scheme to GUID. Set the format type to Mac OS Extended (Journaled.) Click on the Apply button and wait until the process has completed.
  3. Select the indented volume entry on the SSD and click on the Erase button in the toolbar. Provide a volume name in the panel an set the format type to Mac OS Extended, Journaled. Click on the Erase button. You now have a properly partitioned and formatted Mac disk.
  4. Clone El Capitan using Restore Option of Disk Utility:
  5. Restart the computer and after the chime press and hold down the COMMAND and R keys until the utilities menu screen appears.

a. Select Disk Utility from the main menu then press the Continue button.

b. Select the Destination volume - indented entry on the SSD - from the left side list.

c. Select the Restore option in the Edit menu. A panel will drop down.

d. Select the Source volume - the indented entry of your external drive - from the drop down menu.

e. Double-check you got it right, then click on the Restore button.

Destination means the external drive. Source means the internal SSD. Remember that a volume is an indented entry under the physical out-dented drive entry.


Changes in Disk Utility in El Capitan.


Disk Utility is somewhat different in usage if you need to partition, re-partition, or format a disk for use with your Mac. Please read these instructions if you are using El Capitan.


1. Restart the computer and after the chime press and hold down the COMMAND and R keys until the menu screen appears. Select Disk Utility from the main menu and click on the Continue button.


2. After Disk Utility loads select the indented volume you wish to partition and/or erase from the left side list. Click on the Partition or Erase icon in the Disk Utility toolbar. The Partition icon may be grayed out if the device has never been partitioned for the Mac. If this is the case, then you need to select the out-dented physical disk entry in the sidebar.


3. If the Partition icon is not active, then select the out-dented entry as mentioned above. Click on the Erase icon in the toolbar. A panel will dropdown in which you can select the partition scheme - GUID - and the Format type - Mac OS Extended, Journaled - from two dropdown menus. If the disk has been partitioned, then you can erase it by just selecting the Erase icon in the toolbar. Set the format type to Mac OS Extended (Journaled) in the panel’s dropdown menu. In either case once configured you can click on the Erase button and wait until the process has completed.


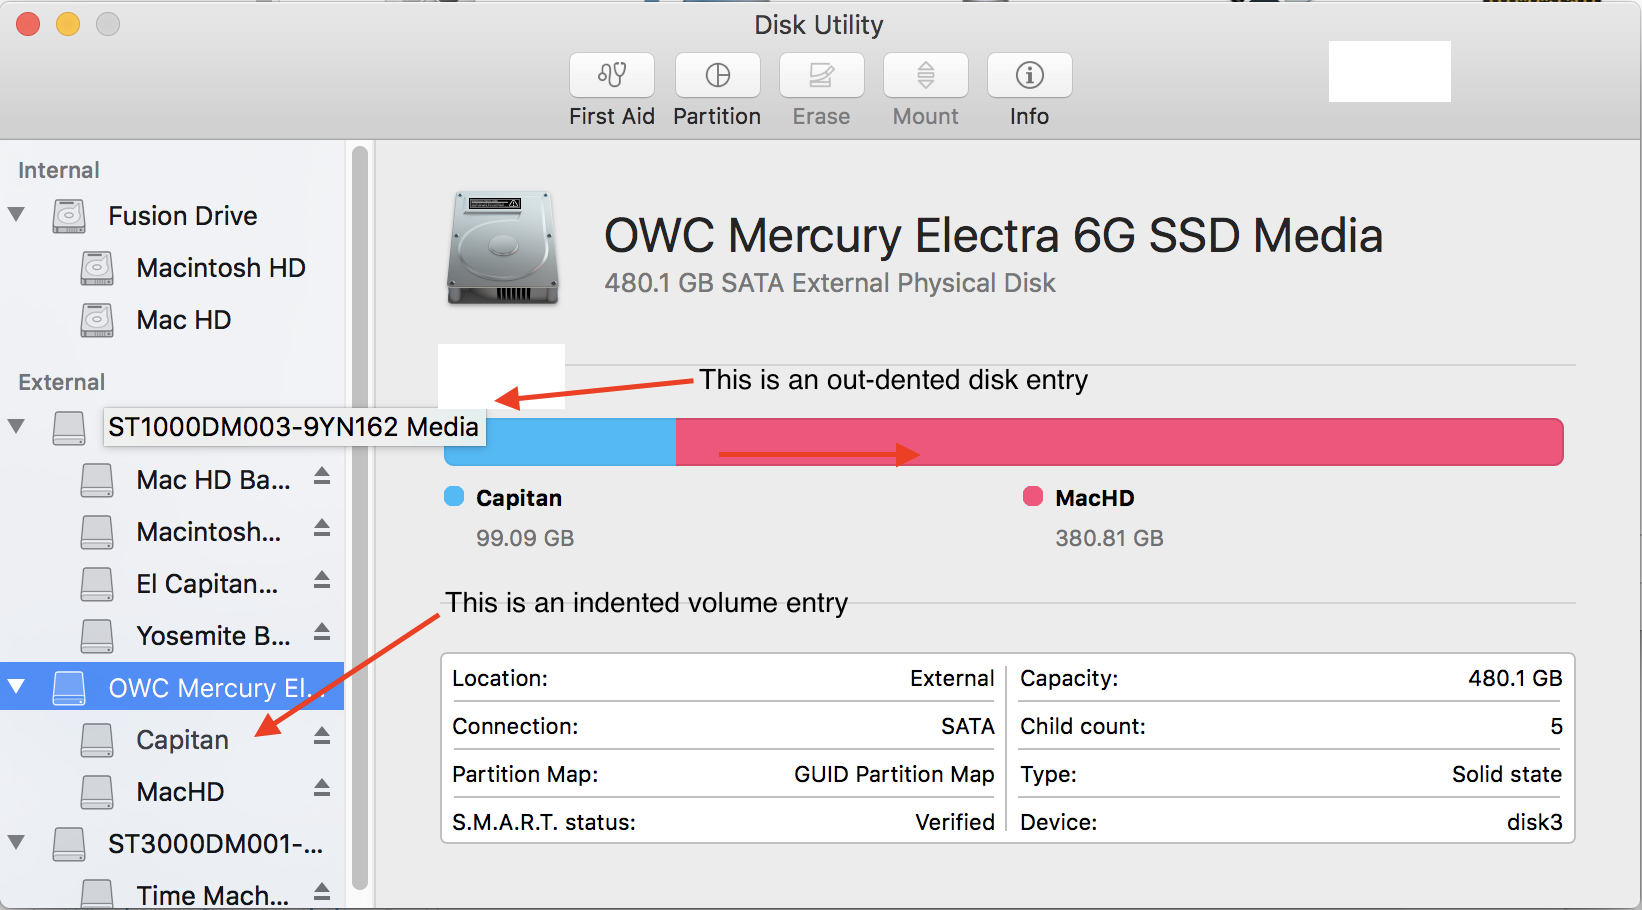
As you can see in the image below what the out-dented and indented entries are in the sidebar. At the top is the toolbar. In this image the Partition icon is active because the selected disk is already partitioned. The Erase icon is now inactive because no volume is selected to erase.


User uploaded file


For more help with the new Disk Utility please see: Hands-on with Disk Utility in El Capitan.

Apr 21, 2016 7:51 PM in response to KimUserName

I just received one of these drives (1TB). I have not installed it yet.


TRIM sounds a little scary to me. Can’t I just plug this drive in like I always have?


http://superuser.com/questions/1006991/trim-debate-mac-os-x-el-capitan-samsung-8 xx-evo-pro


I was thinking about temporarily plugging it into my Windows 10 machine to update the firmware. However, when I read the 2,300+ reviews on Amazon for this drive every single person reported problems after updating the firmware.


In my 40 years of computing, I have never bothered to update the firmware on any type of drive, and I'm doing fine so far, (at least I think I am).

Samsung does not provide any understandable, (to me anyway) method of dating firmware on a Mac. Look near the bottom of this webpage and see if you can figure out anything.


http://www.samsung.com/global/business/semiconductor/minisite/SSD/global/html/su pport/downloads.html

Apr 22, 2016 4:32 AM in response to Ziatron

User uploaded file

Absolutely, if you are unsure about TRIM, do not enable it.

When I install my Samsung 850 EVO 500GB drive I did not turn trim on initially. I read the articles about problems with trim. But then I found out it was only on Linux systems. I have had TRIM turned on for about 8 months with no problems.

But it should work fine without trim. You can always turn it on later if you decide.


I have read on this forum that if you boot your system using Option, and then do not select a boot drive, and let it sit like that for a half hour or so, that it will allow the drive to do its own garbage collection. (TRIM)

User uploaded file

In my opinion, I would not upgrade the firmware in the Samsung 850 EVO unless it is not working.

Samsung 850 EVO is a fairly new drive and the firmware version should be fine for many years.


Kim

Apr 22, 2016 8:59 PM in response to KimUserName

I would not upgrade the firmware in the Samsung 850 EVO unless it is not working.


I have the the Samsung SSD 850 Pro, not the "EVO".


At the bottom of the page below are firmware updates for Mac. Strangely, they somehow talk about using DOS, and a DVD. DOS !?!?


http://www.samsung.com/global/business/semiconductor/minisite/SSD/global/html/su pport/downloads.html


Moreover, the 850 Pro is not listed in the Mac section. I read through the 2300 reviews on Amazon for my Samsung SSD 850 Pro. Every single reviewer that attempted to update the firmware had problems. Some even reported that it bricked the hard drive.


I'm willing to risk attempting to update the firmware but after many hours of searching I can find no method to determine what the current firmware is, what my version of my firmware is, or any method to update the firmware.


Perhaps the reason the Samsung SSD 850 Pro is not on any list is because there is no firmware update?

Apr 23, 2016 10:27 AM in response to KimUserName

Guess they don't want you to update firmware except on Windows.


Actually, Samsung does have firmware drivers for Mac. But there are no procedures given, and they don't have an installing application. To further add to the confusion, they talk about having a DOS bootable DVD drive!


So, I used my Windows 10 machine, (the one with Dual M-DISC capable Blu-ray burners). I install their magic software but discovered it cannot access the drive unless that drive is plugged directly into the SATA buss! This accomplished, I discovered my firmware is the latest version.

This thread has been closed by the system or the community team. You may vote for any posts you find helpful, or search the Community for additional answers.

Samsung SSD 850 Pro Help

Welcome to Apple Support Community
A forum where Apple customers help each other with their products. Get started with your Apple Account.