Looks like no one’s replied in a while. To start the conversation again, simply ask a new question.

Patrick Scoffield’s book, How to cheat in Motion5; How to calculate the Oscillator settings, in the tutorial called, Card Dance.? How to calculate the settings for other project sizes & pieces sizes?

Patrick Scoffield’s book, How to cheat in Motion5; How to calculate the Oscillator settings, in the tutorial called, Card Dance.? How to calculate the settings for other project sizes & pieces sizes?

Posted on Mar 9, 2018 6:14 PM

Reply
8 replies

Mar 10, 2018 2:04 AM in response to chawil

I dare to say, without the book, it's too difficult to answer the question…

(gottit last year on amazon, 'used' for 5$ - incl. snail-mail US>>Germany = no clue, where the 'business' with such prices LOL)


Maybe I can can answer a part of it:

It basically is about how to move an element with an Oscillate/Sawtooth behavior… like that:


User uploaded file


The task is:

Move the bar along the 'Viewer'…

In Example#1 (green), the bar is 1000 pix wide, and the Viewer is 100pix.

So, math is (as described in the book):

User uploaded file

half the width = 500 pix minus half the 'viewer' size (in the book: width of the card is meant, Scoffield confusingly says 'project')

= 450pix


example#2 yellow bar…

User uploaded file


Bar is 600pix wide / 2 = 300, minus the Viewer size is 60 / 2 … = 270pix.

… so, in short: very little π involved


… but why Scoffield sets the Offset to -11 is a riddle to me 😝 … none of the values, 720x480, 32/20, etc reasons an eleven… for me - I'm lost beyond the the first 4 rules of arithmetic LOL.

Following his advice word by word, does NOT give the result as in the book… e.g. the ramping of the y-value doesn't match with the size of my pic…


Again, without the book hard to discuss…

Mar 11, 2018 3:01 AM in response to fox_m

fox_m wrote:

Is there a video of this "Card Dance" tutorial somewhere I could take a look at?

Not that I'm aware of… but to give this discussion some 'basics', I build it, following the book, pgs 181-183, slavishly… which is, btw for vers3… not vers5.-

User uploaded file

… and uploaded it to my gDrive, ready for dl here << link to gDrive


A few remarks:

Project is set to 720/30fps (the bars project was 720/25, to mention that)

The pic is a 1280/720 scaled jpg…


soooo, to repeat the OP's original question:

• What 'knobs' to turn for projects of diff. res and length (dare to say: THAT I have found out myself, see post above), but I think you can explain better…

• The Sawtooth Oscillator is in use to 'scan' the pic horizontally … so, Width of pic defines Amplitude (which is, imho, explained in the book…)

• Why 616x548 for the Replicator … needs some explanation …

• Why off-set -11?? That is beyond me…


btw: that 'Basic' is used in the book for two 'effects' I'm too lazy to rebuild here. But for demo purposes: applying a Random Motion behavior, gives for example that:


User uploaded file

… nice 'atomizing' of a pic 😉


Just to mention: I'm a huge fan of Sheffields* 'Recipe Book', imho a must for every Motion user, but its ease-to-use is its biggest flaw: follow illustrated advice step-by-step gives wonderful results, but doesn't explain the why&whats… -


Looking forward for your remarks, sensei 😉

(suggestion for an fcpco article, 'Hidden gems of Replicator', hm?)


* <book in hands> It's Sheffield… Patrick

Mar 11, 2018 8:38 PM in response to Karsten Schlüter

Ok - got it working...


First, I'd like to say that this project uses a **brilliant** method for creating an "inline" image sequence from parts of an image.


As a different (1080/60p) project, I will be referring to a 1920 x 1080 image and all pixels (full screen image) will be used.


The first thing to do is decide how many columns and rows you will be using. How much of an image you use is not a priority.


Divide the Width of the image by the number of Columns. [1920 ÷ 20 = 96]

Divide the Height of the image by the number of Rows. [1080 ÷ 15 = 72]


In my project, I'm using a 1920 x 1080 with 20 columns and 15 rows — the "full" image.


If we imagine for a moment the full image cut along the column and rows into "tiles", this is what the oscillating animation is going to do, starting with the upper left corner, sliding the image to the upper right corner with the sawtooth oscillator. When the waveform reaches it's peak, we will slide the image up 72 pixels and "scan" the next row. Repeat until we reach the bottom right corner.


The image will slide in a 96x72 pixel "window" (or "viewport") and each frame of the 20 x 15 = 300 frames will display a different piece of the image. What a wickedly cool way to create an "inline" image sequence!!!


Every object in Motion belongs to at least one group, a "global" top level group. You can make as many groups as you like and set 2D/3D properties of each one independently. Anyway, once you import/add your image, it is placed in a group. Select that group and in the Group inspector, set 2D and Fixed Resolution. For Fixed Width, set it to your calculated tile width. For Fixed Height, set it to your calculate tile height. For my project, I'll be using Fixed Width = 96 and Fixed Height = 72. Motion will not draw *anything* outside of the bounds of a 2D Fixed Resolution group and whatever "fills" it is our "tiled" image.


Since I'm going to be animating my image in this small viewport, I need to set up its starting point. To set up the upper left corner of my image, I already have to know that when tiling a Replicator, the "cell" occupying the top left corner is pinned in position at its Center point. So my first offset Position > X value is 1/2 the 96 width or 48. The Position > Y value needs to move the image down by 1/2 1080 - 36 or "-504".


Adding the Oscillator to image:

Right click on the Position > X parameter for the image and Add Parameter Behavior > Oscillate. The Amplitude needs to move the image from right to left so that the tile pieces will appear in left to right "sequence". The Amplitude will be the 1/2 the Width of the calculated Columns X Fixed Width (cell width). In this case, full sized, 1920 ÷ 2 and going from right to left - so negative or -960.


The Speed of the Oscillator will be however many cycles is required to "scan" the number of rows needed or simply the number or Rows. My project is 60p and 10 seconds long. I only need 20x15 (300) frames. To limit the animation to exactly 300 frames, I move the playhead to frame 300 (or 299 if you start your projects on Frame #0) and set an out point for the image's Group. That will set the same out point for all objects (and this behavior) inside the group.


The Oscillator always starts on 0. It needs to be adjusted so that the peak of the sawtooth wave starts on the first frame. In the Sheffield example, a 30fps project required a speed of 90. In my 60fps project, it will take a Speed of 2x90 (180) to create the same number of wave cycles. However, the adjustment to the wave peak will still only be -11 using the Start Offset parameter.


The easiest way to deal with the Speed parameter and Start Offset adjustments is to select the Oscillator behavior and open the Keyframe Editor (click the three linked diamond shapes at the bottom right corner of Motion's window.) You should see the waveform. Count the peaks. Set the Start Offset so that the first peak lines up on the first frame, then count. You should have Row peaks. The last frame should be the -Amplitude value:


User uploaded file


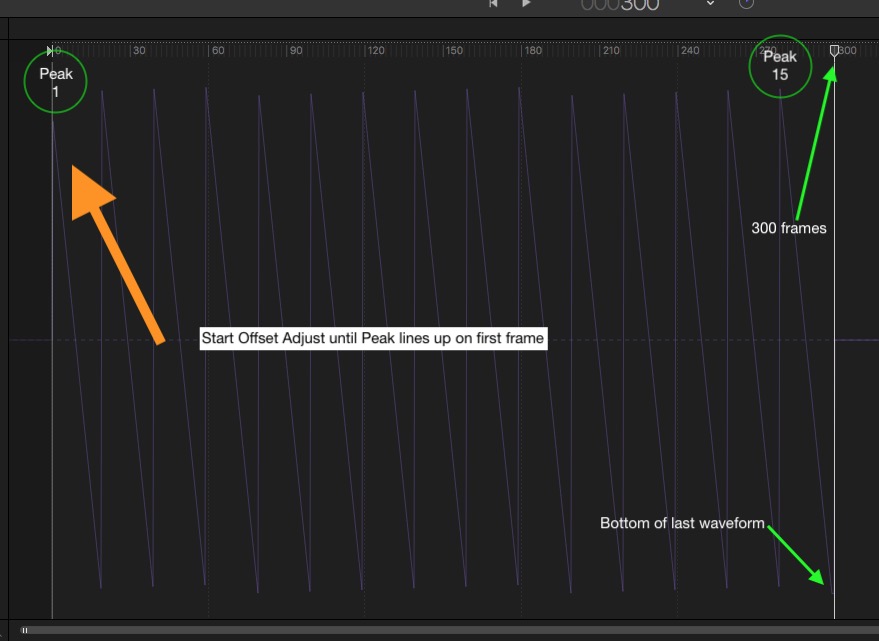
To answer Karsten's question: the -11 is 300/15 = 20frames/2 = 10 frames. Since the Sawtooth waveform never really Peaks, but resets on the cycle's end frame, the Start Offset is adjusted by one more frame. That will not always be the case in other circumstances, it's "what works" in a 300fps 15 cycles animation. Same thing about the Cell Height adjustment - things in Motion are not always perfect. A sawtooth has a -Amplitude value but never fully attains the +Amplitude value due to the reset of the waveform.


To the image Position > Y, right click and Add Parameter Behavior > Ramp. The Start Value will be 0 and the End value will be the height of your "tile" times Rows. In my case, it's 1080 (72 x 15).


To the image Position > Y, right click and Add Parameter Behavior > Quantize. The Step Size will be the height of your group Fixed Height. In my case: 72. The rate at which Ramp moves the image vertically in Quantized jumps is simply *synchronized* with the speed of the Sawtooth oscillator. The quantized jump in Y position happens exactly when the sawtooth wave finishes one complete cycle.


I renamed my animated image group CardsBuild.


With CardsBuild group selected, type the K key to create a Clone.


The Clone is a completely rendered entity consisting of 300 frames of 96 x 72 sized images — and inline image sequence of pictures taken from our original larger picture.


Since the Clone is an image sequence (in this case - clones can be other things too) when we create a Replicator from it (with the Clone selected, type 'L'), we get extra parameters: Play Frames, Random Start Frame, Source Start Frame and Source Frame Offset. I'll come back to these. Turn off the "visibility" (checkmark to the left of "Clone Layer").


The Replicator:

Set the Shape to Rectangle and the Arrangement to Tile Fill (should be the default).

Dial down the Size disclosure triangle.

The Size will be the width of your image minus the width of your cell. In my case 1920 - 96 = 1824.

The Height will be the height of your image minus the height of your cell: 1080 - 72 = 1008. If you see a "crease" or dark line through your image, adjust this value to 1080.05 or very closely in that vicinity. (Not everything is "perfect" in Motion!)

Set the Columns and Rows to the numbers you calculated. I stayed with 20 x 15.

Set the Origin to Upper Left and the Build Style to By Row. For my project, I also checked 3D because I want my tiles to move in Z space.


In the Cell Controls section, find Play Frames and turn it off. When on, every cell will "play" every tile(/frame). You will also need to set the Source Frame Offset to 1.0.


You should now have a perfectly "re-assembled" picture.


The original project started fully assembled and breaks up with Random Motion. I'm going to make a change here to use a Sequence Replicator and assemble the image. Since I decided to change up the ending a little bit, I also checked Additive Blend in the Replicator Cell Controls.


To the Replicator object, I added a Behaviors > Replicator > Sequence Replicator. For the Parameters I:

Add > Rotation; Add > Opacity; Add > Position.

I dialed down the Rotation disclosure triangle and for X, randomly dragged down to about -1370; for Y randomly dragged up to about 1800; for Z randomly dragged down to -630. None of these values need to be explicit - to translate, the X rotates approximately 3 1/2 to 4 times; Y rotates ~ 5 times; and Z rotates approximately 2 times. Plus or minus directions also do not matter.


For the Sequencing Control, I set the Sequencing to "From".

Unit Size to Custom.

End to 100%.

Spread to 300.

Traversal to Decelerate.


As a final touch, I keyframed the Replicator Size parameter from 20 to it's final 1824 value.


The result of this project can be seen here:

Card Dance demo reworked for full HD - YouTube

The project files can be downloaded here:

https://fcpxtemplates.com/ngtopics/cardDance-reworked.zip


[I need to explain one more thing: after importing the original image, I cloned it to use as the animated image. I was using it to compare positions with the stationary original.]


I can definitely see why Patrick Sheffield had a problem writing about this... it's a difficult subject to explain. Easy if you already know the technique involved.


—I hope I was able to clear things up.

Mar 9, 2018 8:54 PM in response to chawil

Oscillator Speed is bpm (beats per minute) where a beat is one complete cycle - the "wave" goes from its starting position of 0 to +Amplitude to -Amplitude and returns to zero (when phase = 0) . A setting of 30 is 30 complete cycles per minute no matter what your frame rate is. A setting of 60 is exactly 1 cycle per second (60 bpm).


Remember that a cycle is a distance of 2xAmplitude from one extreme to the other (it plays a part in the phase setting).


The Phase is in Radians (a complete cylce is 2π). A setting of 6.2832 is the same as 0 is the same as 12.5664 (4π, 6π, 8π, etc.) Since the beginning value of the Oscillator is 0 and the range is +Amplitude to -Amplitude, offsetting the Phase by π (180º) or -π, you can set the starting point of the oscillating animation to one end or the other (Motion will accept typed in values of up to at least 8 decimal places for numeric values even though it will only show about 4 places rounded — I *know* it makes a significant difference sometimes to type in more accurate decimal values by experimentation.)


How you calculate oscillators is in absolute time...


I never read How to Cheat in Motion, so I have no idea what the Card Dance is, so I can't be more specific about the sizing issues.

Mar 10, 2018 3:13 PM in response to Karsten Schlüter

The Sawtooth waveform is a special case waveform. It's a Ramp where the top and bottom are diametrically opposed values. However, objects in Motion cannot occupy two different locations at the same time (as the Ramp hits its peak value, it resets to its lowest value -- and this cannot happen on the same frame). Depending on the number of fps of the project will determine how close Sawtooth comes to reaching its peak value, but whatever frame the peak would be on, it still needs to be, on that same frame, reset to its minimum value.


Ok - Scoffield (I thought it was Sheffield) offsets the position (not the start time) of one of the rectangles (doesn't really matter which one) the distance it travels in 1 frame ÷ 2. At a Speed of 30, which is traveling rather fast, in a 30 fps project over a distance of... you don't really need to do the math for Motion, you just need to visually align the "top" end so that on the next frame on the reset, you get the same amount of "overlap" (adjusted) because, as I've been trying to say, you're never going to close the gap on the top with Sawtooth with "even" geometry. In my experiments, I not only had to adjust the X offset of the rectangle, but I also had to readjust the Amplitude slightly.


Waveforms always start at 0; go to +Amplitude; then to -Amplitude; and back to 0 for a full cycle (except Square which is either +Amplitude or -Amplitude and nothing in between). To start an animation like the sliding rectangles from one end or the other, the Phase (angle) needs to be adjusted. This is where "π" comes in because that IS the basis of Phasing over the distance of the waveform. You can change direction of animation with negative amplitudes or negative speeds, but the phase angle - no matter positive or negative - is always going to be determined by a "modulus" of π (2π for a full 360º phase offset). Most of the time, you're just trying to *start* an animation at a positive or negative Amplitude value, and therefore, 180º out of phase, therefore π. It is absolutely predictable. [And, extremely useful in some projects!!! Set the Speed to 0 and animate phase 😉]


Karsten, your gif shows the animation from left to right for the animated rectangles. You set your Start Offset to -30 which is in frames. I can tell, just by looking at this parameter, you created a 60fps project. So the frame rate of the project will play a part in your settings, but if you use Phase, it won't matter what the frame rate is. Try setting the Phase at 3.141593 (you will have to type in the value - Motion only displays 4 decimals when option dragging the value) and the Start Offset to 0. Now copy and paste the objects in a 30 or 25fps project. Then what happens when you set the Phase to 0 and Start Offset to -30? (You don't really have to tell me, I know.)


Is there a video of this "Card Dance" tutorial somewhere I could take a look at?

Mar 11, 2018 9:49 PM in response to fox_m

fox_m wrote:

First, I'd like to say that this project uses a **brilliant** method for creating an "inline" image sequence from parts of an image.


To answer Karsten's question: the -11 is 300/15 = 20frames/2 = 10 frames. …

I can definitely see why Patrick Sheffield had a problem writing about this... it's a difficult subject to explain. Easy if you already know the technique involved.


—I hope I was able to clear things up.

… was sure, that method catches your attention! 🙂

Should be handy to create for example 'Venetian blinds' transitions, 'shattering' effects etc…

… new toy to play with!


Book, incl. many other 'cheats' actually available 'used' for 1.94€ at amazon, hint hint …

(still a riddle, that business model ??)

________


ahaaaa <cue: noise of gears engaging>… to catch the peak of the sawtooth, project length divided by … Didn't come up with that, Thanks for advice … I'm a mouse-pusher, no engineer 😉

________


PS' book is, as mentioned, more a collection of recipes, no real How-Tos … some things are self-explanatory, some things are reasoned (in two or three words…), some leave me clueless. But I'm a tinkerer, playing will all knobs&bottons available LOL

________


Yep, some foggy is gone (any advice with arrows in it is good advice 😉 )… but I'm afraid, we scared the OP away, since no replies from chawil …

Anyhow: THANKS again, F., for chiming in and spending time to explain!

Mar 12, 2018 12:38 AM in response to Karsten Schlüter

I looked at the table of contents... I think I'd rather create all my stuff on my own. Don't want to get into copyright problems (I already push the envelope on that pretty far [Olympic Rings got a takedown request]). I read a couple of chapters in Damian Allan/Mark Spencer's book: Motion 3 back in 2008 (introduction to "3D" space). Watched just about every tutorial from AppleShakeGuru on YouTube and that was it. Nowadays, I just occasionally watch to see what people are doing with After Effects, then I try to get it done with Motion. (It's amazing how much cr^p you have to go through to do things that are relatively simple in Motion... hehehe...) I, like you, have my own way of doing things.


No thanks needed! I'm just a fan. I really get into it 😉 (maybe too into it 😝)

Patrick Scoffield’s book, How to cheat in Motion5; How to calculate the Oscillator settings, in the tutorial called, Card Dance.? How to calculate the settings for other project sizes & pieces sizes?

Welcome to Apple Support Community
A forum where Apple customers help each other with their products. Get started with your Apple ID.