Ok... I think I have an idea what you want.
The idea is to create a single animation:

Note that this is "monochromatic". It will be colorized later. This is just a simple circle that is animated from the top of the frame to the center over about 10 frames. The splatter effect is from the Library > Content > InkWash01.png. If you want to use the Shape > Style > Ink Bleed 01 Heavy, if you notice, every frame is more or less the same image just randomized size and angle (a little "stretching" thrown in). When you create a shape with that style, the "InkBleed"(.mov) file appears in the Layers List. Isolate it, turn on its visibility, pick a frame and export current frame (as a PNG); then re-import the image to use for an emitter. [You can do a lot of this same stuff with a shape style - it's essentially an emitter in itself...] The Ink Bleed (whichever you use) will be the source of an emitter. Set the Shape to Point, zero out Emission Angle and Rangle, Set the Life to 10 (or the entire length of your project). Set the Color Mode to Over Life, and set the Color Over Life Gradient to something like:

Opacity tags are (left to right) 100%, 1.18% and 8.81%.
Color tags are: 0.5 (gray), 0.22 (gray)
[This "color" scheme works like this: as new particles are "dropped", they begin to spread (Scale Over Life); the older they are the larger they are. As the color changes over life, it gradually darkens... The opacities of each particle goes from "solid" to nearly transparent, then starts to increase it's opacity to intensify the edges slightly.]
Everything else is default.
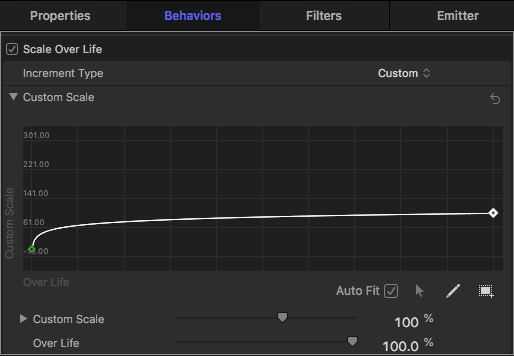
Add a Scale Over Life. Set the Increment Type to Custom and the settings are:
Left: 0% Right: 100% - select the points and right-click on one of the keyframes and set the Interpolation to Logarithmic:
When you've built the emitter, it needs to be shifted to start at the point the circle animation ends. Move the playhead to the end of the circle animation and with the emitter selected, type Shift-[ to move its start point to the playhead.
Both the image emitter and the animated circle must be in the same group. [Not important at this point: the group should have an Image Mask added to it and the source can be your icon shape - Invert Mask set.]
Select the group and type K to create a Clone. Type E to create a new emitter.
In the Emitter Cell Controls, down past the Scale parameters, you will see Play Frames and Random Start Frame. Turn off Random Start Frame. Each particle will now animate from its first frame to its last starting when it is "dropped".
The other Emitter Parameters:
Shape ... can be Rectangle with Random Fill. Width/Height somewhere around canvas dimensions. Emission Range set to 0. Life set to project length (Life parameter is in seconds.) Speed Parameters 0. Scale around 100% and Scale Randomness around 66%.
Depending on how many drops you want, set the Birth Rate/Birth Rate Randomness to taste.
To mix up the Colors, set Color Mode to Pick From Color Range and create a Color Range gradient. To make the colors look like watercolor, take each color option (tag) and open the System Color Picker, select the HSB Sliders tab and set the saturations to about 66%.
————————————
There are two problems with this setup:
You cannot vary the angle without varying the direction of the circle ("drop") animation.
If you vary the angle (randomness) and use an icon "cutout" it will also be rotated.
(Varying the angle of the splatter helps disguise the fact that it's all the same shape.)
You could manipulate the Scale Randomness (offset X and Y to different values) to create shape differences.