You can make a difference in the Apple Support Community!

When you sign up with your Apple Account, you can provide valuable feedback to other community members by upvoting helpful replies and User Tips.

Looks like no one’s replied in a while. To start the conversation again, simply ask a new question.

Green Line Between Cropped Photo in Secondary Timeline and Underlying Video

I'm making a video with a slideshow playing concurrently on the left third of the screen. I have cropped pictures in Photos and exported them in the dimensions I want. Then I have placed the photos in the secondary timeline and everything is working great, except on about half the photos, there is a narrow green line on the right side. The other half look good. Am I doing something wrong or is this a bug? Is there a way to get rid of the green line?

MacBook Pro Apple Silicon

Posted on Feb 17, 2023 6:06 PM

Reply
Question marked as Top-ranking reply

Posted on Feb 18, 2023 10:46 AM

Okay - I *did not* see a green edge, but others have been reporting it. I did, however, manually add a green edge to the image. (Just out of curiosity — do you see a green edge in the image you included above? — I don't! [OS 10.14.6; FCPX 10.4.10])


Try this (Remove Color Fringe):

https://fcpxtemplates.com/?smd_process_download=1&download_id=26093


Install it as an Effect (if you need help with that: https://fcpxtemplates.com/installing-plugins-for-fcpx/)


Apply it to the image.
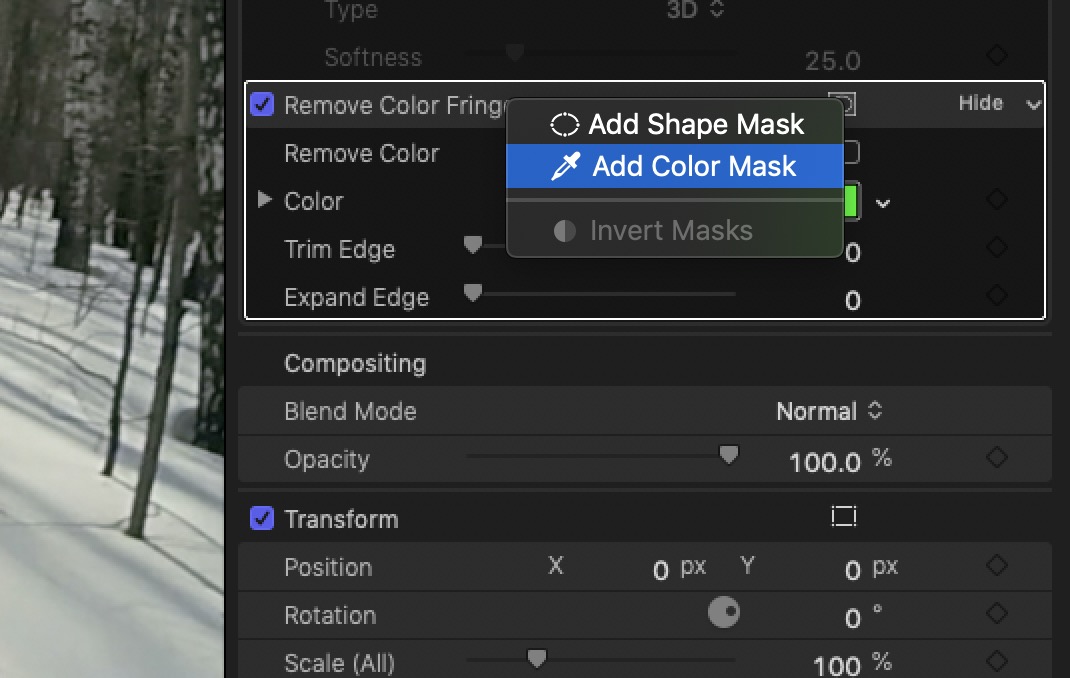


Select the Color Mask and click the eyedropper on the green edge (drag down the line a little to get a better sampling of the greens. You can also increase the Softness.)


The default color is set up for Greens (green screen) but you can optionally ALSO, select the same color with the color swatch.


Turn on Remove Color by selecting the Checkbox.


IF you have anything in the main image area that is the same color you're removing, then add an Effects Mask > Shape Mask. Shape the Mask to basically cover the edge and exclude any important visual content.


In this case: move the Expand Edge slider up to "harden" the edge. (The edge color should turn to a grayscale shade).


(Trim Edge should be exclusively used for green screen keying [and probably only if you're keying by a different plugin than the built in Keyer - which has it's own method of trimming the edges].)


If you have a lot of images you need to apply this to, chances are, they'll all be showing the same color green. Use Remove Color Fringe for ONE image and do a Save Effects Preset. For all other images you need to treat, just select the clip(s) and double click your Effect Preset. (If you have to use a Shape Mask as a "limiter", make sure it's tall enough to cover all your image sizes (you may have to double check these if they are different widths!)


HTH — let me know if it works!


11 replies
Question marked as Top-ranking reply

Feb 18, 2023 10:46 AM in response to Rob Abram1

Okay - I *did not* see a green edge, but others have been reporting it. I did, however, manually add a green edge to the image. (Just out of curiosity — do you see a green edge in the image you included above? — I don't! [OS 10.14.6; FCPX 10.4.10])


Try this (Remove Color Fringe):

https://fcpxtemplates.com/?smd_process_download=1&download_id=26093


Install it as an Effect (if you need help with that: https://fcpxtemplates.com/installing-plugins-for-fcpx/)


Apply it to the image.


Select the Color Mask and click the eyedropper on the green edge (drag down the line a little to get a better sampling of the greens. You can also increase the Softness.)


The default color is set up for Greens (green screen) but you can optionally ALSO, select the same color with the color swatch.


Turn on Remove Color by selecting the Checkbox.


IF you have anything in the main image area that is the same color you're removing, then add an Effects Mask > Shape Mask. Shape the Mask to basically cover the edge and exclude any important visual content.


In this case: move the Expand Edge slider up to "harden" the edge. (The edge color should turn to a grayscale shade).


(Trim Edge should be exclusively used for green screen keying [and probably only if you're keying by a different plugin than the built in Keyer - which has it's own method of trimming the edges].)


If you have a lot of images you need to apply this to, chances are, they'll all be showing the same color green. Use Remove Color Fringe for ONE image and do a Save Effects Preset. For all other images you need to treat, just select the clip(s) and double click your Effect Preset. (If you have to use a Shape Mask as a "limiter", make sure it's tall enough to cover all your image sizes (you may have to double check these if they are different widths!)


HTH — let me know if it works!


Feb 18, 2023 10:50 AM in response to fox_m

There is no green edge in any of my pictures. The green edge only shows up in Final Cut Pro, and only on some images. The picture I attached to my last message was one that has a green edge when added to my video.


I'll try what you suggested above, but my daughter and her family are going to arrive from out of town any minute. I won't get to this until after they leave. I didn't want you to think I was ignoring you since you spent so much time helping me out.

Feb 18, 2023 5:41 PM in response to Rob Abram1

Rob, I'm curious... the image above is 1971 x 2464 pixels. Questions: 1) Did you try re-exporting the images with dimensions divisible by 4 (or maybe by 2)? 2) Do only the problematic images have dimensions not divisible by 4 (or maybe even by 2)? 3) Did you try using the PNG or TIFF format instead of JPEG (especially on the problematic images)? Thanks...

Green Line Between Cropped Photo in Secondary Timeline and Underlying Video

Welcome to Apple Support Community
A forum where Apple customers help each other with their products. Get started with your Apple Account.