I think you misunderstood. Your computer requires Snow Leopard 10.6.6 or later. The retail Snow Leopard DVD installs 10.6.3. It cannot boot your model. Oh, and Snow Leopard is $29.00, not $40.00.
Anyway, here's what you can do:
How To Run Snow Leopard On A New Mac
This does not apply to new Mac Minis or MacBook Airs. When newer models are introduced that also require Lion for hardware support, the techniques described below will no longer work with the possible exception of using Parallels 7.
What has to be done:
- Create a new partition on the hard drive.
- Get a clone of a 10.6.8 Snow Leopard system. Put the cloned Snow Leopard system onto the new partition.
- In your case rather than installing onto a partition on your hard drive, just install it on your external hard drive.
Step One: Create a new partition on the hard drive
To resize the drive and create a new partition do the following:
1. Restart the computer and after the chime press and hold down the COMMAND and R keys until the menu screen appears. Alternatively, restart the computer and after the chime press and hold down the OPTION key until the boot manager screen appears. Select the Recovery HD and click on the downward pointing arrow button.
After the main menu appears select Disk Utility and click on the Continue button. Select the hard drive's main entry then click on the Partition tab in the DU main window.
2. You should see the graphical sizing window showing the existing partitions. A portion may appear as a blue rectangle representing the used space on a partition.
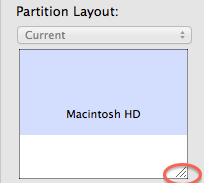
3. In the lower right corner of the sizing rectangle for each partition is a resizing gadget. Select it with the mouse and move the bottom of the rectangle upwards until you have reduced the existing partition enough to create the desired new volume's size. The space below the resized partition will appear gray. Click on the Apply button and wait until the process has completed. (Note: You can only make a partition smaller in order to create new free space.)
4. Click on the [+] button below the sizing window to add a new partition in the gray space you freed up. Give the new volume a name, if you wish, then click on the Apply button. Wait until the process has completed.
You should now have a new volume on the drive.
It would be wise to have a backup of your current system as resizing is not necessarily free of risk for data loss. Your drive must have sufficient contiguous free space for this process to work.
Step Two: Obtain a clone of a Snow Leopard system:
You will need access to a Mac already running Snow Leopard. You will need a 16 GB USB flash drive or an external hard drive to which you can clone the Snow Leopard system from the Mac that has Snow Leopard installed. Alternatives are:
Option One:
- Install a new Snow Leopard system onto a USB flash drive. Boot the Mac used for installing with the USB flash drive. Update the flash drive system to 10.6.8 using the Mac OS X 10.6.8 Update Combo v1.1 to update Snow Leopard. Verify that you can boot the Mac with the USB flash drive.
- Take the USB flash drive to your new Mac and try booting from it. If it works then clone the system from the flash drive to the newly made partition:
Clone using Restore Option of Disk Utility
- Open Disk Utility from the Utilities folder.
- Select the destination volume from the left side list.
- Click on the Restore tab in the DU main window.
- Check the box labeled Erase destination.
- Select the destination volume from the left side list and drag it to the Destination entry field.
- Select the source volume from the left side list and drag it to the Source entry field.
- Double-check you got it right, then click on the Restore button.
Destination means the new partition on the internal drive. Source means the USB flash drive.
Option Two:
If you have a large enough external drive you can erase and use, then it would be easier to just clone the entire Snow Leopard system from the source Mac computer to the external drive.
Clone using Restore Option of Disk Utility
- Open Disk Utility from the Utilities folder.
- Select the destination volume from the left side list.
- Click on the Restore tab in the DU main window.
- Check the box labeled Erase destination.
- Select the destination volume from the left side list and drag it to the Destination entry field.
- Select the source volume from the left side list and drag it to the Source entry field.
- Double-check you got it right, then click on the Restore button.
Destination means the external drive. Source means the Snow Leopard Mac's internal drive.
After cloning verify that it will boot the source Mac. If so then take the external drive to your new Mac boot with it. If all is well then restore the clone to the new partition on your new Mac:
Restore the clone using Disk Utility
- Open Disk Utility from the Utilities folder.
- Select the destination volume from the left side list.
- Click on the Restore tab in the DU main window.
- Check the box labeled Erase destination.
- Select the destination volume from the left side list and drag it to the Destination entry field.
- Select the source volume from the left side list and drag it to the Source entry field.
- Double-check you got it right, then click on the Restore button.
Destination means the new partition on the internal drive. Source means the external drive.
If the above seems too daunting then you might consider running Snow Leopard inside an emulator such as Parallels 7. You are permitted to install a single copy of Snow Leopard inside a virtual machine. You will need to first purchase a copy of Parallels 7 and install it on your new Mac. Create a new virtual machine configured for Mac OS X. You may then install Snow Leopard in the virtual machine then download Mac OS X 10.6.8 Update Combo v1.1 and update to 10.6.8. Be sure to include Rosetta in your initial Snow Leopard installation. Rosetta is not installed by default rather it's an optional install.