Yes it's all pretty easy and standard stuff for Aperture.
Depening on how the two libraries were created an populated, there may be a bit of tidy-up to do first or later. For example, if you had imported the same photos into each library, you would get duplicates. So before proceeding do some basic tidying to make sure each library is in good order. It's probably worth running the first aid repair on each library too, and obviously you should always make sure you have a good backup of your data.
Step 1. Merge the two libraries together.
Open the large library on the external drive in Aperture.
Use the 'File->Import->Library' menu to import the small library from your internal drive. If prompted for "Merge or Add" choose Add. This will bring all of the contents from the small library into the big one.
Check that the library now contains all the projects/images from the internal library. When you are happy the small library has been added into the large one, you can delete the small one from your external drive (again, make sure you have a backup).
Step 2. Check your project (event) hierarchy and make sure you are happy with the names.
Within your now even larger library, review the project names. These are about to become your event folder names on external drive eg: /gborden/photos/2013/01/<project name>.
Step 3. Relocate your photos to your new folder structure on the external drive.
Within you large Aperture library, select 'Photos' from the library inspector to show all of your photos. Press CMD+A to select them all. From the menu choose "File -> Relocate Originals"
The following screen is shown (without the popup):
Navigate to the root of your external drive and select your top level folder (eg: gborden), if it doesn't exist use New Folder (bottom left) to create it. Repeat for the 'Photos' folder within that.
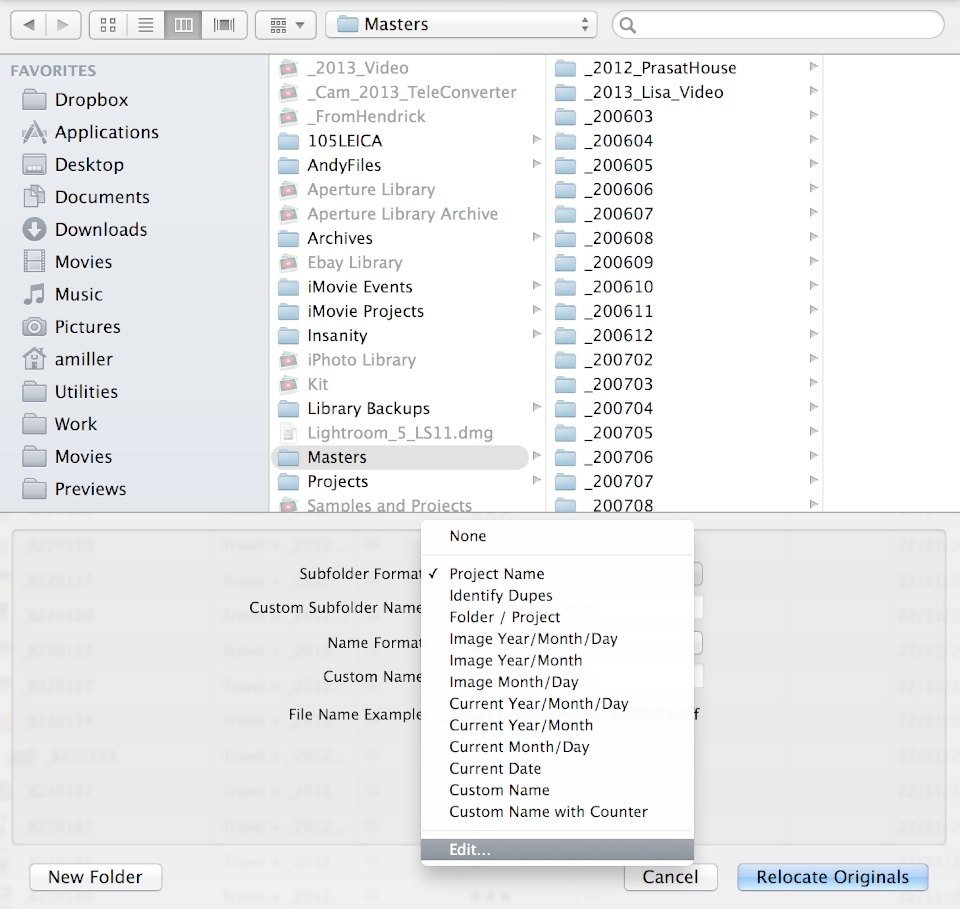
The remainder of the folder structure will be created by relocating. To ensure this happens, click the 'Subfolder Format' selector and choose 'Edit...' from the bottom.
The following screen is shown:

Select the 'Image Year / Month' preset and click '+' to duplicate it. On the right, drag the '/' button into the format line and repeat for the 'Project Name' button so you get the Format line shown above.
Click OK to return to the previous screen, then click 'Relocate Originals'.
It will now begin relocating all your originals into the new location, creating the folder structure as it goes. Note, you'll get '01' instead of 'January'. I don't think there is an easy way to get the month name at this stage. It could be changed later if it's important for you.
And that's it, just leave it to finish.
When you later close the library, you'll see it has shrunk vastly, as all the actual images are now in your 'gborden/photos/etc'.
When you import new images, there is no need to drag them to the folder structure first, Aperture can do tht for you too:
When you import from the card or camera, look at the import settings:

You can name your project/event, then for the "Store Files" choose "Choose" and navigate to your "/gborden/photos" folder, choose copy, and then for the subfolder choose the template you created earlier: "Image Year / Month / Project". This will both import as referenced into Aperture, and copy the files to your folder structure.
Regards,
Andy