Hey Lou Hosta,
Thanks for reaching out to the Apple Support Communities.
I see that you are not able to download pictures from your Canon 10D using Image Capture. It's important to make sure that you can get your important photos on your iMac, so I'll be happy to help assist you with this.
You can also connect your camera and import your photos into the Photos app. I suggest following the steps in the
Import photos from a camera or phone
section of the Photos help page, specifically:
Import photos from a camera or iOS device
-
Connect a camera, iPad, iPhone, or other iOS device to your computer.
-
Make sure the camera or device is turned on and the camera is set to the correct mode for importing photos.
For information on which mode to choose, see the instructions provided with your camera. If your camera has a “sleep” mode, make sure it’s disabled or set to a time increment long enough to allow your images to download.
-
Open Photos (if it isn’t already open), then click the device under Devices in the sidebar.
Note: Devices only appears in the sidebar when a camera or storage device is connected.
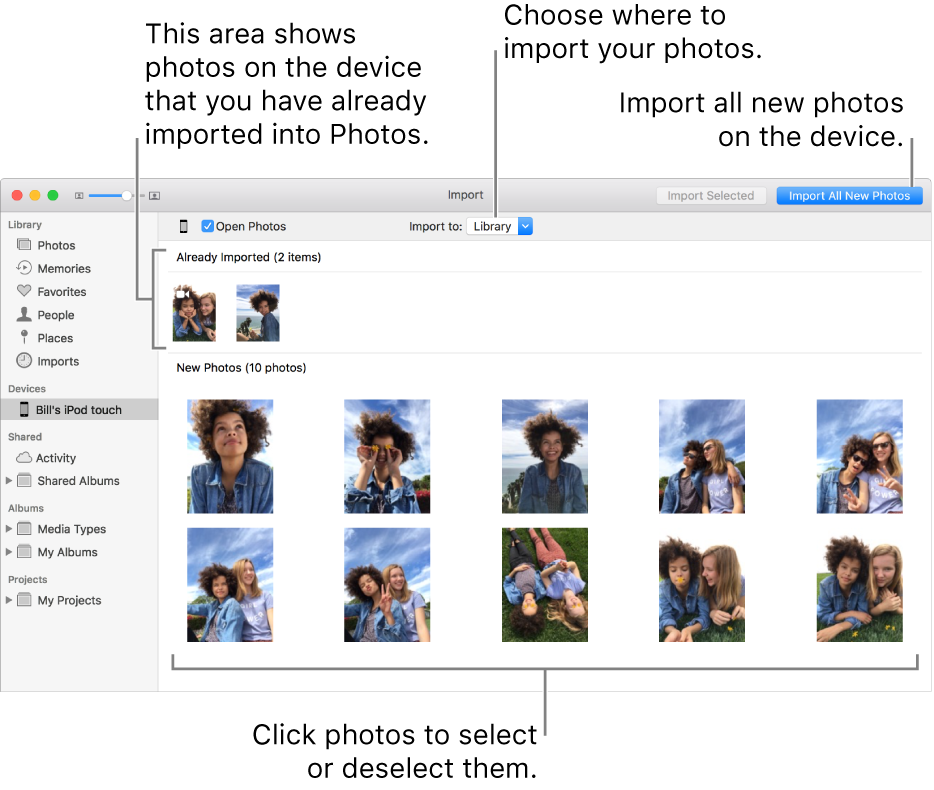
Photos displays all the photos and videos on the device.
Tip: If you want Photos to open whenever you connect this device, select the Open Photos checkbox.
-
If you want to delete photos from the camera after importing them, select the “Delete items” checkbox. This option does not appear for all cameras.
-
To set where to import the photos, do one of the following:
-
Import into an existing album: Click the “Import to” pop-up menu, then choose the album you want from the list.
-
Import into a new album: Click the “Import to” pop-up menu, choose New Album, enter an album name, then click OK.
-
Import into the Photos library without specifying an album: Click the “Import to” pop-up menu, then choose Library.
-
Do one of the following:
-
Import all new photos: Click Import All New Photos.
-
Import a selection of photos: Click the photos you want to import, then click Import Selected.
-
If a message asks whether you want to delete or keep the photos on your camera after they’re imported, click Delete Items to remove the photos, or click Keep Items to keep them on the camera.
Photos imports your photos. To cancel importing, click Stop Import.
-
When all photos have been imported, disconnect the camera or device from your computer.
If you didn’t import the photos into an album, they appear in the Imports album in the sidebar. They also appear among the other moments and collections in your Photos library; to browse them, click Photos in the sidebar.
If you have photos taken with a film camera, you can import them into Photos by converting them to digital files (using the Image Capture app and a home scanner). After importing the digital files into Photos, you can edit them and add them to albums and projects, just as you can any other digital photos. You can also use the Image Capture app to set Photos to open automatically whenever you connect your camera. For more information, see Scan an image and Transfer images.
Tip: You can change the date and time of scanned images in Photos; select the image and choose Image > Adjust Date and Time.
Please let me know if you have any questions.
Kind Regards.
