One option for taking a screenshot of a selected portion of your screen with drop-shadow:
1. Install ImageMagick.
The simplest way is to use Rudix. Either install the package manager first and then the package from Terminal or just download the package and install. Rudix packages are precompiled with dependencies included. Rudix ImageMagick packages are available for OS's from Snow Leopard to Sierra. If you are on High Sierra you can try installing the Sierra package, although I haven't tested if it will install or function. I'm still using Yosemite and unable to confirm one way or the other. Other options for ImageMagick install for High Sierra are MacPorts, Homebrew, the binary release available on the ImageMagick website, or building from source. if using the other options be prepared for any greater complexity or troubleshooting. Rudix packages use a version of ImageMagick 6. The latest version is ImageMagick 7. ImageMagick maintains a legacy website for ImageMagick 6. The examples below were created with ImageMagick 6 installed using a Rudix package.
2. Install FastScripts.
This allows you to run scripts from the menu bar and from a keyboard shortcut. Although FastScripts is free to use for a limited number of keyboard shortcuts, If you prefer not to install another piece of software you can create an Automator service instead. Besides its convenience, I find FastScripts reliable.
3. Create the AppleScript.
In Script Editor create the following AppleScript, compile, and save to your ~/Library/Scripts/ folder using a filename of your choice:
set filePath to POSIX path of (path to desktop)
set currentDate to (do shell script "date +'Screen Shot %Y-%m-%d at %H.%M.%S'")
set tmpFile to "/tmp/sourcefile.png"
set outputFile to quoted form of (filePath & currentDate & ".png")
try
do shell script "screencapture -i -s " & tmpFile
on error
return
end try
try
do shell script "/usr/local/bin/convert " & tmpFile & ¬
" \\( +clone -background Black -shadow 50x25+0+20 \\) +swap -background none -layers merge +repage " & outputFile
on error
display dialog "An error occured. Review your script and try again." buttons {"OK"} default button "OK"
end try
4. Create a keyboard shortcut.
If you installed FastScripts click on its menulet in the menu bar, hold down the Command key (⌘) while highlighting the script name and click. A preferences window will open where you can enter a unique keyboard shortcut. Following the sequence of keyboard shortcuts for screen capture you might try Shift-Command-5 (⇧⌘5). If you created an Automator service instead you can set the keyboard shortcut in System Preferences.
5. Run the script.
Use the keyboard shortcut you created to run the script. A crosshair cursor will appear. Click-drag the area to capture and release. Hit the Escape key any time before release to cancel. A PNG file will appear on your Desktop.
Examples:
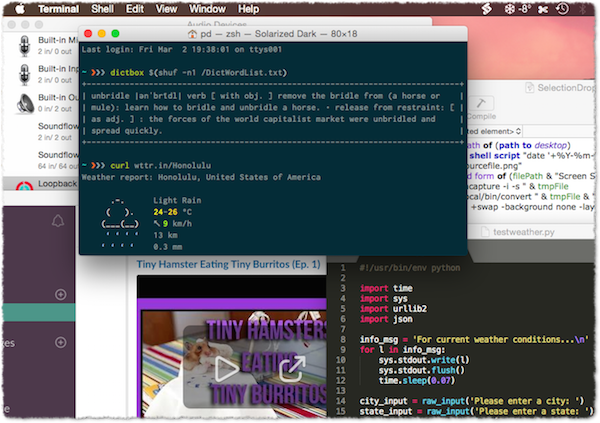
Selected portion of the screen with drop-shadow:

Besides black ("-background Black -shadow"), you can use any color for the shadow as in Red here:

Using ImageMagick you can manipulate your screenshots in other ways, such as a torn paper edge effect:
Or a "Polaroid" effect with a push pin layered on top:
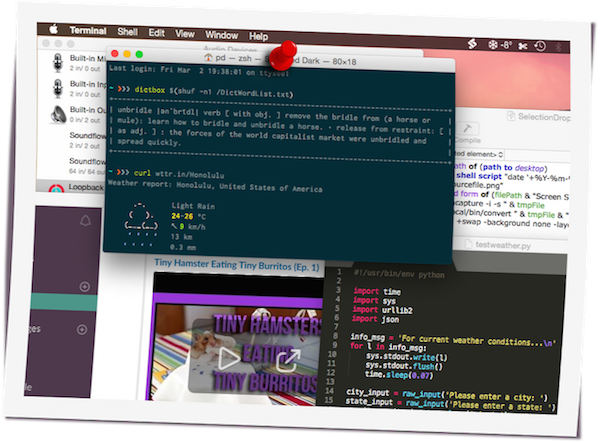
Photo spread:

And so on...
Tested with OS X Yosemite 10.10.5 & ImageMagick 6.8.6 only.