Looks like no one’s replied in a while. To start the conversation again, simply ask a new question.

How can I publish a control found rounding the corners of the Title Background in FCP?

These are the steps I was taking, and then I got stuck...


  1. Created a new Title project in Motion and deleted the default Text layer.
  2. Created a Rectangle and sized it to perfectly cover the entire canvas.
  3. Duplicated the Rectangle shape, changed it's Fill color, and lowered it by approx ~1/3 on the canvas.
  4. Added a slow overshoot behavior to have the second rectangle move into position within ~1 sec.
  5. Placed these two rectangle layers behind the Title Background layer.
  6. Then, on the Properties tab of the "Title Background" layer, I cropped in 25px all the way around.


This seemed to work. And when I applied this new title t to a to a clip in FCP, the clip appears in the Title background layer, with a 25px frame just like I wanted.


But... I want to publish a control to the title, that will allow me to round the corners of the clip.


[Re-Titled by Moderator]

Posted on Mar 18, 2023 3:54 PM

Reply
Question marked as Best reply

Posted on Mar 19, 2023 12:58 AM


Use a shape layer to create the mask source - set it to the height and width you need


With the image mask selected, drag image the mask source layer into the image mask source zone.


Note that the source zone can be put onto a rig & widget - maybe not something you need to do now but is good to know for future projects. On a widget you can swap the source of the mask and publish for options in FCP.

Similar questions

15 replies
Question marked as Best reply

Mar 19, 2023 12:58 AM in response to Dolmetscher


Use a shape layer to create the mask source - set it to the height and width you need


With the image mask selected, drag image the mask source layer into the image mask source zone.


Note that the source zone can be put onto a rig & widget - maybe not something you need to do now but is good to know for future projects. On a widget you can swap the source of the mask and publish for options in FCP.

Mar 18, 2023 9:30 PM in response to Dolmetscher

Hi


I’m away from the iMac right now so I can’t provide any visuals


Generally we have two options


1:Create mask directly using the rectangle mask tool - apply the mask and just consider it a shape layer (which it is) and you will find the height and width and roundness in the inspector.


A mask is ‘pinned’ to the layer it is applied to, so if you wanted it to be independent and not follow the layer position, then apply to the title background group instead.


2: Image mask & source - this is what I did - create your shape with the shape tool, set it to the height and width you need to create the crop area- then, on the title background, right click and choose ‘add image mask’ .. then drag the shape layer you made into the image mask source zone.


here is some general user manual information

Apply an image mask to a layer in Motion – Apple Support (AU)


Note that masking in Motion may produce antialias lines/very fine gaps around the mask edges that may spoil the results by allowing layers below to bleed through. If this becomes a problem, then in the shape or mask layer, you’ll find feather and falloff setting. A falloff of -1000 and a feather of -0.1 will remove this. I only know this works, I can’t explain the reason why as well as others here so I’ll differ to those members on this. There are resources that cover the topic but links to external sites are banned in this forum.


I should be back at the iMac in a couple of hours, if you are still stuck I’ll send some screen shots to better explain.


Generally, on the topic of cropping and clipping and creating adjustable areas for title background and dropzones / masking and publishing from the mask is the way to go. What we applied here is how we would manage a dropzone also, and also for many other layer to layer situations.


Mar 18, 2023 6:25 PM in response to Dolmetscher

Hi


It will really help to see what you are describing. Can you provide screen shots of the project in Motion and how it runs in FCP?


'lowered it by 1/3' on the canvas - are you talking about the scale here?


Generally, the shapes roundness parameter is there in the inspector in the shape geometry panel


The title background does not have a local roundness parameter.


I'm not sure of your goal, but if you want the title background to instruct the media in FCP to have a rounded display - offset by 25 pixels all around, this is something you would do with masking or with image masks. The mask has roundness to publish and a shape as an image mask source has roundness also. Your mask or mask source would be 25 pixels less all around - and you can link those parameters to the mask or image mask source.


If you are deleting the text want to do this strictly as an effect - then the effect template may be the better option. Otherwise, this can work as a title based layer - there are merits to both options.

Mar 18, 2023 6:47 PM in response to Dolmetscher

This is the result I get in FCP following your steps.


I get the border but I don't see the function of the second layer overshoot working here.


if your goal is to have a border that can be user controlled for roundness in FCP, then masking is the method to employ.


Note that there is also a stroke filter - in the borders category that may also be useful here.


If you can provide some visual references to the goal, we can determine the best options available - there is never 1 best way to get it done - it all depends on how you want this to function in FCP and what controls you want to give the user with that.

Mar 18, 2023 8:20 PM in response to Dolmetscher

Hi Dolmetscher


Is this the roundness control you need?


If this is what you are looking for, it is done with an image mask - the mask is creating the 'crop' and has roundness to publish. This can be done with a the mask tool rather than image mask+source.


On the topic of borders, there are various filters in Motion for a quick effect - in the border category.


This is just one of many ways to get it done, other members here may have more to offer.


From doing this, I note that the roundness is not flattening out, it was just an optical illusion.

Mar 19, 2023 3:12 PM in response to Dolmetscher

Hi


There are various ways to do this. We are generally thinking about changing the state from A to B for a given parameter or set of parameters. While there are many ways to do this, let's keep to the things you are already exploring = using behaviors.


The basic motion behaviors act on the total set of parameters for that function, so grow will act on the total scale and does not consider the ratio across x and y to keep it in proportion.


When we want to give instructions to specific parameters independently, we use the parameter behaviors. Of these, the ramp behavior is most often employed to change a parameter from A value to B value.


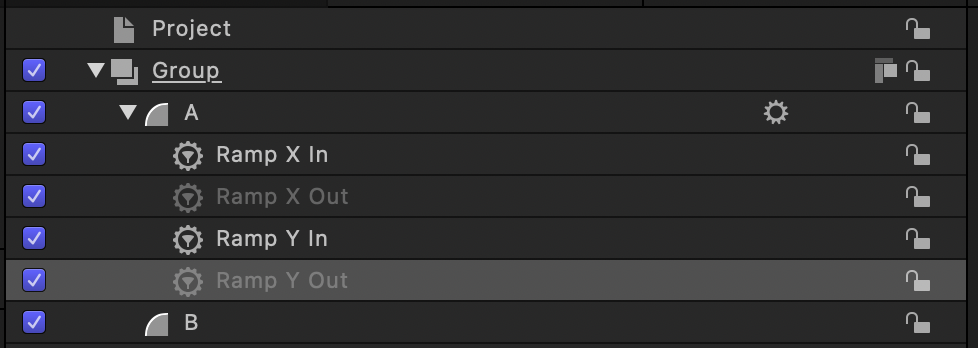
Set ramp on the x scale and another ramp on the y scale


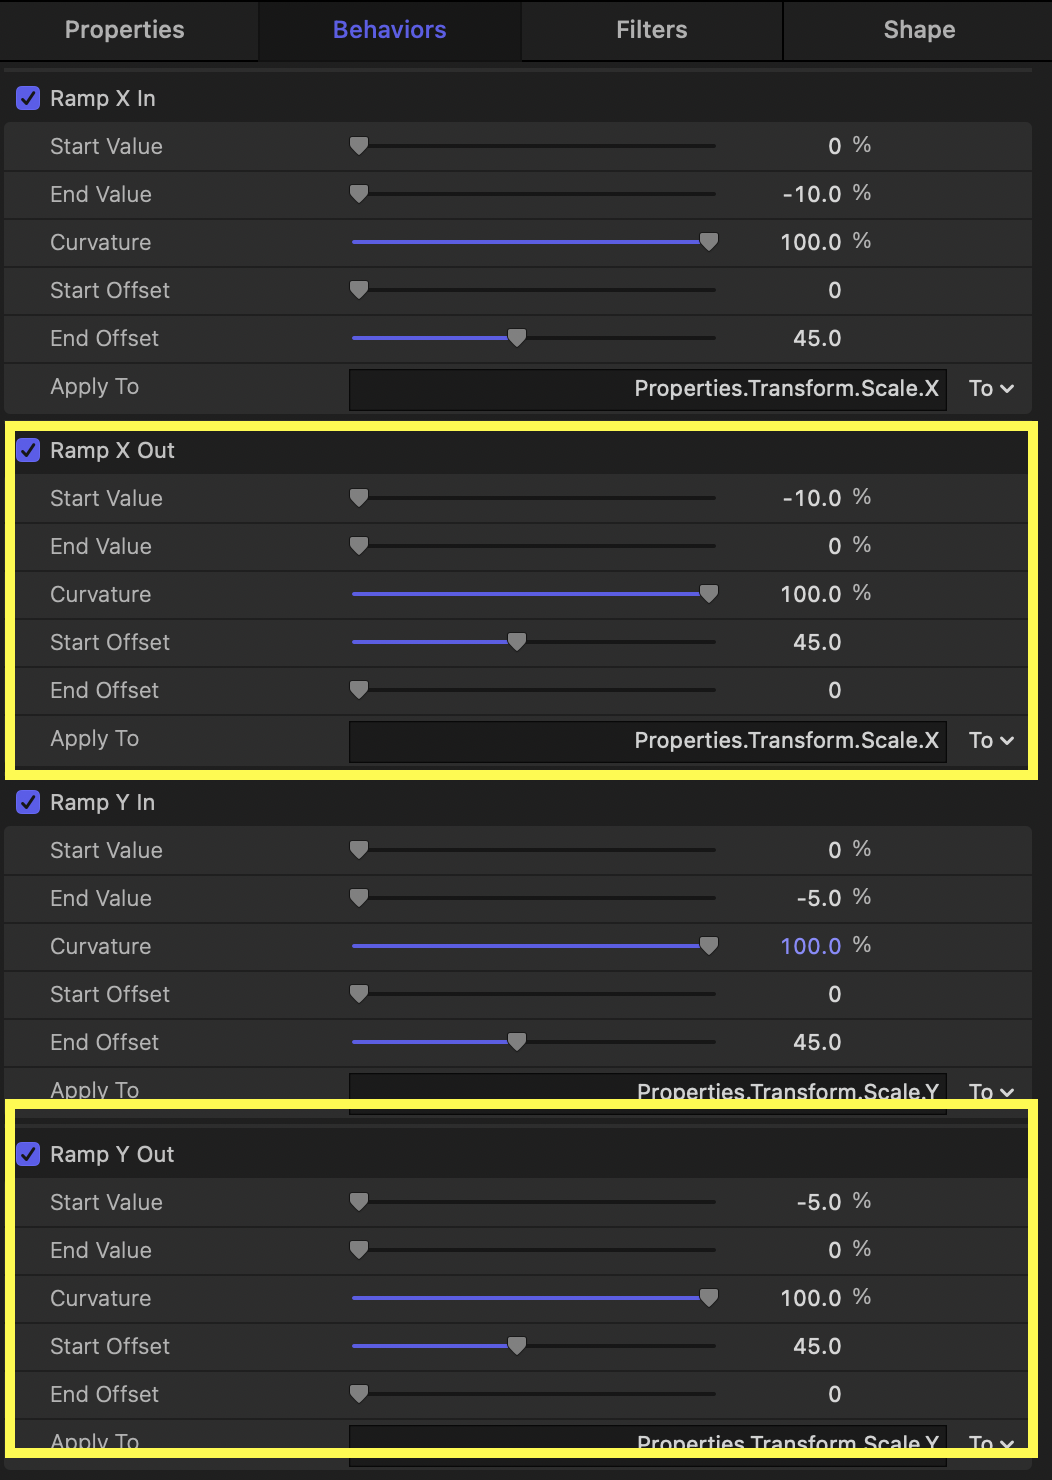
Trim these to half the duration of your project. Name them X in and Y in, and then duplicate each one, move it to the end of the project and name them X out and Y out


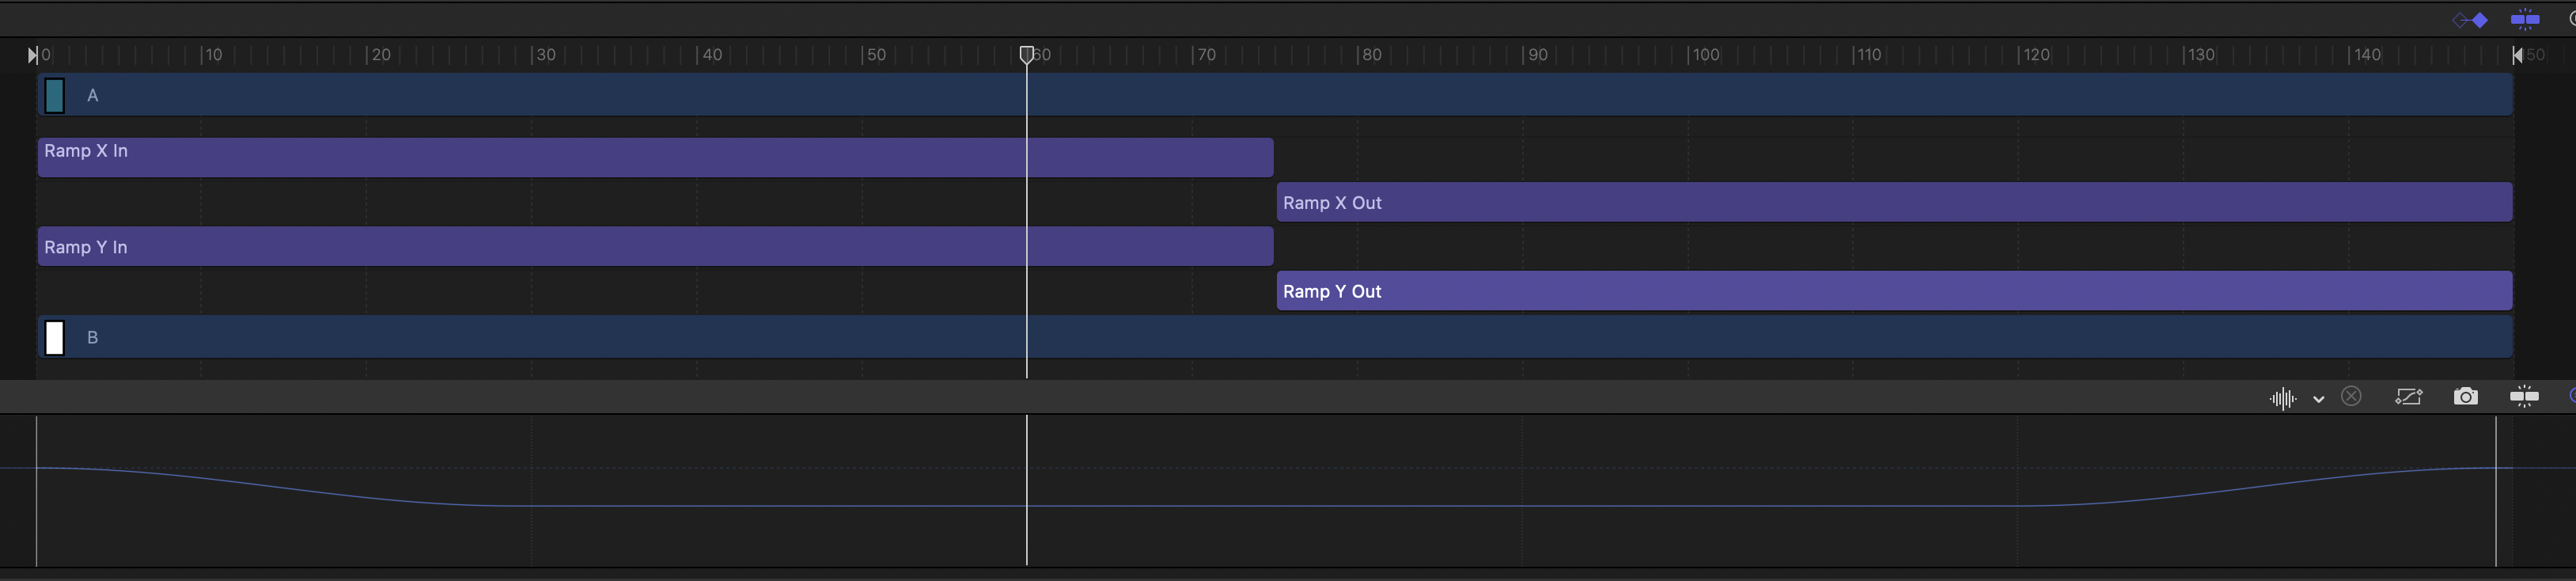
Behaviors are the general topic here. They are very contextual and how we set them up is all going to depend on the animation we want to do. In this case I am running each behavior half the project duration and using the start and end offsets to set the beginning frame and end frame of each animation. In other situations, we would just trim the behaviors to set the duration. In this case - because we are moving from a higher value to a lower value - if we trim - the layer will snap back to the original state at the end of the behavior.


Note in the screen shots the start and end offset values - end offset for the In animations and start offset for the out animations.


Generally - the end offset counts frames backward from the last frame of the behavior - and the start offsets count frames forward from the first frame of the behavior.


Start offsets delay the beginning of the animation.

End offsets make the end of the animation happen sooner.


In this case here, my project is 5 seconds at 30 fps.


The in behaviors run for 75 frames from 0 to 74 and the out behaviors run for 75 frames from 75 to 149


The end offset on the in is set to 45 - so 75 less 45 leaves 30 frames/1 second for the animation.


The start offset on the out is set to 45 - so the animation has 30 frames to run on the other side - animating in the last 30 frames of the behavior.


To the in behaviors, leave the start value at zero and set the end value to determine the final state of the parameter. In this case, for the y I set the end value to -5 and for the x the end value to minus 10 to keep proportion.


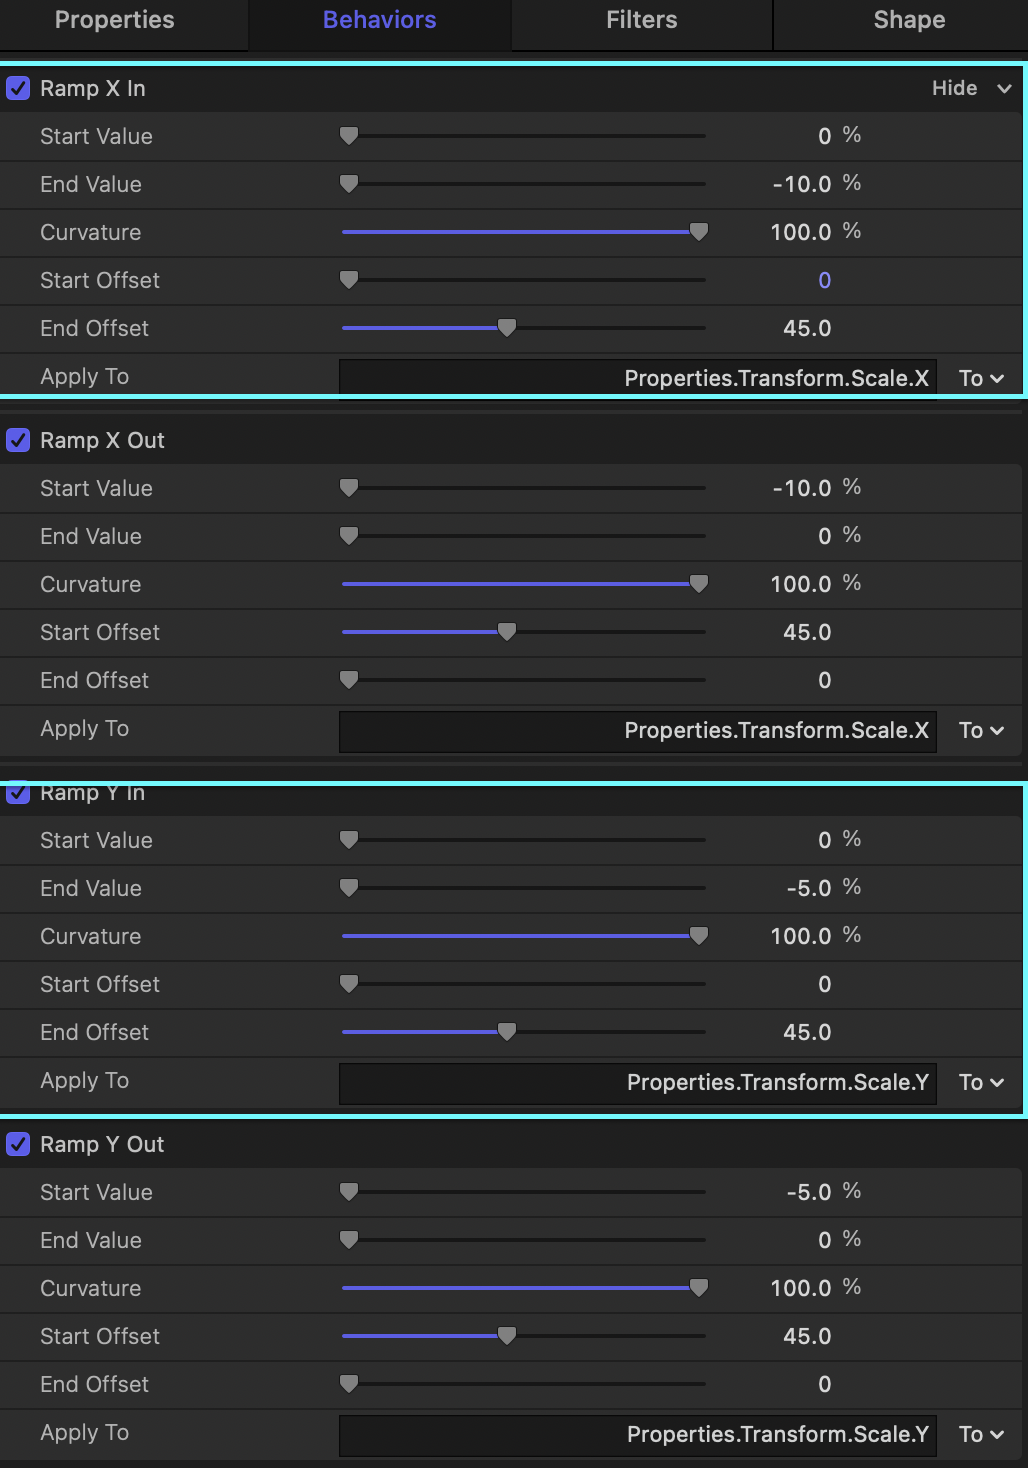
Now for the out behaviors, I set the start value to match the end value of the in behaviors.


The in animations moves from state A to B, while the out animations move from state B to A. Note that this is not a golden rule - as I noted before, how we configure the behaviors all depends on the animation we want to do and the functions we want to publish for the user in FCP.


I have the curvature of all behaviors set to 100 to give an ease in ease out style. Unfortunately, the ramp behavior is limited to this for animation style. To get more easing options, we can have other methods with other behaviors, especially the link behavior with the mix slider - but I will stick to just ramp behaviors here.


You can do the same with ramp behaviors on the width and height.


Once you explore this and get it working, I thin, if you are making a template to use in Final Cut Pro, then you will want to be able to publish something to set the size of the border in FCP. The solution would be to put the in animation end values and the out animation start values on a slider widget - to unify them into 1 parameter and then publish the slider. Let's look at that later when you get to that point.


This is a good exercise to get you familiar with the ramp behaviors. It is really important to note that ramp behaviors are just 1 way to get it done.


You mentioned keyframes before. That should work just fine. If it was getting messed up, then we need to look at your layer order and location of layers in the timeline - something was not correct there.


However - if we want to publish controls to FCP - keyframing a parameter directly is not the way - because if you publish a keyframed parameter - FCP will ignore the keyframes. Keyframing through a behavior and then rigging is the way to employ keyframes in a way that can then be published - but that is something to look at once you become familiar with regular behaviors.


Mar 19, 2023 3:52 PM in response to Dolmetscher

Now let's have a look at a different way to apply the ramp behaviors.


In this case, I duplicated the 120x720 layer and then linked the copy(Layer A) to the original (Layer B) by geometry - height and width.


In the link behavior - we have have the offset parameter for height and for width.


By using the same method with the ramp behavior, we can now animate the geometry of the framing layer from A to B and then from B to A again.


The benefits here


1: Using width and height instead of scale keeps the proportions. The offsets do not need to independent for the x and y axis to keep the framing layer in proportion and avoid chunky areas.


2: Now, the initial state of the main graphic can be variable. When we adjust the height and the width of the parent layer - the animation is maintained.


The parent layer height and width can now be published for user control - or be used to set the snapshots within the template, if you want your template work in other aspect rations - 1920x1080, 1080x1080 for example.


Note the snapshot function in the template. This is what allows us to create a template that works in various FCP project sizes, all from the same template - so no need to make different templates for different FCP projects.


This is probably overload of information for now, but note this for future projects.

Mar 18, 2023 7:24 PM in response to Dolmetscher

Thanks for this reference, I think I see what you have in mind now.


What parameter is the overshoot applied to here? Is it scale of position?


What function is the move behavior performing? - or is that an overshoot that has been renamed?


Side note~ in your screen shot, the rounded layer appears to be flattening out on the edges - this will happen when there is roundness and the scale is adjusted. If this is not the look you want - then in the shape roundness controls you'll see an option 'preserve scale' - turn that off to prevent scaling from flattening out roundness.


I'm assuming this is 1080x1920 vertical project - either by the project setting or as a snapshot within a project.


Cropping the title background will create the area, but, as we noted previously, it does not support roundness to be published. We want to set the visible area of the title background with a mask or image mask instead.


I'll be back soon with an example.


Mar 19, 2023 6:07 AM in response to rowie302

My Man!!! You have... NO IDEA... how thankful I am that you showed me this. I am a Photoshop wizard. I know Illustrator like the back of my hand, but when it comes to creating motion graphics... I seem to become an absolute perma-n00b. Your step by step help was HUGE!!! It worked perfectly. Thank you!!! If you're ever in the Charleston, SC area... Beers on me!

Mar 19, 2023 7:00 AM in response to Dolmetscher

Quick Follow-up question.

Since the canvas is 720 x 1280, any the image mask covering the Title Background is 625 x 1150, it appears as a frame around the clip it's applied to in FCP. I'd like to have the mask begin at 720 x 1280, i.e. 100% of the canvas, and, during the first 1 second build-in, shrink to the final 625 x 1150, and then in the end, during the "build-out, do the opposite. i.e. grow to fill the canvas again.


The Grow/Shrink behavior seems like what I'd want to try, but it works on percentages. So... it will scale the L/R value equally with the top/bottom value. But this creates a big chunky top and bottom to the frame. I want it to be more close to equal all around. I tried using keyframes on the image mask, but it made the mask not show up at all in FCP. I still cannot figure out when it is best to try to use keyframes vs. a behavior in Motion.


Mar 19, 2023 3:25 PM in response to Dolmetscher

Some further notes.


Parameter behaviors add or subtract from the existing parameter value.


In a ramp behavior - a start value of 0 does not mean we instruct the layer to start at 0 scale. The 0 start value means we want nothing added or subtracted from the initial parameter value. In this case, we are working with scale. The initial scale value is 100 - so a start value of 0 instructs that parameter to not change.


The end value of -5 means the final state of the target scale will be 100-5 = 95.


On the other side, with the out behaviors, we tell the layer to begin at -95 and to end at 100.


Have a look at the properties inspector as the animation runs - see how the behaviors control the scale parameters. This is universal for parameter behaviors, so what you learn here with the ramp behaviors generally applies to all parameter behaviors.


Also - you have roundness to consider. If your framing layer is going to have roundness but begin in a state that goes corner to corner - then you need to look at ramping the roundness from A to B also.

How can I publish a control found rounding the corners of the Title Background in FCP?

Welcome to Apple Support Community
A forum where Apple customers help each other with their products. Get started with your Apple ID.