Erasing an iPhone 5 With No Valid Apple Id or iCloud or Log In Info or Passwords

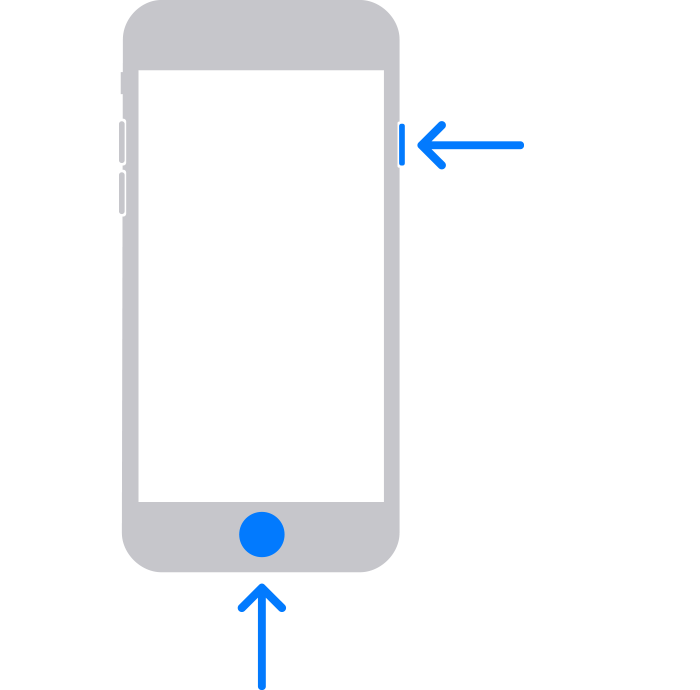
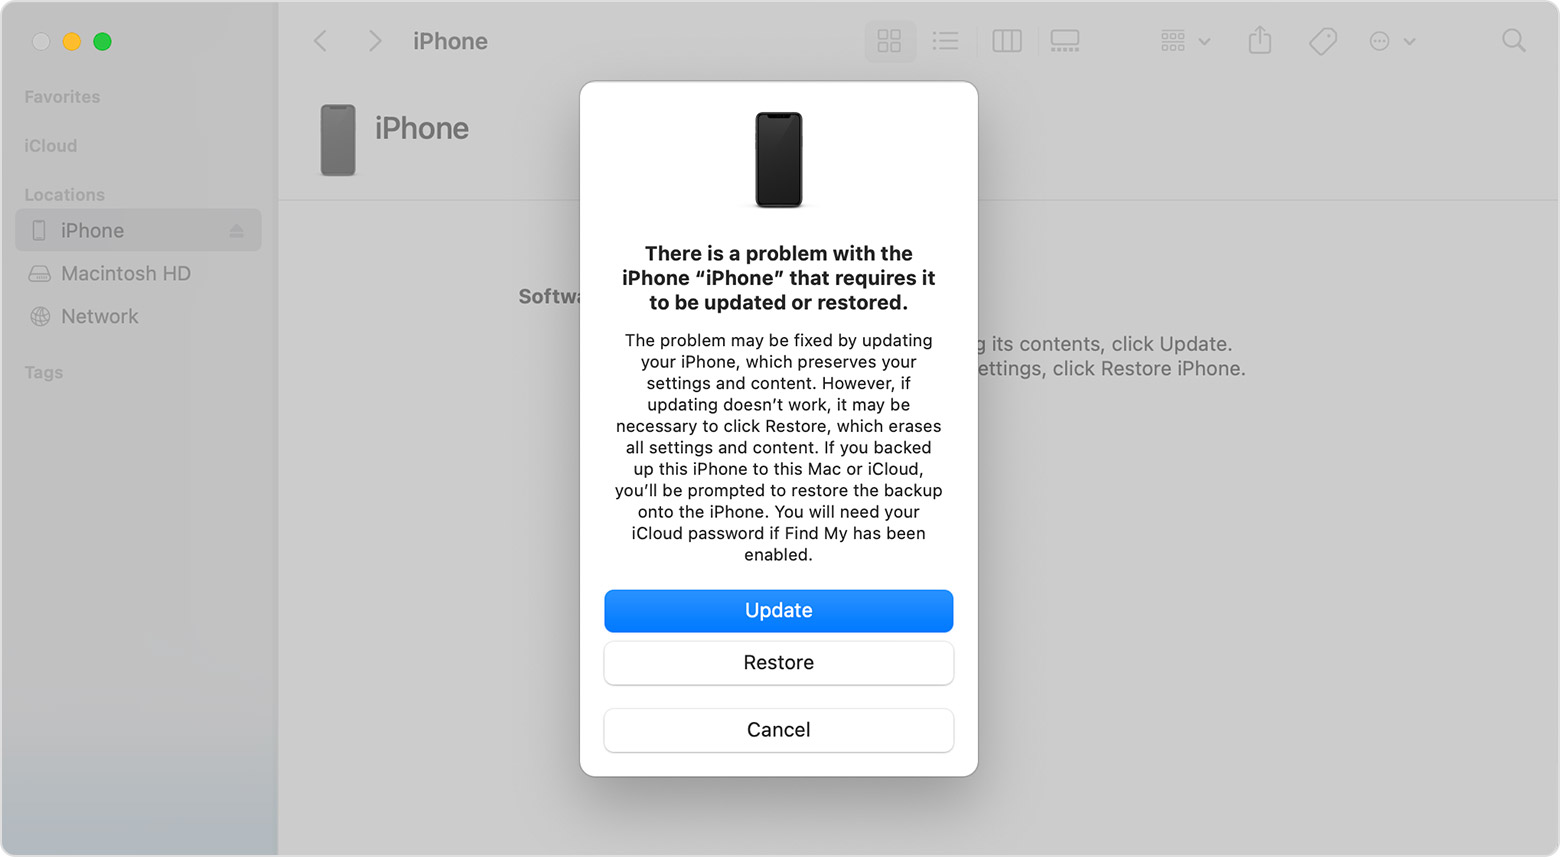
I just want to erase my deceased wife's iPhone 5 and then recycle it. I DON'T WANT TO RESTORE IT!! Who knew that such a process would be more difficult than congress trying to avoid government default? She once had an Apple ID and password, but they have long been out of use and no matter what I do to try to erase this phone, I keep getting prompts to enter either an iCloud ID or an Apple ID or an Apple ID password. The Apple ID she once used is an old deleted email address and when I try the last known password for that ID it says the person does not exist. I have tried the recovery mode option and that did not work because I was still being asked for the invalid ID/iCloud/Apple password data. I see lots of third party apps to accomplish this, but do I really need to pay $30 just to erase an old iPhone? What a colossal PIA! BTW, I have scoured the web for how I can accomplish this but have yet to find a free solution that works.

Earlier iPhone models

Posted on May 21, 2023 9:57 PM

Reply
Question marked as Best reply

Posted on May 23, 2023 2:07 PM

Thanks for replying, Bryan, and that additional info, it really helps! Glad you were able to figure this out with the Apple Store.


Have a great day and thanks for using the Apple Support Communities!

Similar questions

3 replies

May 23, 2023 1:01 PM in response to Bryan Lawrence

Hello Bryan Lawrence,


If entering the Apple ID password in Settings doesn't allow you to erase all content and settings on the iPhone, the only other option is to restore the device using recovery mode with a computer. When you put the device into recovery mode, the Apple ID isn't required to restore the device but may be required to set it up. After it's restored you don't have to set it up, it's OK to be recycled.


You can learn how to use recovery mode here: If you can't update or restore your iPhone or iPod touch - Apple Support


These steps may help:

Put your device in recovery mode and set it up again
1. Make sure that your Mac is up to date. If you're using iTunes, make sure you have the latest version of iTunes
2. On a Mac with macOS Catalina or later, open Finder. On a Mac with macOS Mojave or earlier, or on a PC, open iTunes. If iTunes is already open, close it, then open it again. Find out which macOS your Mac is using.
3. Keep your device connected and wait until the recovery mode screen appears:
* iPhone 6s or earlier, including iPhone SE (1st generation), and iPod touch (6th generation) or earlier: Press and hold both the Home and the top (or side) buttons at the same time. Keep holding them until you see the recovery mode screen.
4. Locate your device on your computer. When you see the option to Restore or Update, choose Update. Your computer will try to reinstall the software without erasing your data. Wait while your computer downloads the software for your device. If the download takes more than 15 minutes and your device exits the recovery mode screen, let the download finish, then repeat step 3.
A Finder window on a Mac showing options to restore or update your iPhone.
5. After the Update or Restore completes, set up your device.

Please note: Your post shows "Earlier iPhone Models" so we remove the information for other device types. If you need steps for a newer device, check out the article we linked above.


Thanks.

May 23, 2023 1:59 PM in response to ace1018

Thanks for your reply. I did try that but could only get so far. I took it to the Apple store and they ran in to the same problems I was having. The phone was so old the software kept getting corrupted when it was downloading. So we just agreed that they would recycle it as is. Since the email and IDs and passwords are invalid, the security risk is pretty low. And they assured me that when they recycle it should pretty much destroy everything.

Erasing an iPhone 5 With No Valid Apple Id or iCloud or Log In Info or Passwords

Welcome to Apple Support Community
A forum where Apple customers help each other with their products. Get started with your Apple ID.