What I ended up doing is partitioning my internal drive using disk utility so that I have my main partition and a Photo Library partition. You won't have to partition your internal drive if you have an External Drive available.
Scenario: 1 2008 iMac, 3 users, each want to share a Photo library, but each still want their individual iCloud Photo Sharing capabilities.
If you have an external hard drive that you can dedicate to be your exclusive Photo Library Drive, you can skip Step 1.
Step 1 (skip if you have a large external hard drive available):
I didn't have another external drive to use, so what I did is partition my internal drive.
If you have access to another Mac, pay attention to the underlined segments ahead.
2 Macs:
Restart the Mac and hold the T key before it starts booting. This will enter the Mac into Target Disk mode. Connect another Mac (we'll call it Source) into the Mac in Target Disk Mode (Target) using a Firewire or Lightning cable.

My photo examples won't be exact, but hopefully they still help.
Launch Disk Utility and select your internal drive or the internal drive of the Target Mac (be sure not to select one of its partitions or you won't see the 'Partition' tab).
Select the Partition tab:

Create the partition by clicking the '+':

Make it large enough to support whatever size of a Photo Library you think you may need.
Click Apply.
2 Macs:
Eject the Disks that belong to the Target Mac, disconnect it from the Source Mac, Shut it down by holding the power button, and reboot it.
Step 2:
Find and select your new partition or your external drive in Finder. Either use the keyboard shortcut Command+i or right click the partition and select 'Get Info'.
At the bottom of the Info window click the little lock:

Enter the administration credentials in the prompt.
Then check the box that says "Ignore Ownership on this volume":

Step 3 (repeat for each user):
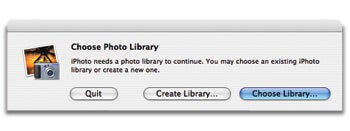
Now Option-Launch Photos (Launch Photos holding the Option key). If you don't see the library that is on the new partition (you can see the full path below the list to the library if you select a library in the list), select'Other Library...':

Remember to repeat this step for each user.
Step 4:
Now the library should be working fine for each user, they can each import photos, and each user will see them.
Fast Switching should work, but only one user can have Photos running at once. If a user has it running and you can't log them out, then you're locked out of the library (But an admin user can log other users out). So you'll have to agree on some rules with the users about quitting Photos when each user is done.
To get your iCloud photos working Select 'Photos' in the Menu bar and select 'Preferences' ( keyboard shortcut: Command+, ).
Ensure the 'General' tab is selected in the Preferences window and click the button 'Use as System Photo Library' (it will be greyed out if the library is already the System Photo Library):

This will allow you to enable you iCloud Photo Sharing in the iCloud tab.
I am happy with how this is working. Hopefully it's a decent solution for someone else. Let me know if I missed any steps, because I'm posting this after the fact from another computer.
Goodnight and Good Luck.