As promised, here’s my full tutorial:
Recently, iTunes received an update, 12.6.0.100. In previous a version iTunes had the option to right-click on each item to change to 1080p, but now that option is gone. It's still in the menu bar > Movie > Video Quality > High Definition (1080p). It's still not possible to select multiple titles then check the 1080p option, it has to be done one at a time.
Lets fix this using Automator!
First we need to create a keyboard shortcut that will change the selected title to 1080p.
- Open System Preferences.
- Click Keyboard.
- Click Shortcuts.
- Click App Shortcuts.
- Click the "+" button.
- In the Application field, select iTunes.
- In the Menu Title field, enter "High Definition (1080p)" without the quotes.
- In the Keyboard Shortcut field type a unique keyboard shortcut. I used "ctrl+opt+cmd+h" w/o the quotes.
- Click Add. Quit System Preferences if you want.
- In iTunes, click the ‘View Chooser’ - that little drop down menu in the upper left next to the [<] [>] buttons (Music, Movies, TV Shows, etc) - Click on Movies.
- Beneath that ‘view chooser’, in the Sidebar, under "Library" click "Movies" so you see all of them.
If you can’t see the Sidebar, type opt+cmd+s.
- In the menu bar, click View > View As > List.
- Select the title at the top of the list. Or which ever title you need to change.
- Type your super-awesome keyboard shortcut - "ctrl+opt+cmd+h" w/o the quotes.
- Type the down arrow on your keyboard then repeat the keyboard shortcut as needed.
If you only have a few to fix, then you can manually enter this keyboard shortcut for each title. If you have more than a few, it’s time for that little Automator robit to get to work.
- Open Automator.
- Click New Document.
- Click Service.
- Make it look like the attached screen grab, including the part at the top, "service receives [no input] in [iTunes.app]”.
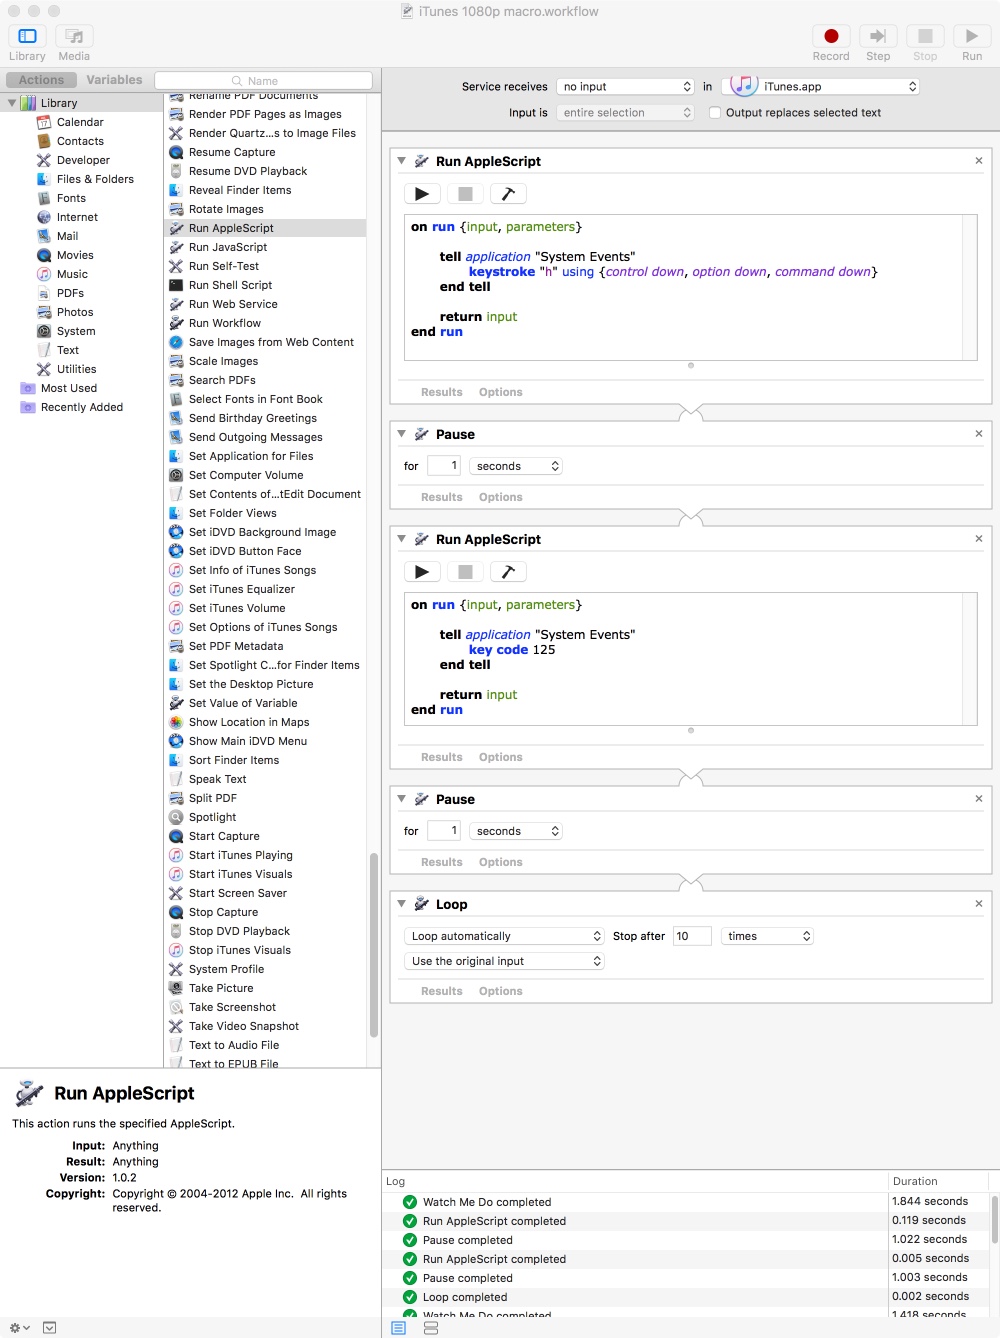
- Change the Loop to whatever you want, but test with smaller increments first. *See notes below*
- Save it as "Auto 1080p" or whatever. It will go in a super secret folder where you'll never find it ( ~/Library/Services/ )
- In iTunes, follow steps 10-13. This will be the ‘starting point’ for your workflow.
Alter step 13 as needed - select the title where you want to start the workflow.
- In the menu bar click iTunes > Services > Auto 1080p.
Pro Tip- You can create a keyboard shortcut for this Service!
- Follow step 1-4.
- Click Services.
- Scroll to the bottom of the list to find your new Service.
- Click “none” to the right of the Service name.
- Click “Add Shortcut”
- Type a unique keyboard shortcut. I used "ctrl+opt+cmd+a" w/o the quotes.
- Go back into iTunes and type "ctrl+opt+cmd+a" w/o the quotes.
- Watch the workflow then enjoy your 1080p content!
Just a few notes:
- Enter at your own risk. This is a keyboard macro emulating your typing on the keyboard; if you didn’t follow exactly, or even if you did follow exactly, it might do something undesirable.
- Don’t touch your computer until it stops unless you know how to stop the workflow... I couldn’t figure that out. I tried going back up to menu bar > iTunes > Services, but I couldn’t even get that far since the keyboard was typing.
- So maybe don't set your loop too high in Automator.
- It will not perform the desired function if you click out of iTunes, but it will technically keep going so you still have to wait for the loop to end.
- If you followed steps 23.a.1. - 23.a.6. DO NOT reenter the Service keyboard shortcut. I haven’t tried this, but I assume it will be like crossing the streams: total protonic reversal.
- This won’t undo any title that is already set to 1080p.
- Nor is it smart enough to skip the titles that are already 1080p.
- Nor could I find a way to first sort titles by Video Quality.
- You'll hear an error sound (boop) if the file doesn't have a 1080p version, then it will move on.
- That means titles with max 720p will stay 720p.
- If you show the Size column in List view, you’ll be able to watch the file size change from small to large as the workflow proceeds.
I hope this helps everyone here. It took me much longer to write up this tutorial than it did to create the workflow PLUS fixing my titles!
Good luck!
PS- Let’s hope Apple will fix this issue in the near future. Wish in one hand…