You can make a difference in the Apple Support Community!

When you sign up with your Apple Account, you can provide valuable feedback to other community members by upvoting helpful replies and User Tips.

Looks like no one’s replied in a while. To start the conversation again, simply ask a new question.

How do you know a page fits into A4 in Apple Numbers

How can you make Apple numbers work in A4 A3 size so you can know where your spresdheet has exceed the print size you are printing into.


You can check by pressing print but it sersiously time consuming going backwards and forwards to see if it has eventually fitted.


There has to be a way to show this on screen while you are working on the spreadsheet.

Posted on Feb 12, 2021 2:13 AM

Reply
Question marked as Top-ranking reply

Posted on Feb 12, 2021 2:07 PM

For a table that will fit on a single A4 page:


Start by determining or setting the size of the print area on that page by pressing command-p to go to Print Setup mode.
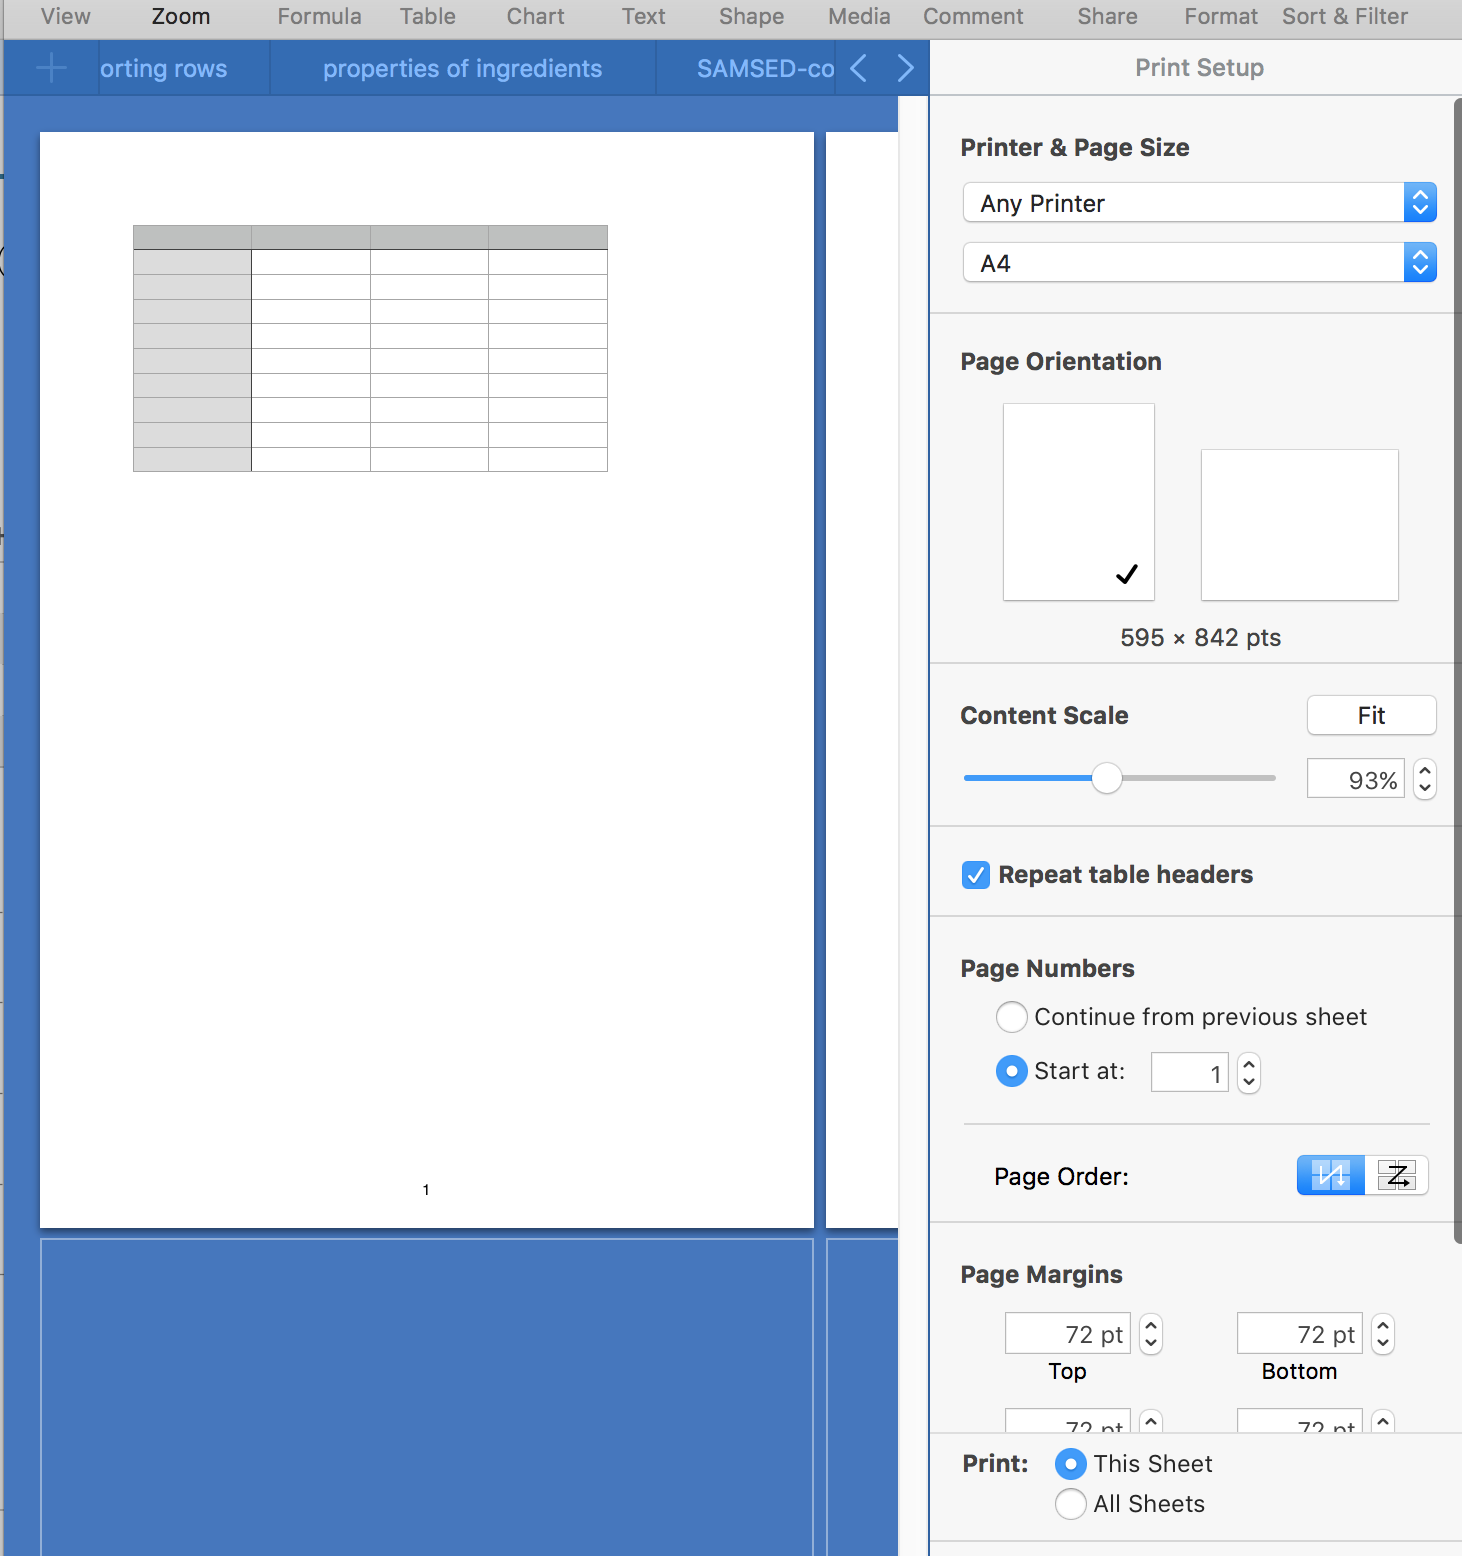

The image shows that with A4 as the paper size, and all margins set to the default 72pts (one inch), this five column table, scaled to 93& of full size is too wide to fit within the width of the print area, and will require two pages. (Note the white "page" to the right of the blue strip between the two 'pages'.


To fit the table onto a single page, you can do any combination of the following to change the scale of the print copy.:

  • In the Content scale part of the Inspector:
    • Click the Fit button, OR
    • Drag the slider left, OR
    • Click the v mark on the stepper

to reduce the print size to fit the available width.


Recommended: Use the stepper. It gives you easier control in small steps.

When the full table will fit on one page, the second page will disappear, and the last column of the table will join the others.
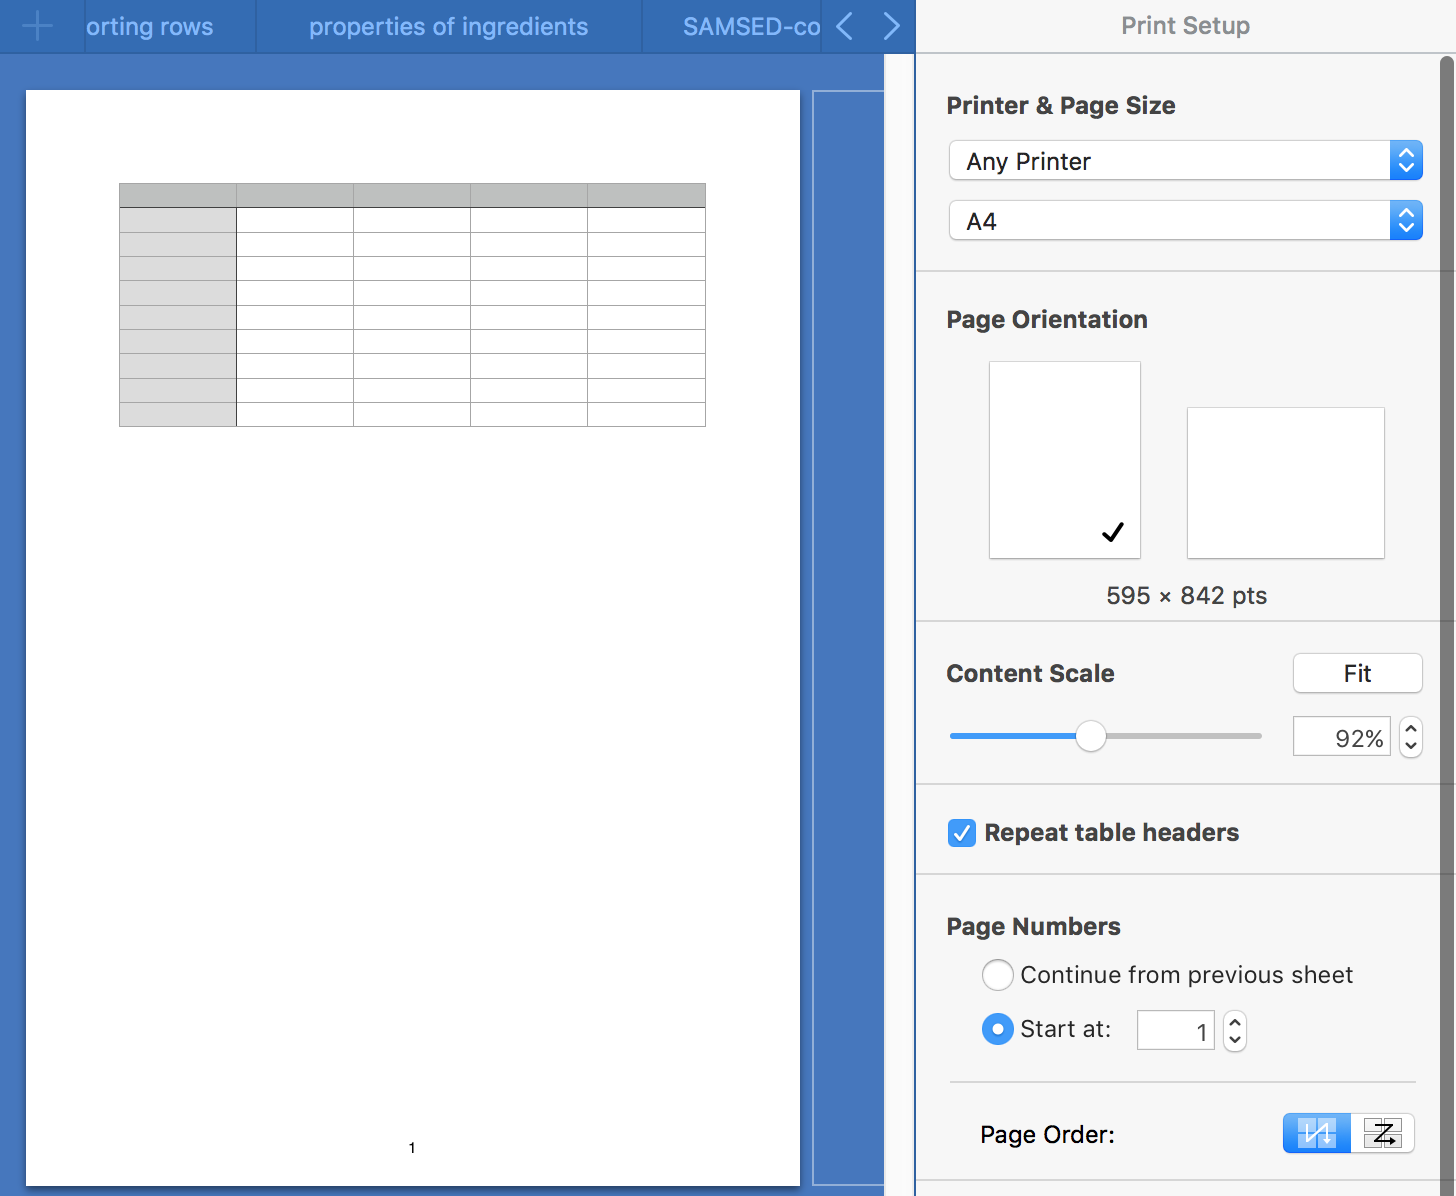

OR you can work in the other direction: Reduce the margins to make the print area greater.


With both left and right margins reduced to 36pts (from the default 76pt) the five column table will easily fit on a single page, and can be expanded to 106% without requiring a second page, as seen below.
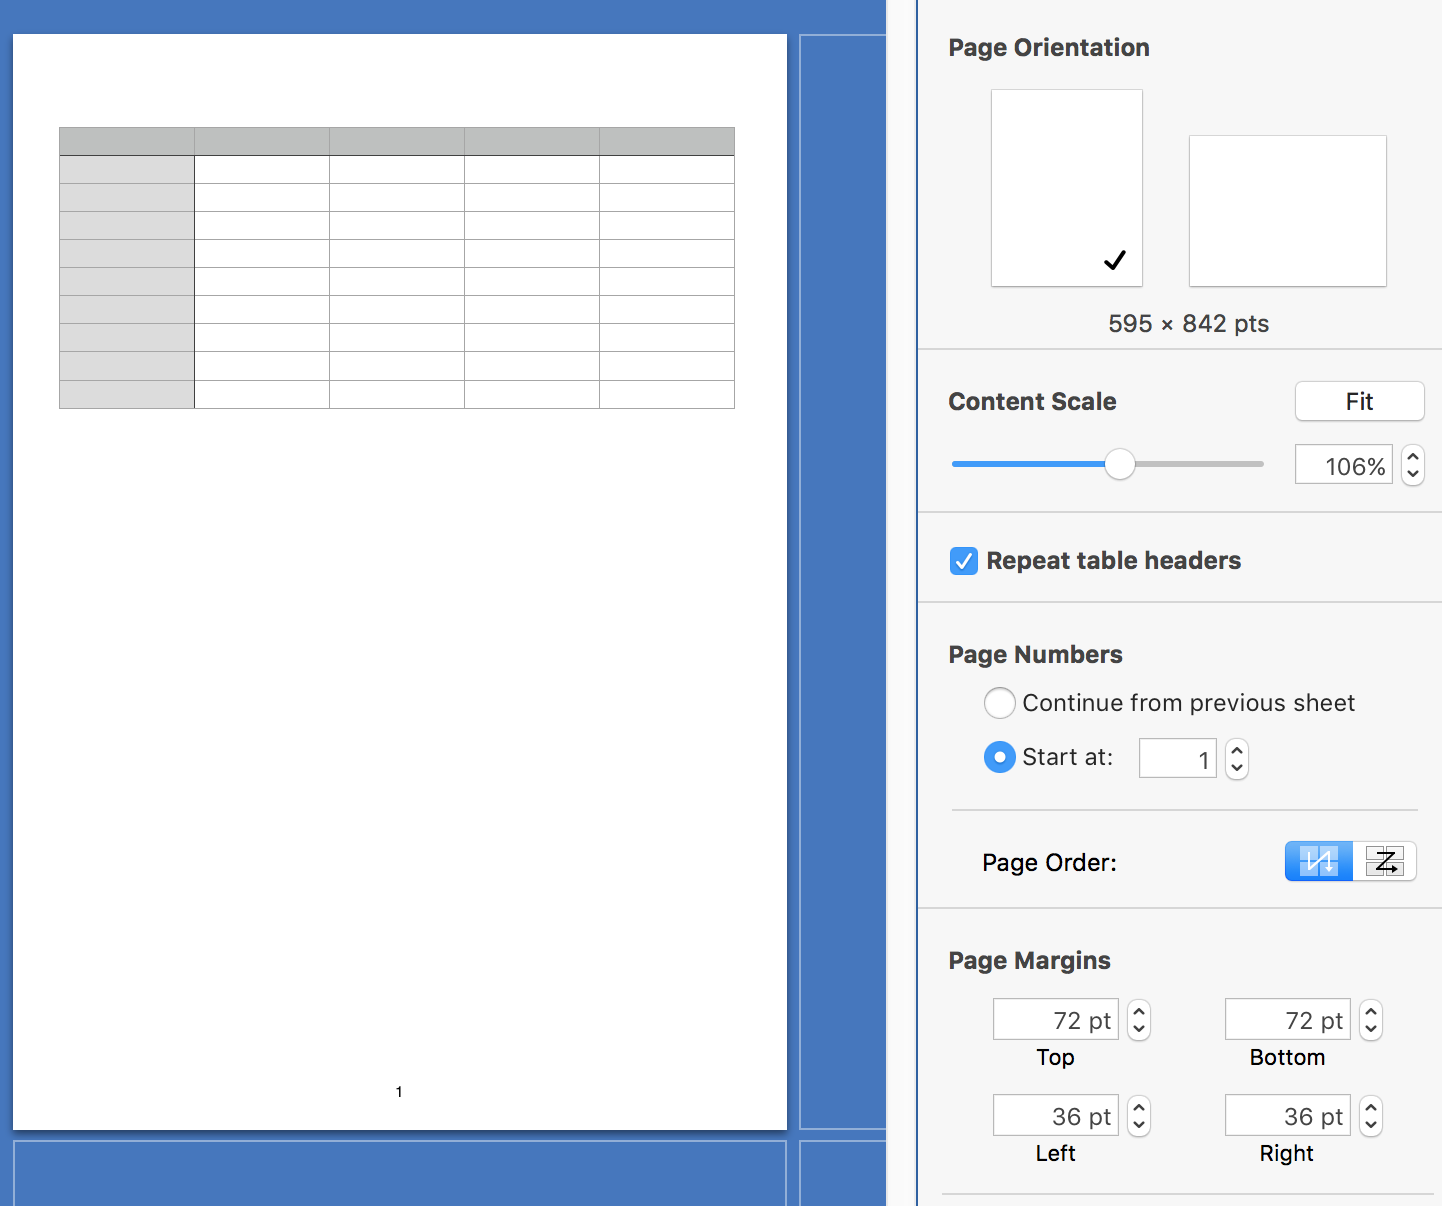


Once you have determined margin settings that will allow the full width (and height, it that is also an issue) at 100%, return to edit mode by clicking Done (bottom left of the inspector panel).


In edit mode, click on the vertical ruler an drag right to drag a yellow guideline to the right edge of the table, and drop it at that edge.

Repeat, dragging a horizontal guide from the horizontal ruler and dropping it at the bottom edge of the table (assuming you've already determined the maximum height that will fit.


The yellow guidelines will remain in place unless you move them, and will show you the boundaries within which you can place tables or other objects without causing Numbers to produce another page to contain them.


Note that this does not work well beyond the 'first' page as tables extending beyond the boundary will be separated between columns, not at the 'page limit'.


Regards,

Barry


2 replies
Question marked as Top-ranking reply

Feb 12, 2021 2:07 PM in response to ciaran161

For a table that will fit on a single A4 page:


Start by determining or setting the size of the print area on that page by pressing command-p to go to Print Setup mode.


The image shows that with A4 as the paper size, and all margins set to the default 72pts (one inch), this five column table, scaled to 93& of full size is too wide to fit within the width of the print area, and will require two pages. (Note the white "page" to the right of the blue strip between the two 'pages'.


To fit the table onto a single page, you can do any combination of the following to change the scale of the print copy.:

  • In the Content scale part of the Inspector:
    • Click the Fit button, OR
    • Drag the slider left, OR
    • Click the v mark on the stepper

to reduce the print size to fit the available width.


Recommended: Use the stepper. It gives you easier control in small steps.

When the full table will fit on one page, the second page will disappear, and the last column of the table will join the others.


OR you can work in the other direction: Reduce the margins to make the print area greater.


With both left and right margins reduced to 36pts (from the default 76pt) the five column table will easily fit on a single page, and can be expanded to 106% without requiring a second page, as seen below.


Once you have determined margin settings that will allow the full width (and height, it that is also an issue) at 100%, return to edit mode by clicking Done (bottom left of the inspector panel).


In edit mode, click on the vertical ruler an drag right to drag a yellow guideline to the right edge of the table, and drop it at that edge.

Repeat, dragging a horizontal guide from the horizontal ruler and dropping it at the bottom edge of the table (assuming you've already determined the maximum height that will fit.


The yellow guidelines will remain in place unless you move them, and will show you the boundaries within which you can place tables or other objects without causing Numbers to produce another page to contain them.


Note that this does not work well beyond the 'first' page as tables extending beyond the boundary will be separated between columns, not at the 'page limit'.


Regards,

Barry


Feb 13, 2021 2:46 AM in response to ciaran161

Hi ciaran161,


If you want to see if all the objects in a Numbers sheet will fit into an A4 page without using Content Scale to Fit, insert a rectangle shape that does fit inside an A4 page. Use that rectangle as a layout guide.


Here is a screen shot of a rectangle in Print Setup that will fit inside a single A4 piece of paper in Portrait orientation at 100%.

Ignore the Zoom setting of 65% (top left of this screen shot). That was simply to make a smaller screen shot. That Zoom setting will not change the Content Scale (100%).


Paper size is shown in millimetres (210 x 297, the international standard). However Numbers uses centimetres for size and position. So, here we go with centimetres.


I calculated the size of the layout rectangle on another Sheet (Tab):


Formula in B1 of the "Size of print area (centimetres)" table:

'Enter paper size & margins (centimetres)'::B1−'Enter paper size & margins (centimetres)'::B3−'Enter paper size & margins (centimetres)'::B4

Formula shows 17 cm.


Formula in B2 of the "Size of print area (centimetres)" table:'Enter paper size & margins (centimetres)'::B2−'Enter paper size & margins (centimetres)'::B5−'Enter paper size & margins (centimetres)'::B6

Formula shows 25.7 cm.


On the "Rectangle to fit 1 page" sheet, insert a rectangle Shape with no shadow, no fill and a black border of 1 pt.

Let us make the rectangle a tiny bit smaller than 17 cm x 25.7 cm to allow some leeway. I used 16.9 cm width and 25.6 cm height.

Drag the rectangle to the top left of the printable area (Position X = 0, Y = 0).


Save as Template for future use.

Everything that will fit inside that rectangle will print on a single A4 piece of paper, Portrait orientation.


You can delete the layout rectangle if you wish.


Please call back with questions.

Regards,

Ian.


How do you know a page fits into A4 in Apple Numbers

Welcome to Apple Support Community
A forum where Apple customers help each other with their products. Get started with your Apple Account.