EXIF data ISO value not displayed when using Get Info

16" MacBook Pro M1 MAX (2021)

32GB RAM

OS version 12.6


When I use "Get Info" to look at the details of an image file, JPG, RAW, NEF, CR3 etc it no longer displays the ISO value from the EXIF data stored within the file details. It did used to, but no longer does which means I now have to open each of the files in Preview and inspect the EXIF details from within that application to find the ISO value.


Please can we have this functionality put back into "Get Info" as it's a major pain having to open up files in Preview all the time to get at that data.


Thank you,

Howard.


MacBook Pro 16″

Posted on Jan 12, 2023 2:20 AM

Reply
Question marked as Top-ranking reply

Posted on Jan 12, 2023 7:50 AM

I just checked if the ISOSpeedRatings key is still in the dictionary formed from NSImageEXIFData property applied to an image and it is still there. This means that someone on the macOS product team (that isn't a photographer) decided it was one line too many in the Get Info panel. See Yer_man's feedback link.


If you are interesting in locating images based on their EXIF ISO speed rating, Spotlight can help:


kind:image iso:50
kind:image iso:50-250
kind:image iso:>50
kind:image iso:<500


Click once on the image in Spotlight and press cmd+R to locate it in the Finder. The latter offers a View > Show Preview option and a Show Preview options list that supports ISO Speed for a selected image.

Similar questions

11 replies
Question marked as Top-ranking reply

Jan 12, 2023 7:50 AM in response to howardfromrochdale

I just checked if the ISOSpeedRatings key is still in the dictionary formed from NSImageEXIFData property applied to an image and it is still there. This means that someone on the macOS product team (that isn't a photographer) decided it was one line too many in the Get Info panel. See Yer_man's feedback link.


If you are interesting in locating images based on their EXIF ISO speed rating, Spotlight can help:


kind:image iso:50
kind:image iso:50-250
kind:image iso:>50
kind:image iso:<500


Click once on the image in Spotlight and press cmd+R to locate it in the Finder. The latter offers a View > Show Preview option and a Show Preview options list that supports ISO Speed for a selected image.

Jan 14, 2023 3:30 AM in response to howardfromrochdale

I am using the app Raw Right Away as a helper in the background.

Once installed, and after setting the preferences and logging on and off, the Info in the Finder will show many existing tags automatically, when viewing a Finder window in column View. http://www.rawrightaway.com/


For example:


As an added bonus, it will install a service to set the creation date of exported images to the capture date.

And show the previews of RAW files right away.


Jan 12, 2023 4:43 AM in response to howardfromrochdale

Please can we have this functionality put back into "Get Info" as it's a major pain having to open up files in Preview all the time to get at that data.


Feature requests go here:


Feedback - macOS - Apple


Worth considering, apps like Graphic Converter offer a wide variety of ways for you to view your image files, and disclose the accompanying metadata. Worth checking out.

Jan 13, 2023 10:43 AM in response to howardfromrochdale

If you have the Apple Command Line Tools for Xcode installed from Terminal:


xcode-select --install


that will install ~3GB of additional development stuff on your Mac. However, the benefit is that I have an AppleScript that uses a Swift handler in it and it extracts all of the metadata from a selected image and displays it in a tall AppleScript Display dialog where you can copy paste items from it. This works for supported camera RAW images too.


Just copy/paste this into Apple's Script Editor, click the hammer button and then run it.


use scripting additions

set f to POSIX path of (choose file of type {"public.image"}) as text
display dialog (my extract_EXIF_data(f)) as text
return

on extract_EXIF_data(ximg)
	return (do shell script "/usr/bin/swift <<'EOF' - " & ximg & "

import Foundation
import ImageIO
// force filename to text string
let fname = CommandLine.arguments.dropFirst().joined(separator:\"\")

let tilde_name = NSString.init(string:fname).abbreviatingWithTildeInPath
var fsURL = NSURL(fileURLWithPath:fname).absoluteURL!
print(tilde_name)

if let imageSource = CGImageSourceCreateWithURL(fsURL as CFURL, nil) {
    let cfD:CFDictionary = CGImageSourceCopyPropertiesAtIndex(imageSource, 0, nil)!
    guard CFDictionaryGetCount(cfD) != 0 else {
        print(\"No metadata present for image\")
        exit(1)
    }
    let nsDic = NSDictionary.init(dictionary: cfD as! [AnyHashable : Any], copyItems: false)
    print(String(describing:nsDic))
}
EOF")
end extract_EXIF_data
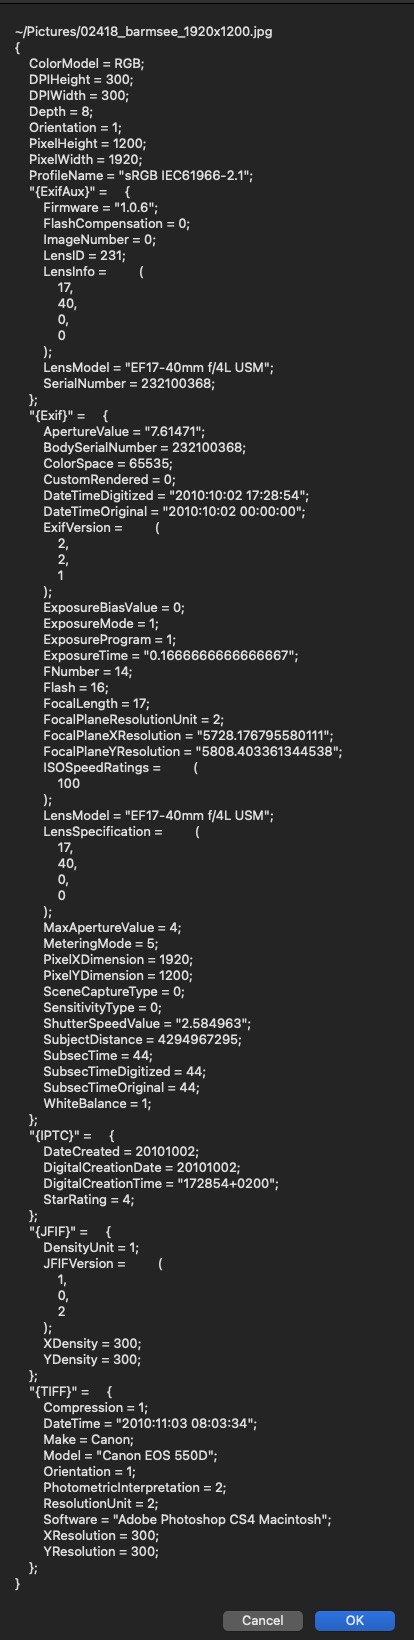

Output:


Jan 13, 2023 6:57 AM in response to VikingOSX

Thanks VikingOSX. I used to clip the get info data into a little image file and use that image added that to the original photo when publishing for my Uni work, so although what you suggest will work, it's just for a particular image file rather than search for all image files with a specific range of ISO value.


Cool way of using spotlight though that I wasn't aware of, and I can see how I could us it in other circumstance.


Cheers.


Jan 14, 2023 11:45 AM in response to howardfromrochdale

You don't need Xcode, just the command line tools for Xcode, which is the only thing that xcode-select is installing. If you don't trust xcode-select then just type clang or python3 and a return in the Terminal and you will be prompted to install the command line tools.


Unfortunately, Apple's dialogs do not scroll and longer EXIF data listings will probably truncate in display dialog. I am looking into creating a scrollable window dialog for that content to avoid the issue.

This thread has been closed by the system or the community team. You may vote for any posts you find helpful, or search the Community for additional answers.

EXIF data ISO value not displayed when using Get Info

Welcome to Apple Support Community
A forum where Apple customers help each other with their products. Get started with your Apple Account.