You will need to reinvent the wheel a little bit.
Shape outlines are, fundamentally, emitters (set up Airbrush or Image Brush Types and play with Advanced > Dynamics or the Jitter controls in the Stroke section). After the Shape, the emitter can use a shape as a source for emitting particles (Geometry). Unfortunately, neither the shape or an emitter allows us to offset the points/particles used to render the shape. So basically, you need to convert your Bezier shape to a Replicator which also can use "Geometry" as the basis of outline replicated items.
Draw another small circle to use as your "brush". Type L to create a Replicator using the dot as your "brush".
For the Shape, select Geometry and to the Shape Source drop well add your Bezier line. Depending on the size of your "dot", set the number of points to around 512 (go higher if you need smoother) to start and adjust the Scale parameter in the Cell Controls.
Set the Color Mode to Over Pattern.
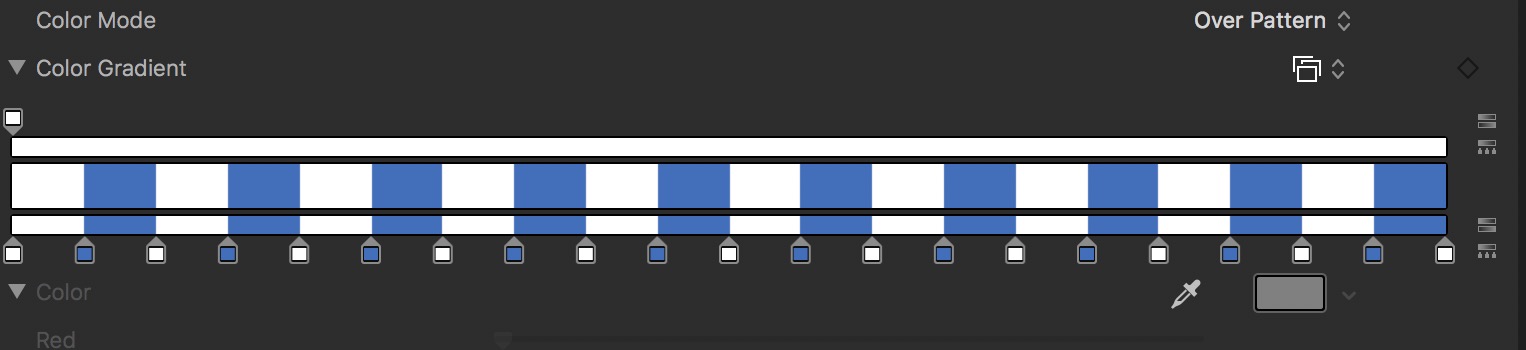
Create a Gradient that looks something like:
How you do this is:
Select the leftmost color tab and set it to white. Look down the gradient parameter list for Interpolation and set it to Constant. Drag the rightmost tab over significantly and also set its interpolation to Constant. Now, any other tab you add will automatically set itself to Constant when added — but all you need to do is hold down the option key then click and drag the alternate color tabs to add/duplicate more tabs. Don't worry about alignment.
In the "gradient" created above, there are 21 tabs (an odd number is important to keep the light/dark coloring even across the line and the first and last are the same color).
When you've created the 21 tabs (or 19, 17, etc...) with alternating color (doesn't matter what the darker color is) there are two, very tiny icons on the right bottom corner of the gradient editor. Click the bottom one. All the tabs will be automatically distributed perfectly evenly across the range of colors. [The button over it will flip the gradient order "backwards" -- you won't want to do that here! You get the same two "buttons" for the Opacity gradient over the color gradient.]
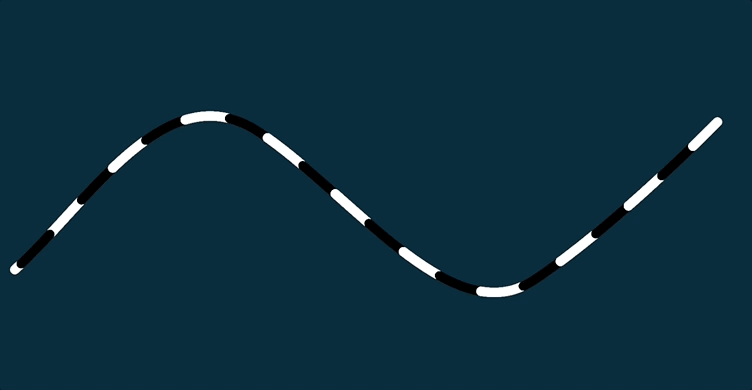
To turn this to black and white, just drop a Filters > Color > Threshold filter on the Replicator.
Now, when you drag the Offset control back and forth, you will see the color pattern move. To automate this, right click on Offset and Add Parameter Behavior > Oscillate.
In the Oscillate behavior, set the Speed to a multiple of 3 (based on a project length evenly divisible by 5, typically 10 seconds for a default length project). I personally like 9 for this.
HTH