Looks like no one’s replied in a while. To start the conversation again, simply ask a new question.

Safari pop-up preferences missing - Monterey

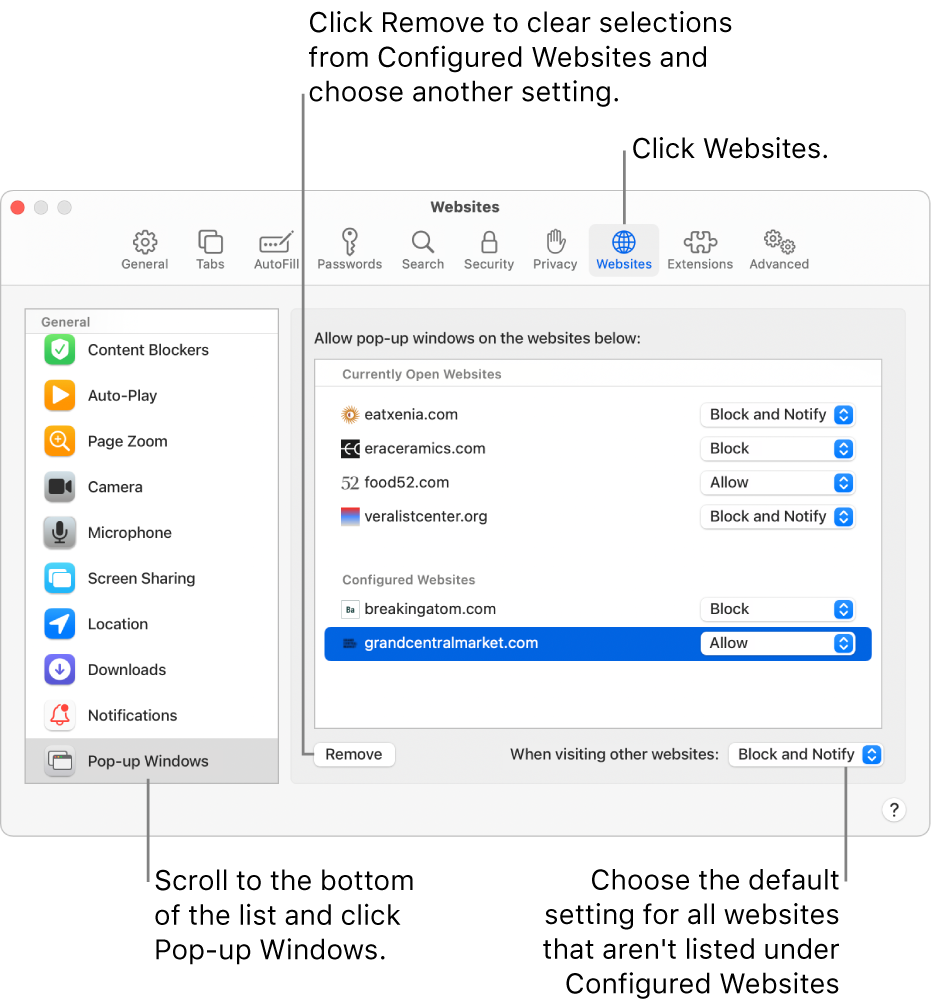
When I go to Safari Preferences and click on the Websites tab, there is no Pop-up option in the left bar (see screen shot- I've scrolled to the bottom). I am using Safari 15.4 running macOS Monterey 12.3.1 on an M1.


Previous question on this topic from 2019 mentions a .plist which does not exist on my Machine. There are only 2 plist files in that location.


MacBook Air 13″, macOS 10.15

Posted on Oct 6, 2022 10:16 PM

Reply
15 replies

Oct 15, 2022 7:48 AM in response to Godfrey Raftesath1

Hi Godfrey Raftesath1,


Thank you again for trying those steps. Safari version 16.0 is correct. When we reinstall the macOS, that reinstalls everything with the macOS, which includes Safari.


How about Safari extensions?

  1. Safari
  2. Preferences
  3. Extensions

Do you have any extensions installed? If so, let's turn them off, by deselecting its checkbox,

and see if that resolves this missing Pop-up Windows option.

How to install Safari extensions on your Mac - Apple Support


If the option is now there in System Preferences, and there was only one Safari Extension, you can just uninstall it. If more than one, turn then back on one at a time, to see which one is causing the issue.


Take care!

Oct 16, 2022 3:28 PM in response to K_Faith

I tried a brute-force approach: I shut down Safari and renamed ~/Library/Containers/com.apple.Safari. I restarted Safari and it recreated the com.apple.Safari folder. Pop-up Windows is now present, as are all my bookmarks. Some preferences are default. 


In the original folder there is file Container.plist which is not in the new folder. It has not been modified for almost a year. I shut down Safari again, deleted the new Safari folder, renamed the original Safari folder back and renamed Container.plist. Safari started, bookmarks and preferences are as they were before. Pop-up Windows is present.


Problem solved.


Thank you to those who understood the issue and offered suggestions.

Oct 8, 2022 12:28 PM in response to Godfrey Raftesath1

Hey Godfrey Raftesath1,


What type of pop-up are you referring to? We checked Safari Preferences > Websites tab as well and it looks just like your screenshot. We want to confirm what's missing to make sure that we're on the same page.


To learn more about Websites preferences in Safari on Mac, check out this user guide here: Change Websites preferences in Safari on Mac


We'll be looking forward to your response.


Cheers!

Oct 8, 2022 3:35 PM in response to Godfrey Raftesath1

Godfrey Raftesath1, To ensure we're on the same page, do you want to allow pop-ups on websites?


If so, we recommend the steps in the link below in the section titled "Allow or block pop-ups on all websites"


1) In the Safari app  on your Mac, choose Safari > Preferences, then click Websites.
A window showing Safari preferences for websites, with Pop-up Windows selected at the bottom of the sidebar and all configured websites selected.

2) Click Pop-up Windows on the left.

If you don’t see Pop-up Windows, make sure you scroll to the bottom of the list.

3) If Siri Suggestions isn’t listed, you can turn it on.

If you don’t see Configured Websites, either you haven’t set pop-up blocking preferences for any sites yet or you’ve cleared the list.

4) Click the “When visiting other websites” pop-up menu, then choose one of the following:

*Allow: Pop-ups for the websites appear.

*Block and Notify: Pop-ups for the website don’t appear, but when you visit a website with blocked pop-ups, you can choose to show them.

*Block: Pop-ups for the websites don’t appear.

If you block pop-ups on a website but you continue to see them, you might have unwanted software on your Mac. See the Apple Support article About pop-up ads and windows in Safari.

Note: Blocking pop-ups might also block some content you want to see.


Post back if you are still having problems after working through the steps in the link above.


Thanks for using the Apple Support Communities.


Cheers!

Oct 11, 2022 7:22 AM in response to Godfrey Raftesath1

Hey Godfrey Raftesath1,


Let's test to see if the option appears in safe mode by completing the steps below that are also listed here: How to use safe mode on your Mac - Apple Support


How to use safe mode
Determine whether you're using a Mac with Apple silicon, then follow the appropriate steps:

Apple silicon
1. Shut down your Mac.
2. Turn on your Mac and continue to press and hold the power button until you see the startup options window.
3. Select your startup disk, then press and hold the Shift key while clicking “Continue in Safe Mode.”
4. Log in to your Mac. You might be asked to log in again.

Intel processor
1. Turn on or restart your Mac, then immediately press and hold the Shift key as your Mac starts up.
2. Release the key when you see the login window, then log in to your Mac. 
3. You might be asked to log in again. On either the first or second login window, you should see ”Safe Boot” in the upper-right corner of the window.

If the issue still occurs in safe mode, then please setup a new admin user account and test for the issue there by completing the steps listed here: Set up users, guests, and groups on Mac - Apple Support that are also listed below.


Add a user
1. On your Mac, choose Apple menu  > System Preferences, then click Users & Groups .
If the lock at the bottom left is locked , click it to unlock the preference pane.
2. Click the Add button  below the list of users.
3. Click the New Account pop-up menu, then choose a type of user.
• Administrator: An administrator can add and manage other users, install apps, and change settings. The new user you create when you first set up your Mac is an administrator. Your Mac can have multiple administrators. You can create new ones, and convert standard users to administrators. Don’t set up automatic login for an administrator. If you do, someone could simply restart your Mac and gain access with administrator privileges. To keep your Mac secure, don’t share administrator names and passwords.
• Standard: Standard users are set up by an administrator. Standard users can install apps and change their own settings, but can’t add other users or change other users’ settings.
• Sharing Only: Sharing-only users can access shared files remotely, but can’t log in to or change settings on the computer. To give the user permission to access your shared files or screen, you may need to change settings in the File Sharing, Screen Sharing, or Remote Management pane of Sharing preferences. See Set up file sharing and Share the screen of another Mac.
For more information about the options for each type of user, click the Help button in the lower-left corner of the dialog.
4. Enter a full name for the new user. An account name is generated automatically. To use a different account name, enter it now—you can’t change it later.
5. Enter a password for the user, then enter it again to verify. Enter a password hint to help the user remember their password.
6. Click Create User.
7. Depending on the type of user you create, you can also do any of the following:
• For an administrator, select “Allow user to administer this computer.”
• For an administrator, select “Allow user to reset a password using Apple ID.”
• Use Sharing preferences to specify whether the user can share your files and share your screen.


Best regards


Oct 12, 2022 7:34 PM in response to K_Wall44

Thank you, K_Wall44, for your suggestions.


Restarting in Safe Mode (Step 2 on Silicon Mac doesn't work: need to press power button once, release and then immediately press and hold until ...) and logging in as my admin user did not change the situation.


I then restarted and created a new Admin user as suggested and logged in as that user. The Pop-up Windows option appeared beneath Notifications.


So, as you suspected, something is amiss with my user. What to do?

Safari pop-up preferences missing - Monterey

Welcome to Apple Support Community
A forum where Apple customers help each other with their products. Get started with your Apple ID.